
Introduction: A Minimalist LED Lamp
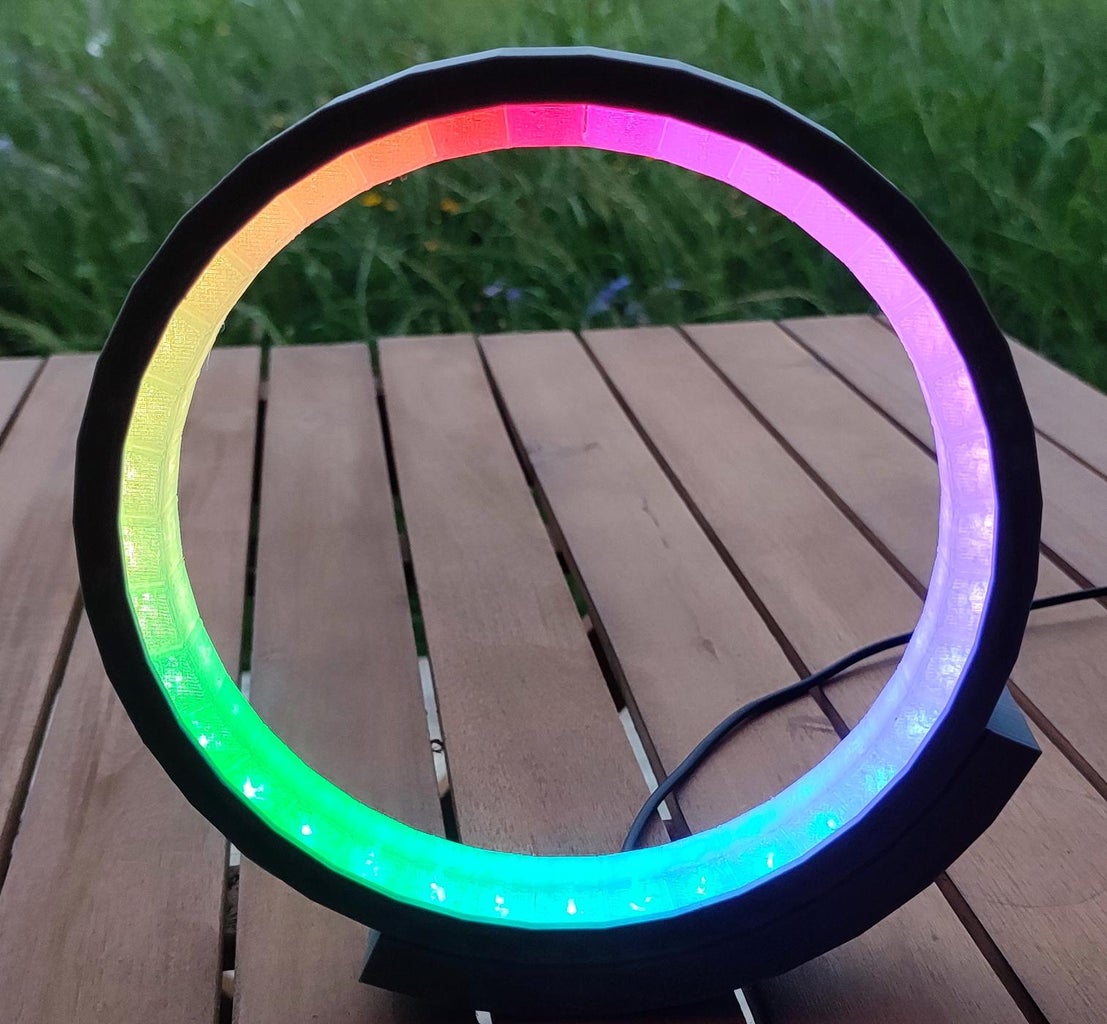


In this article, I am thrilled to present a project that I recently conceived – a unique watch (yes, another watch!) with a twist (maybe a future project). I've reimagined the initial concept, made it as a lamp and I realized that would be a perfect participant for the Rainbow contest.
The essence of this project lies in its minimalistic charm, which extends to various aspects. Not only is the design elegantly minimalist, but its components have been streamlined to simplicity. The electronic part boasts a bare minimum of components, and the software has been crafted to cater to those embarking on their journey with addressable LEDs such as WS2812, leveraging the excellent FastLED library.
I hope you'll start this exciting project, as it's capable to bring you great satisfaction and joy.
Let's get to work! :)
Step 1: Things Needed...

- 3D printed parts - STL files are attached below and are also on Tinkercad, and they could be edited, the parts are 100% made with Tinkercad's editor;
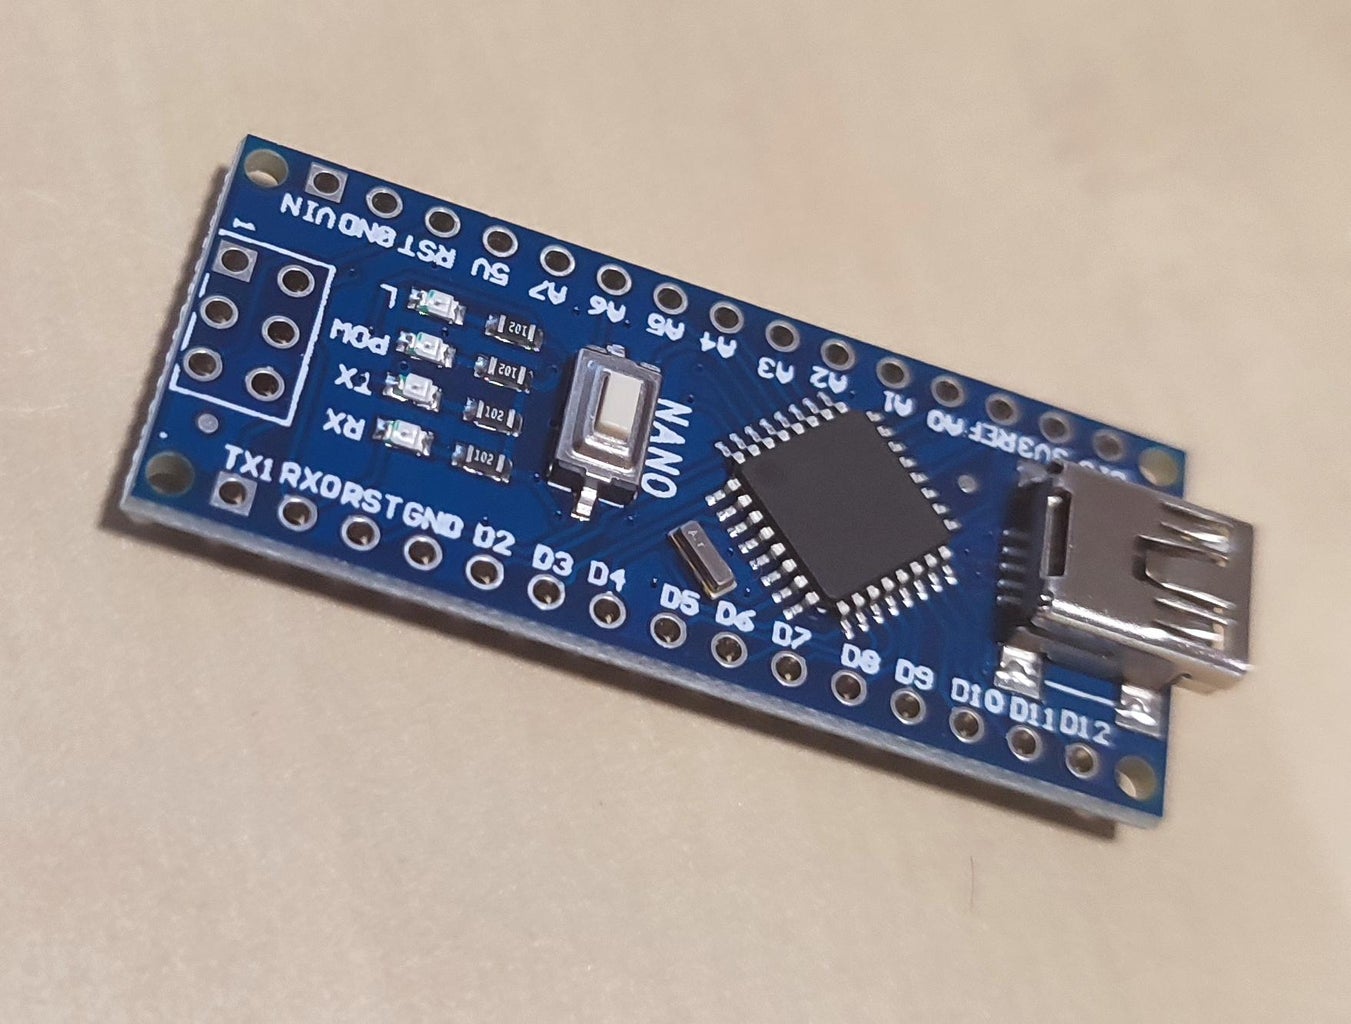
- one Arduino Nano board;
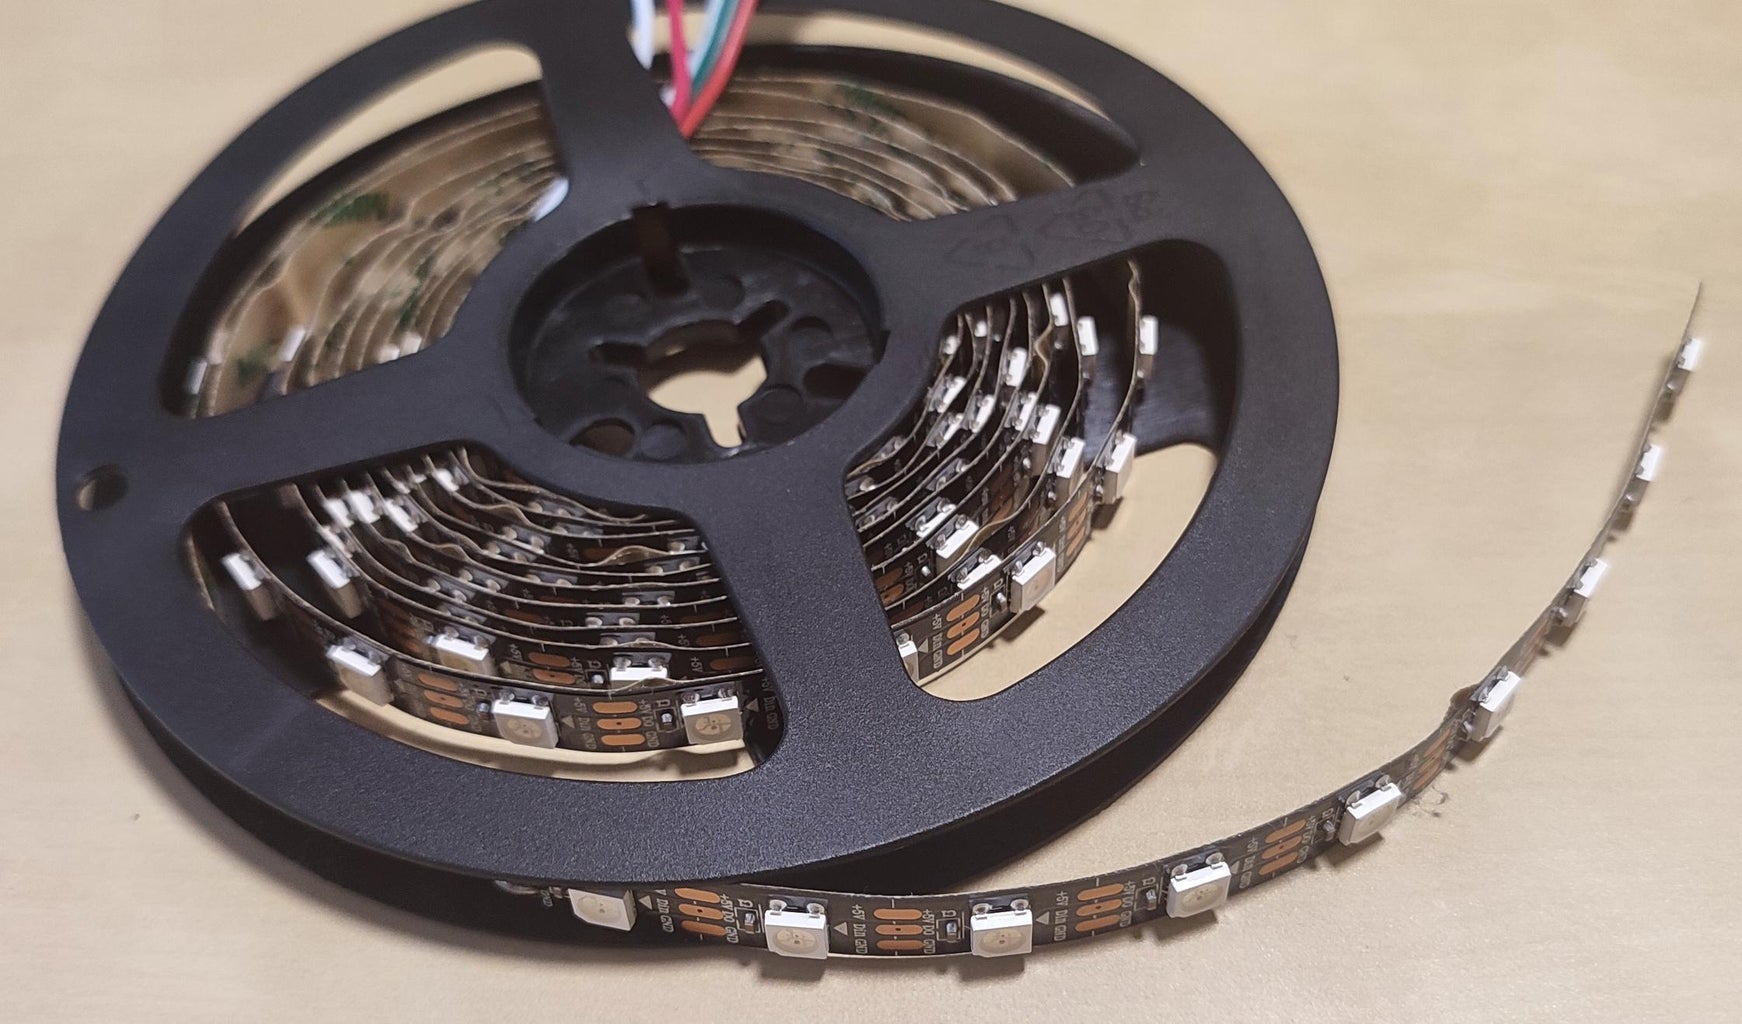
- 36 WS2812 LEDs ( from a piece of 60LED/m L:ED strip);
- 5V/2A power supply and a corresponding female DC plug with wire;
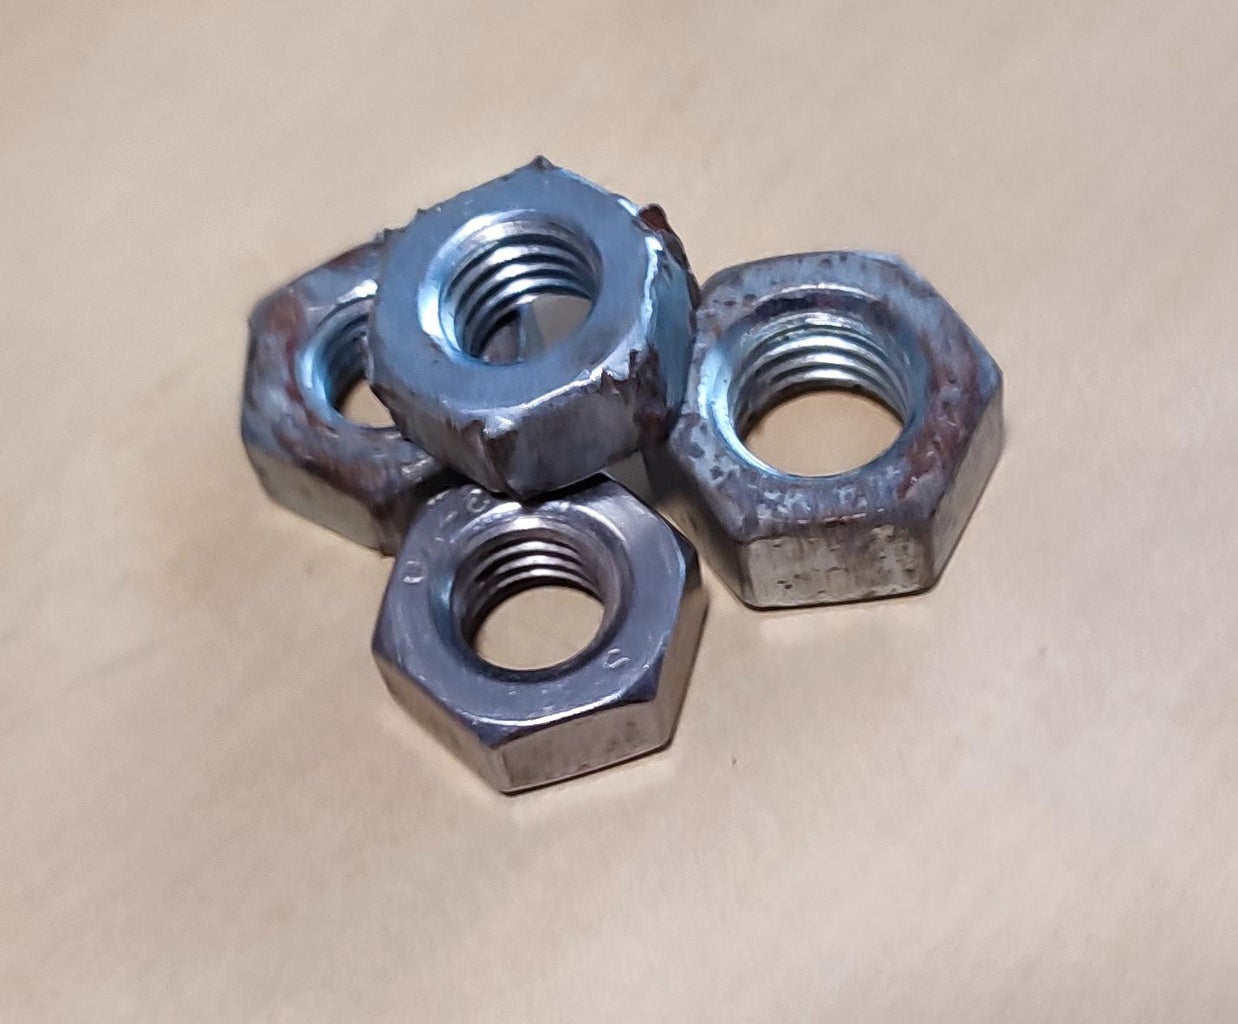
- wires, hot glue, some scrap nuts.
Step 2: Construction

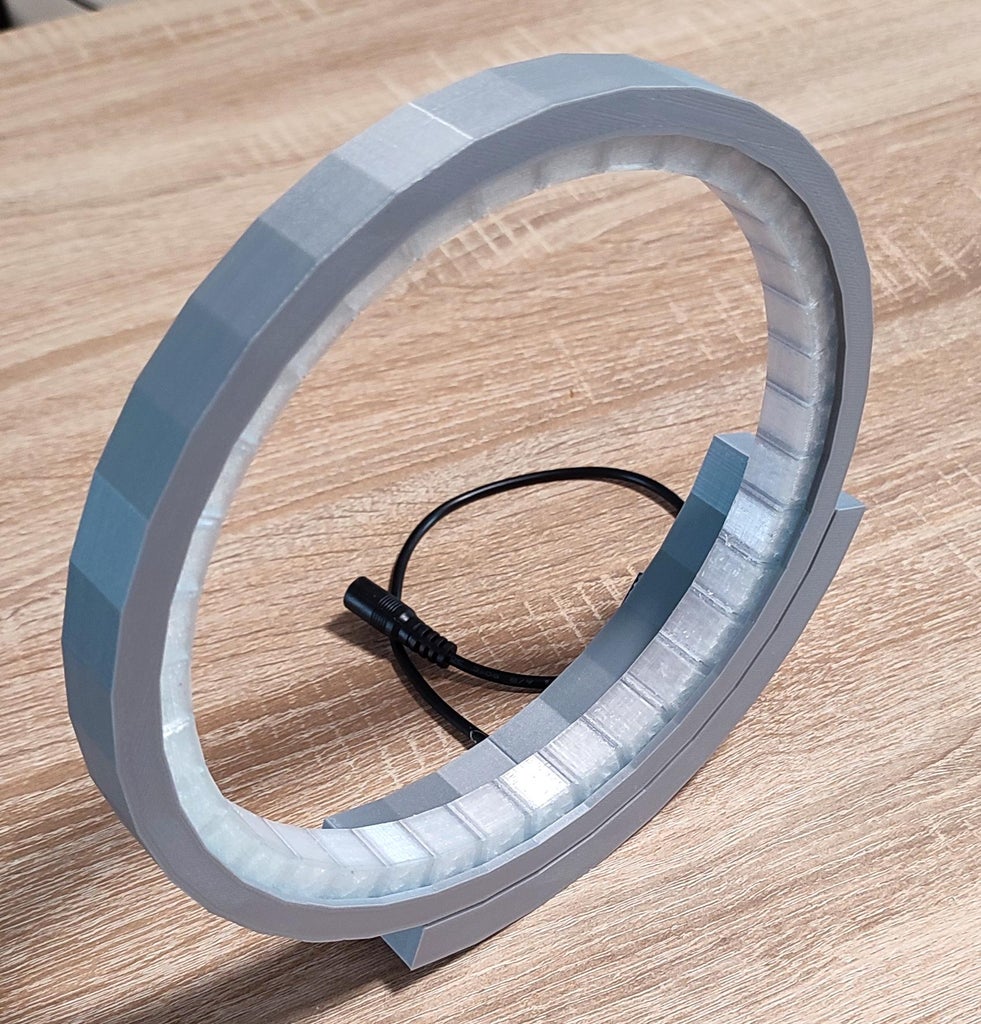
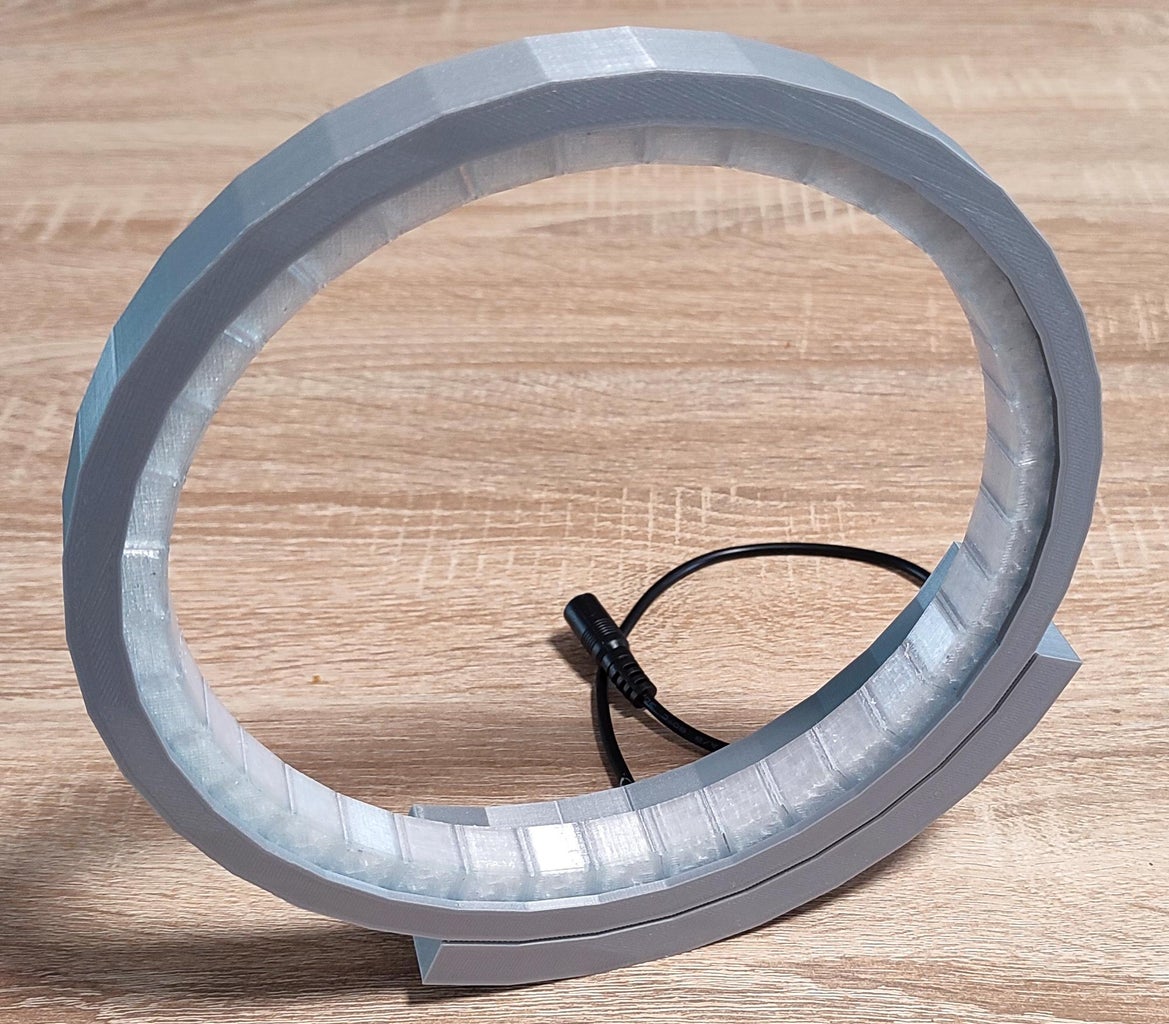
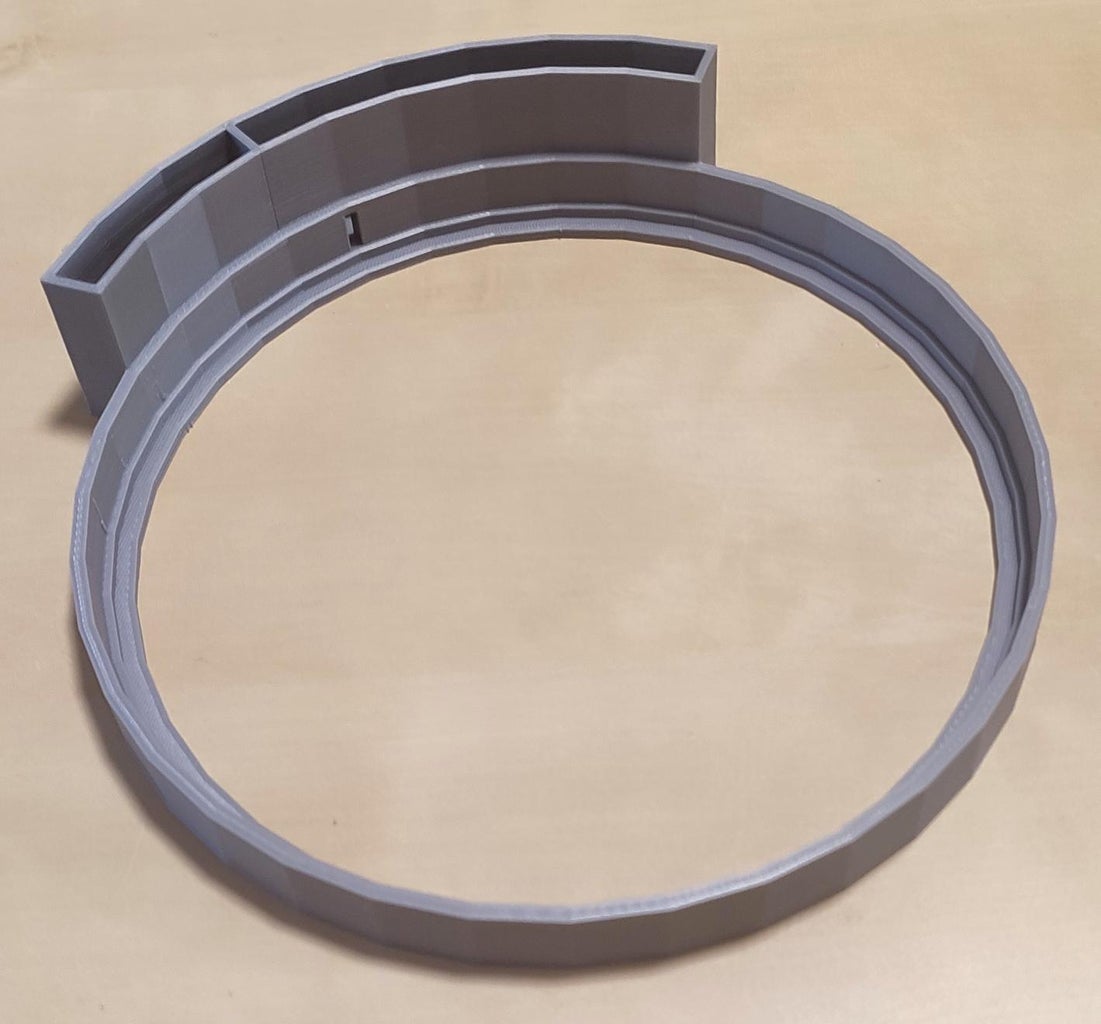
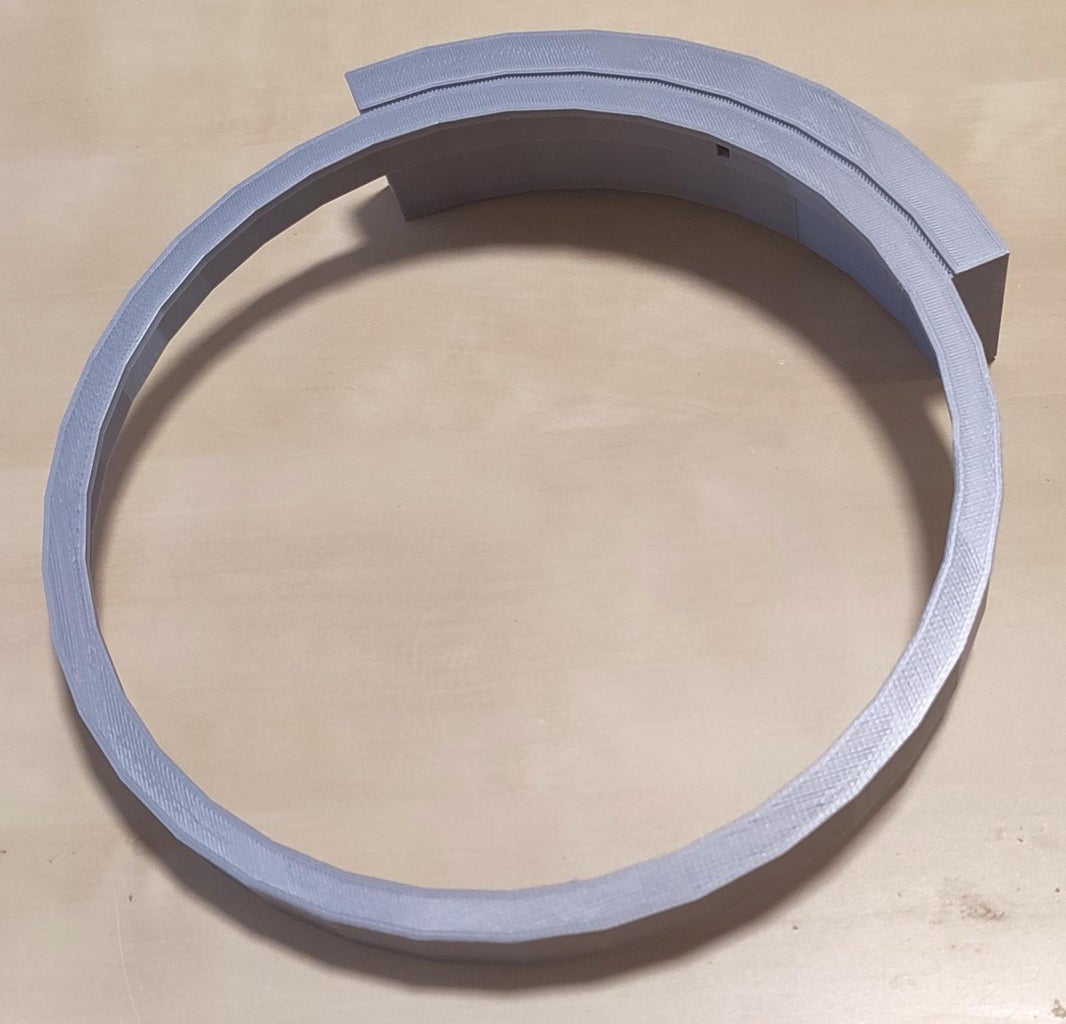
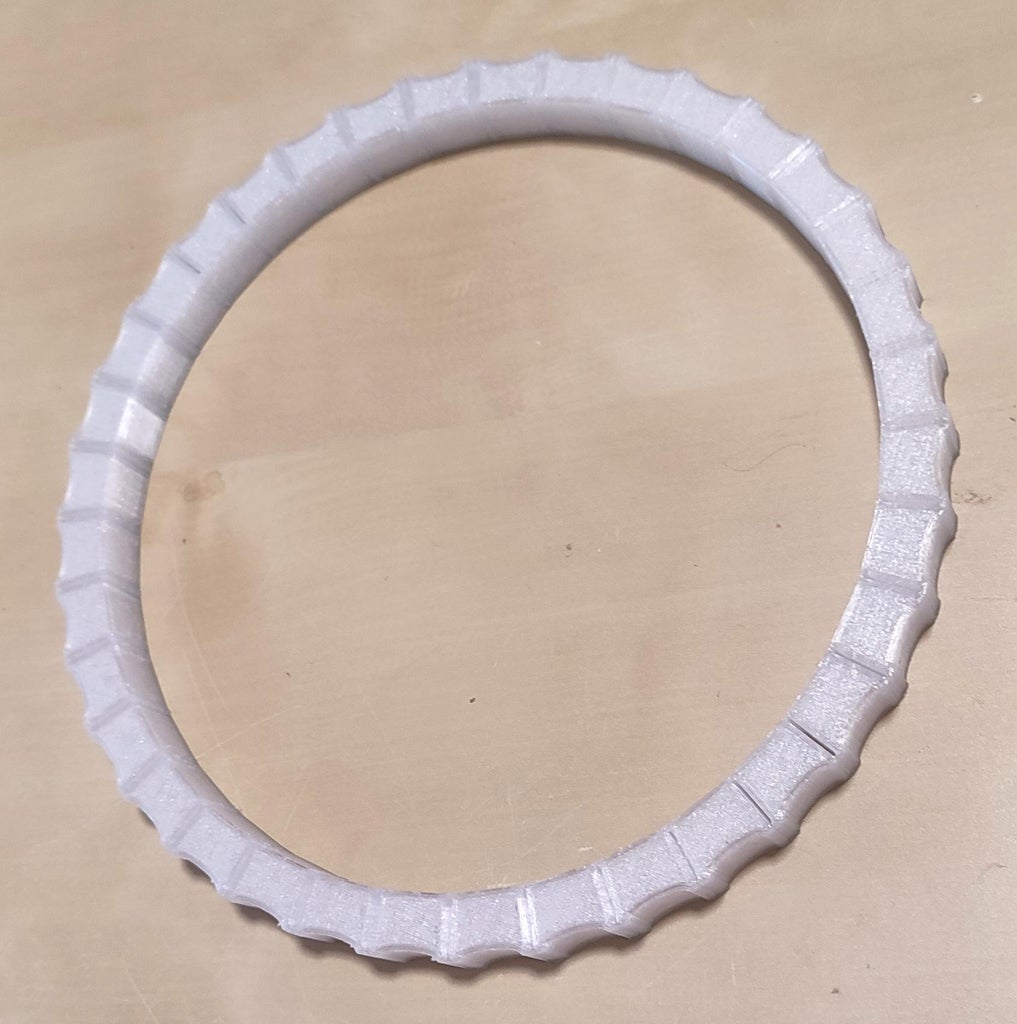
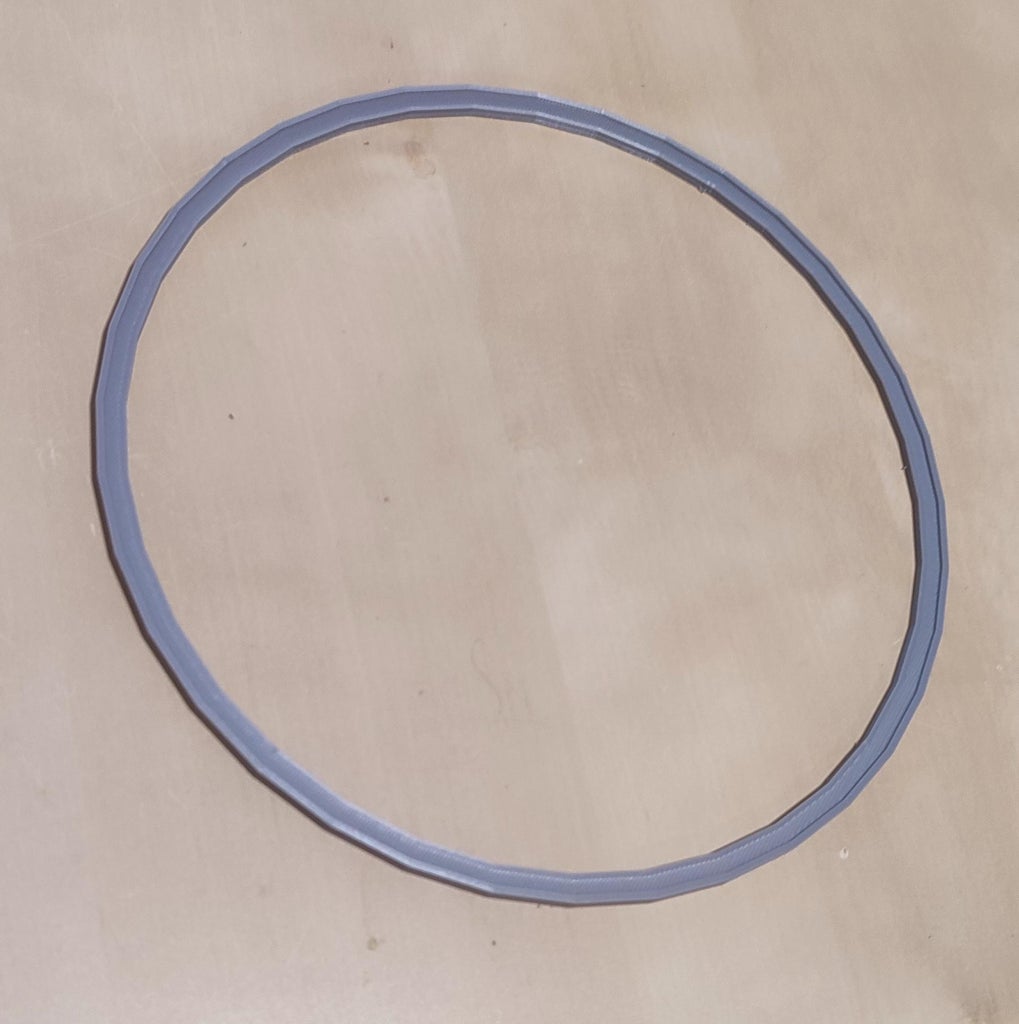
Assembly of the lamp will naturally begin with 3D printing the support, LED diffuser, and lamp cover. The centerpiece is the LED diffuser, for which I used transparent PETG filament. I utilized Prusa Slicer as the slicing software, selecting a layer height of 0.2mm, 15% infill, and a gyroid fill pattern for the top and bottom fill patterns. For the rest of the components, I used silver silk-colored PLA filament. The printing settings remained consistent with a layer height of 0.2mm and 40% infill to reinforce the lamp's structure and make the support and cover less transparent, preventing the LED light from passing through them.
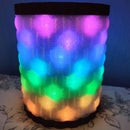
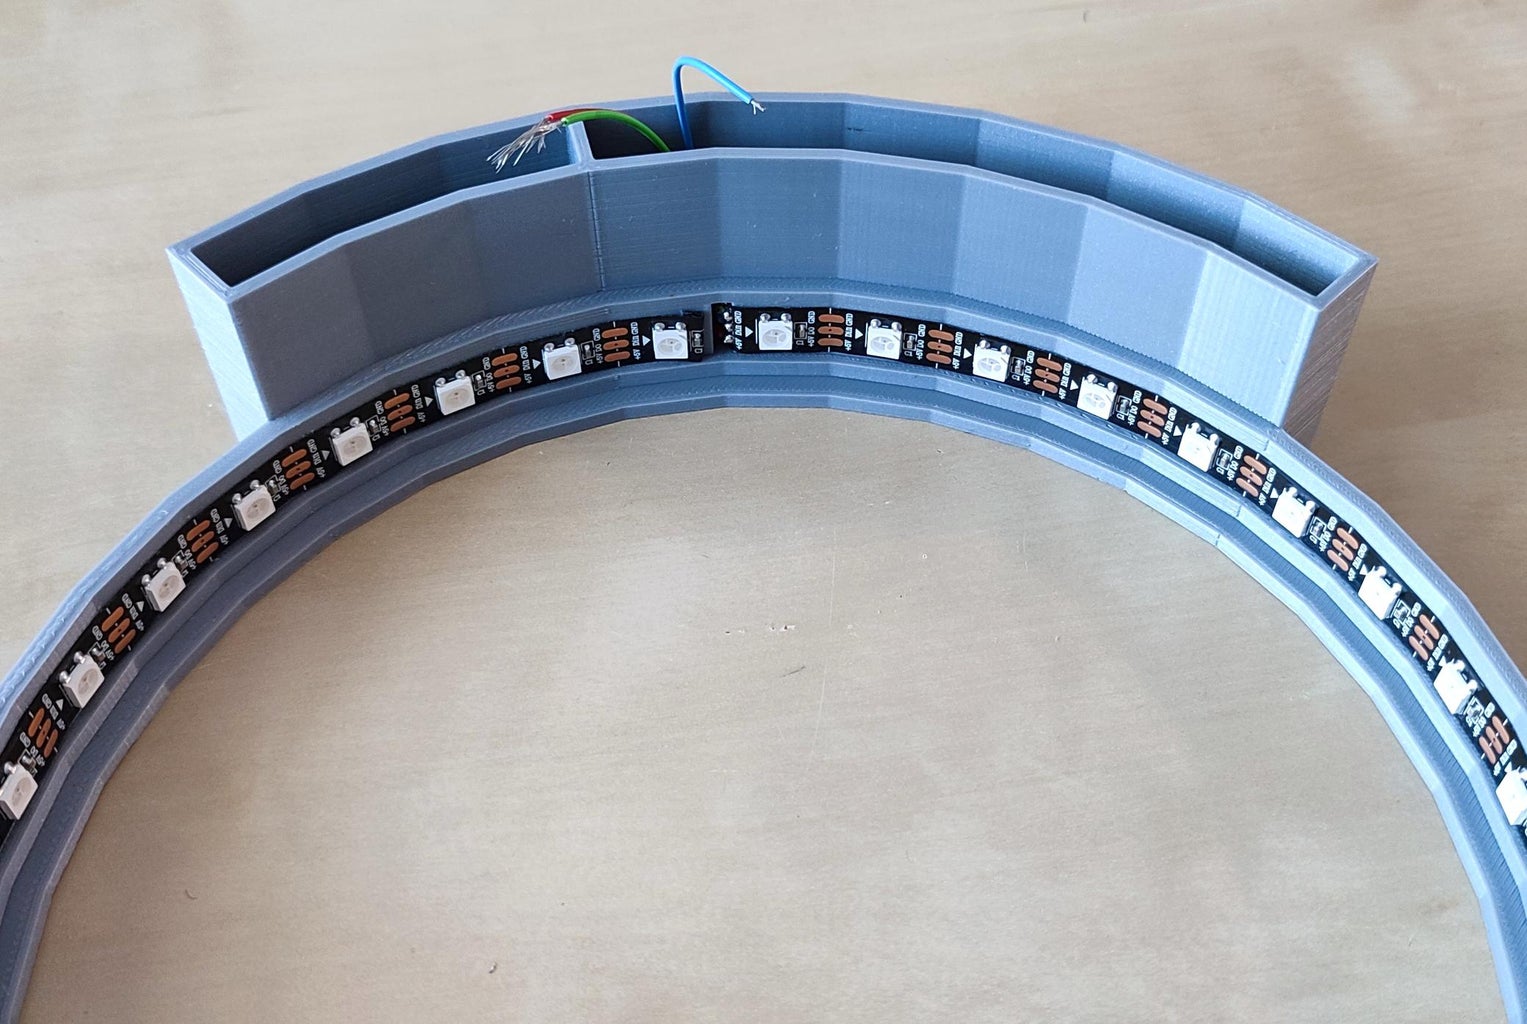
A thing about the light diffuser: it consists of 36 transparent plastic blocks that fit over each LED on the strip. Between these blocks, I designed some slots that significantly reduce bleeding, and if you insert a piece of darker-colored paper or paper covered with aluminum foil, the bleeding is greatly reduced. Even a piece of white paper helps a lot with this. The reason I designed these slots is that, as I mentioned in the introduction, my intention was to use this kind of diffuser in a clock project.
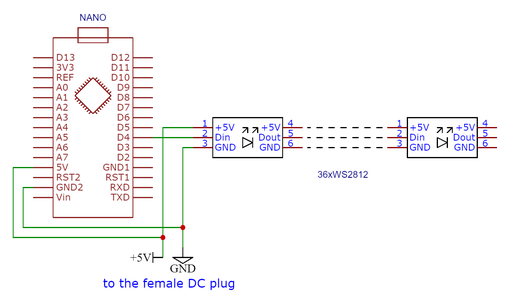
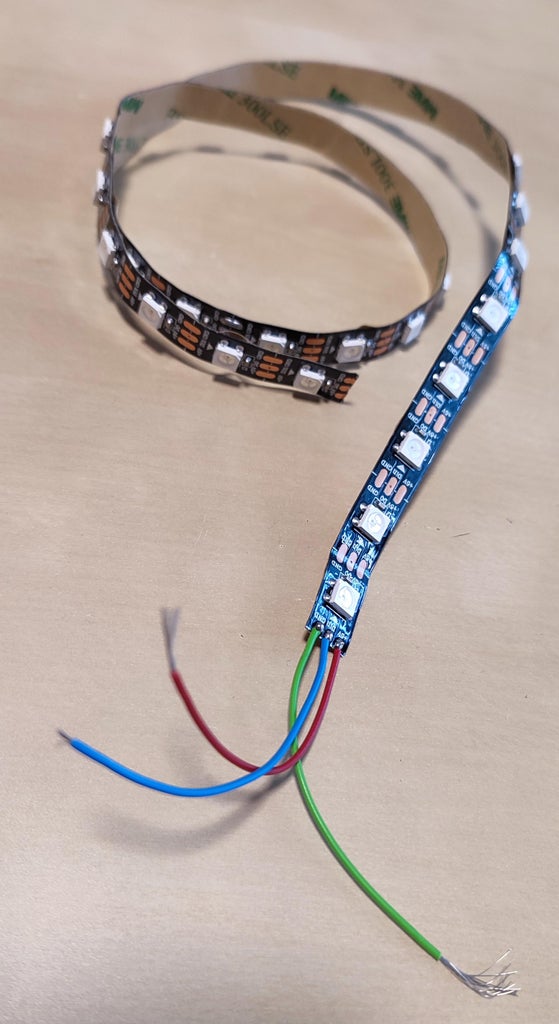
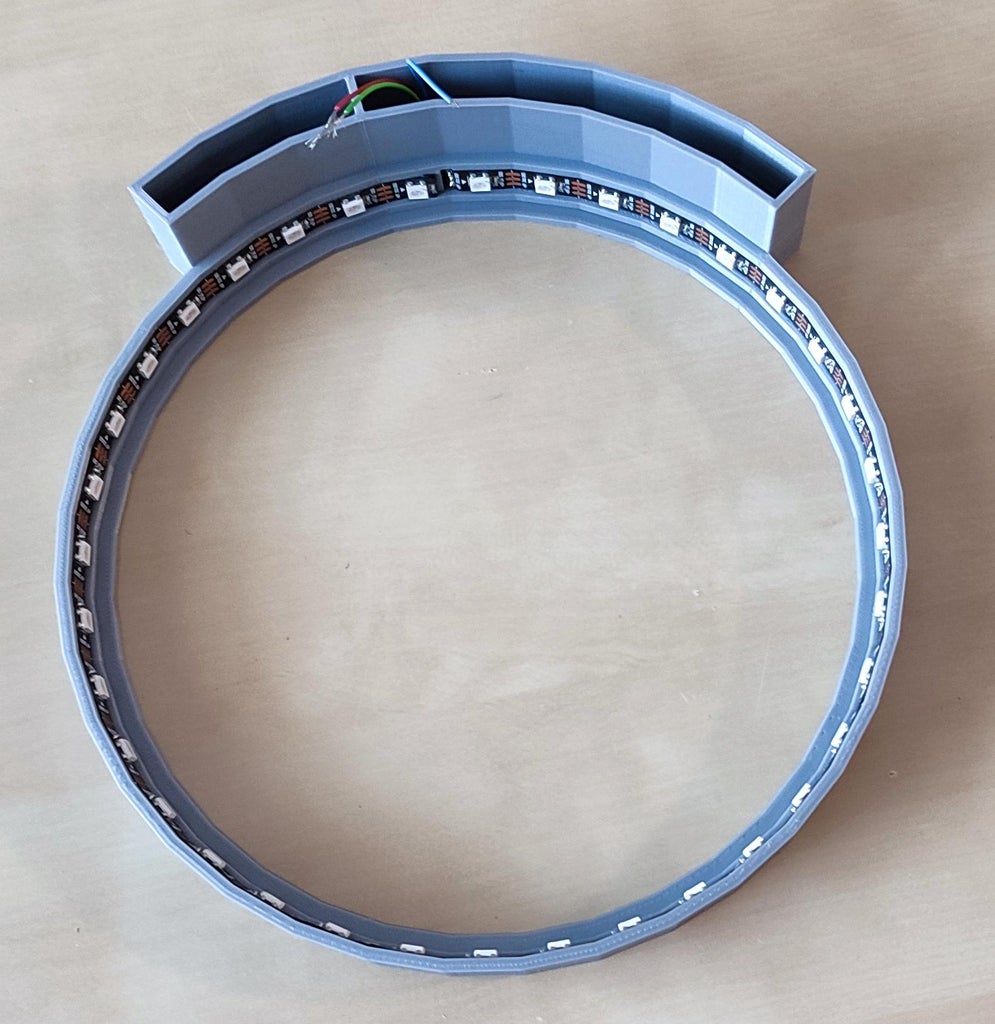
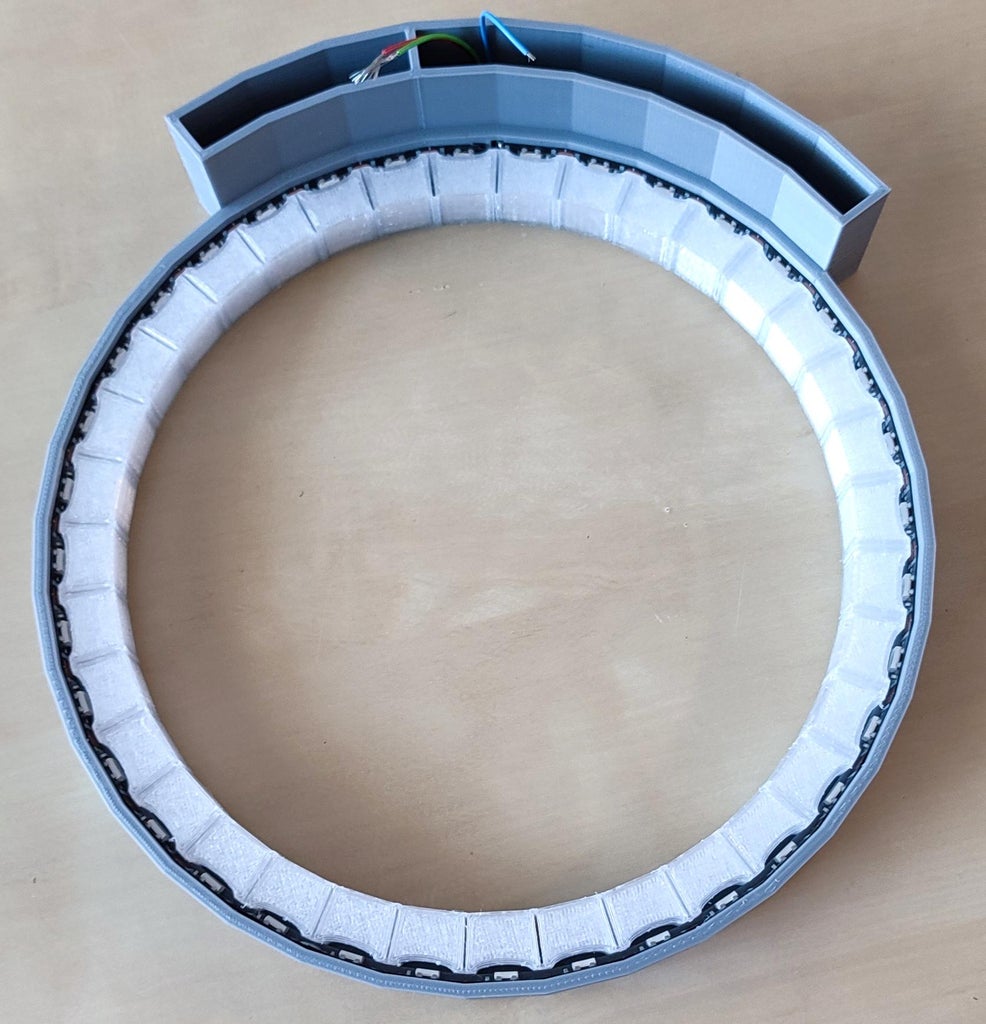
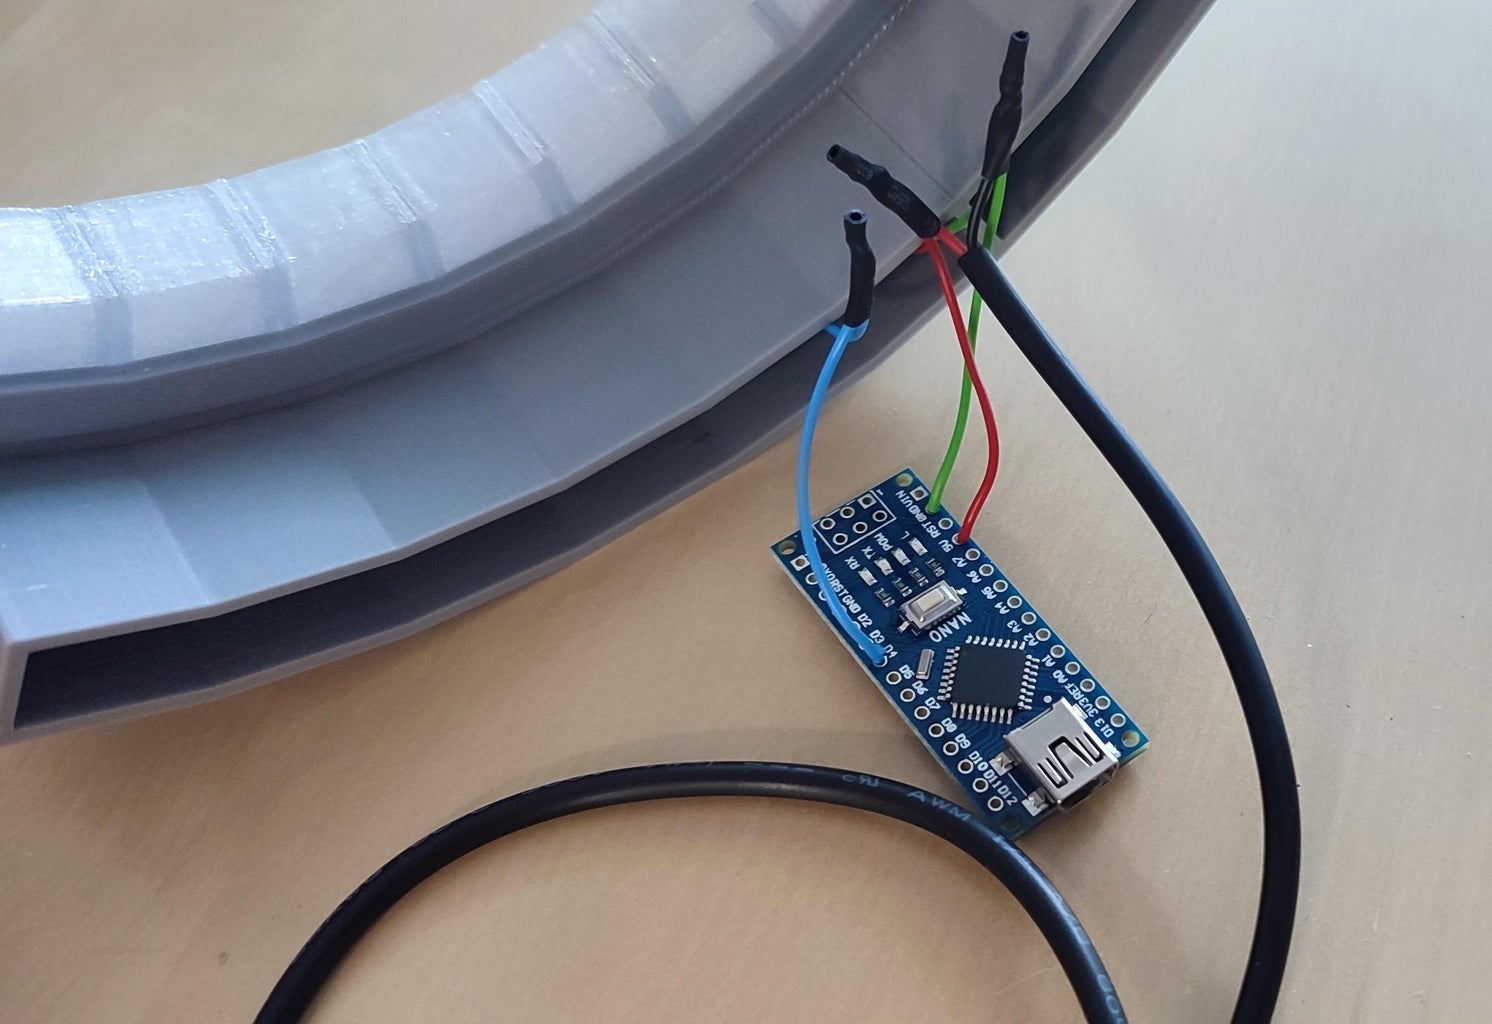
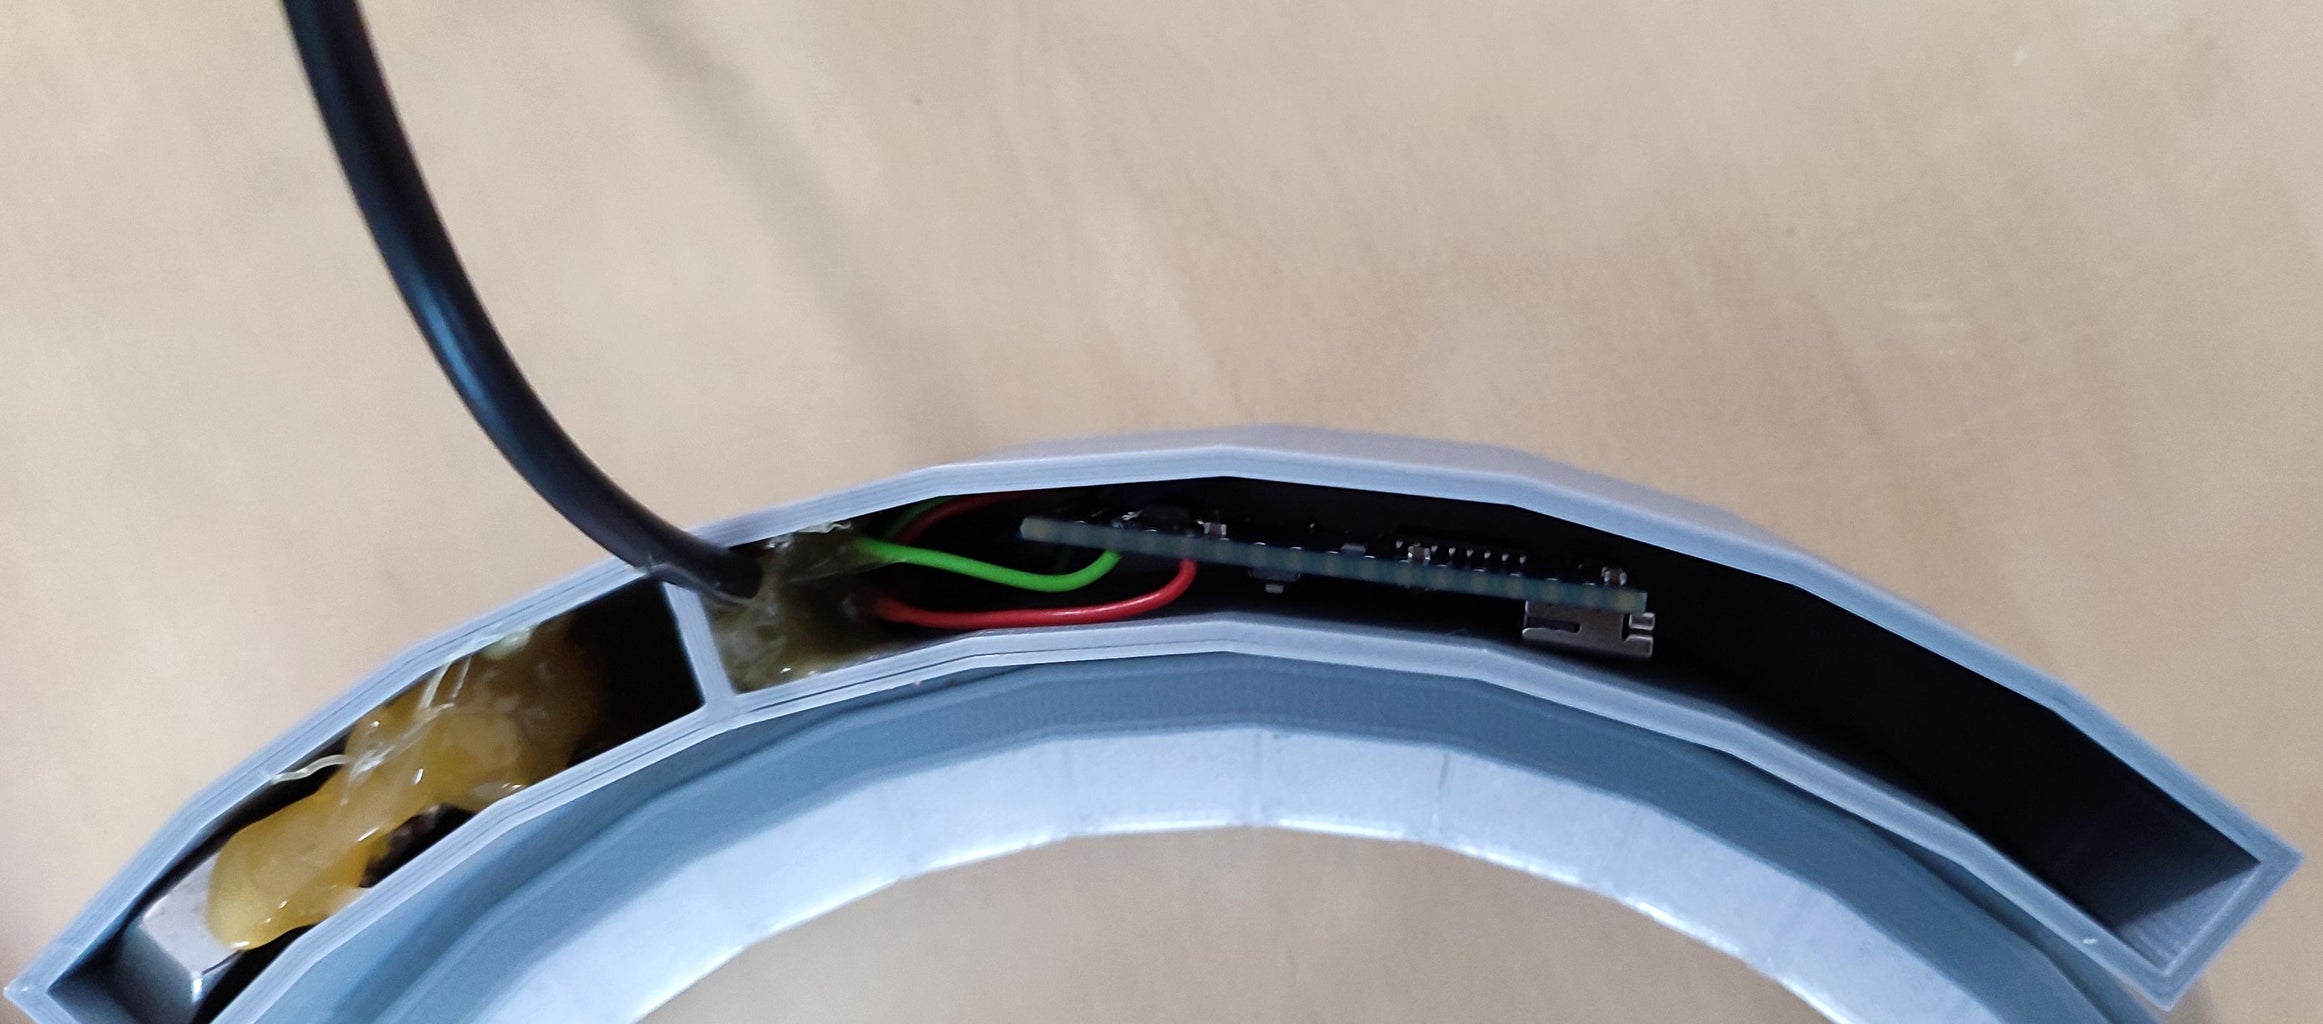
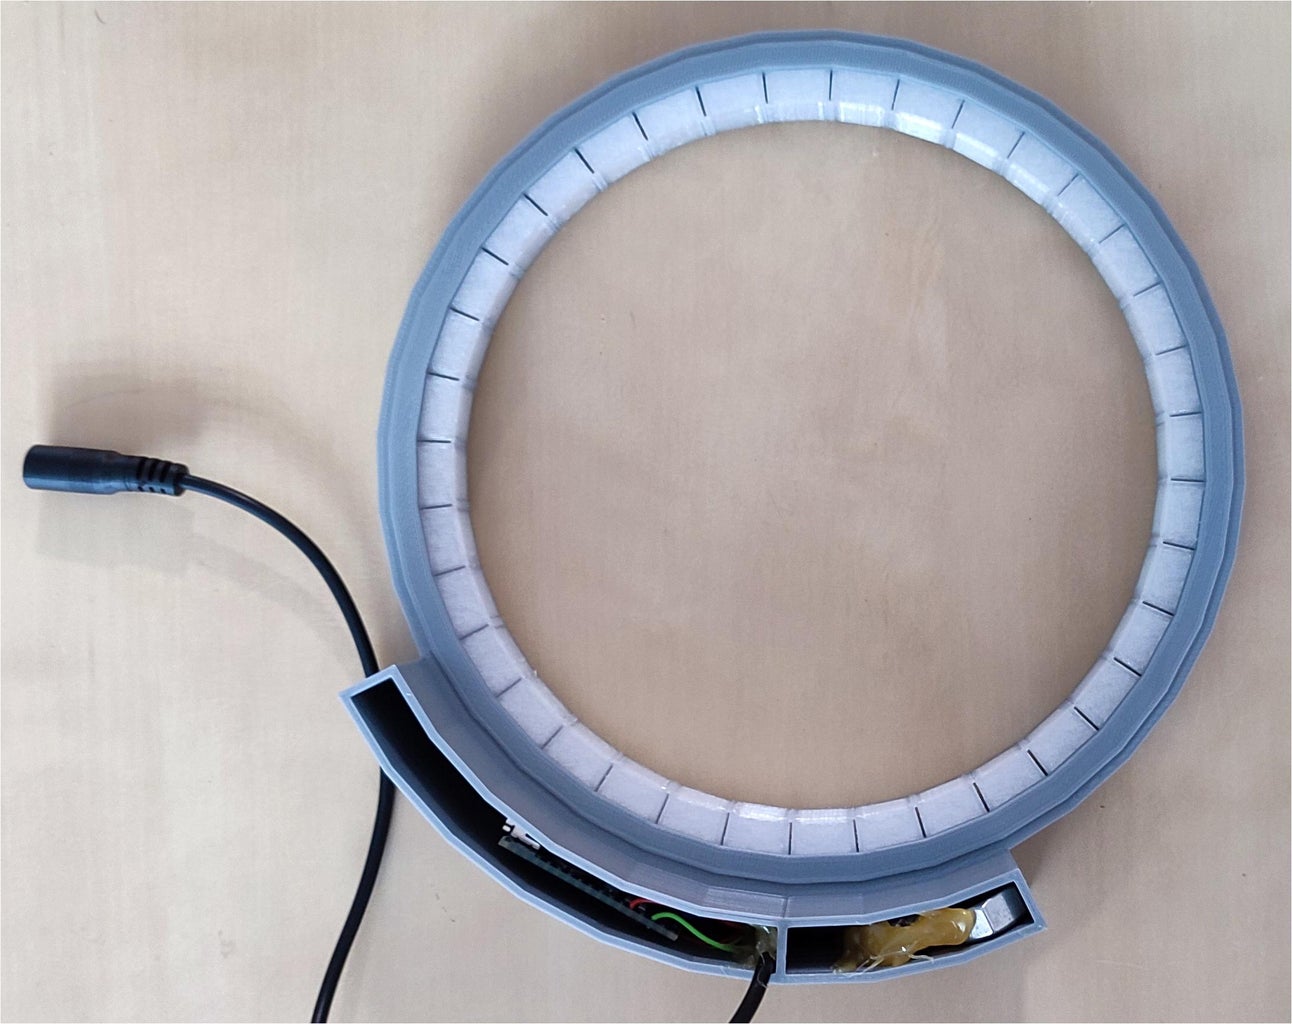
Once the 3D prints turned out well, we can move on to the electronic part. I cut out a segment of 36 LEDs from a self-adhesive WS281 LED strip. I soldered three wires to the beginning of the strip for power and data, then attached the strip to the support. If the strip isn't self-adhesive, we may need to use a few drops of instant glue to secure it in place. I also fit the diffuser in the support. Next, I made the remaining connections to the Arduino Nano module and the power plug, following the provided schematic. I arranged all the components neatly within the support. For stability and to achieve the desired position, I placed a few slightly heavier nuts in a specially designated area and secure them with some hot glue.
Next, I attach the lamp cover, but I don't glue it permanently until I've verified that everything is functioning correctly. Only if everything works fine, we can securely glue the back cover using a few drops of instant glue.
All the steps described in this process are visible in the above pictures.
Step 3: The Software
To program the lamp, all we need is a computer (desktop/laptop) and a USB to miniUSB cable.
First, download Arduino IDE and install it, and then install the FastLED library within Arduino IDE.
For more information on installing the IDE, click here, and for installing the libraries, click here.
RAINBOW
#include <FastLED.h>

// LED strip configuration
#define LED_PIN 4         // Define the pin to which the LED strip is connected (as in the schematics)
#define LED_TYPE WS2812   // Specify the type of LEDs used in the strip
#define COLOR_ORDER GRB   // Define the color order of the LEDs
#define BRIGHTNESS  120   // Set the brightness level (0-255) of the LED strip
#define NUM_LEDS 36       // Define the number of LEDs in the strip

// Initialize the LED array
CRGB leds[NUM_LEDS];

// Set the initial hue
int hue = 0;

// Rainbow cycle function
void Rainbow() {
    // Cycle through the hues
    hue += 2;
    if (hue > 255) {
        hue = 0;  // Reset hue to 0 when it reaches 255 (wrap around the color wheel)
    }

    // Set the color of each LED
    for (int i = 0; i < NUM_LEDS; i++) {
        // Calculate the hue value for each LED in the strip, creating a gradient effect
        // Each LED has its hue offset based on its position (index) multiplied by 256/NUM_LEDS
        // This spreads out the colors smoothly across the strip
        leds[i] = CHSV(hue + (i * 256/NUM_LEDS), 255, 255); // Set the color of the LED using HSV representation
    }
}

// Setup
void setup() {
    // Add LED strip configuration to the FastLED library
    FastLED.addLeds<LED_TYPE, LED_PIN, COLOR_ORDER>(leds, NUM_LEDS);

    // Set the brightness of the LED strip
    FastLED.setBrightness(BRIGHTNESS);
}

// Main loop
void loop() {
    // Update the rainbow effect
    Rainbow();

    // Show the rainbow on the LED strip
    FastLED.show();

    // Delay for a bit to control the animation speed
    delay(50);
}
Let's take a closer look at what happens in the code above.
First, let's examine the elements that will repeat in each example...
- In the first line, we declare that we need the FastLED library for the code to run.
- Next, as mentioned in the code comment, we provide some information about our LED strip:
- The Data-IN line of the strip is connected to pin D4 on the Arduino Nano module;
- The type of addressable LEDs used is WS2812;
- The color order may vary from one manufacturer to another, typically, WS2812 LEDs have a Green-Red-Blue color order, but if colors are not displayed correctly, adjustments need to be made during this initialization;
- The brightness value not only affects the amount of light emitted by the LEDs but also determines their current consumption. In our case, by reducing the brightness to more than half of the maximum value of 255, we will have a current consumption of approximately 1 Amp - 0.06A (consumption of one LED at maximum brightness) * 0.5 (half brightness) * 36 (number of LEDs). However, in reality, not all LEDs will be at maximum brightness, so a 5V/2A power supply should be sufficient.
- The last value is the number of LEDs in the strip.
- Now, we declare an array of NUM_LED, which is 36 in our case, a special array that will contain color values for each red-green-blue component of each LED.
- The actual initialization takes place in the setup function of the program with the two lines of code.
- In the main loop of the program, we have also elements that will repeat:
- Calling the function that initializes the colors to be displayed on each LED;
- FastLED.show() will effectively display what was set up in the previous function;
- A delay can be used to change the speed of the effect.
The most interesting part, however, is the function that generates the desired effect in our case: Rainbow().
A side note: displaying a certain color on an LED is a two-step process. We tell the LED what color to display, and then, not necessarily immediately, we send the command for the actual color display. For example, to display white on leds[0], which is the first LED in the strip and also the first member of the array, we write leds[0] = CRGB(255,255,255), and only after that, we activate the actual color display with FastLED.show().
In general, we begin with initializing all the LEDs with the colors that they will display, and then, with a single FastLED.show() command, we display the defined colors on all LEDs simultaneously.
We do the same in our function, but instead of using CRGB, we use CHSV for display.
CRGB is an object representing a color defined by the primary Red, Green, Blue values (RGB). R, G, and B can take values between 0 and 255. On the other hand, CHSV is an object representing a color defined by Hue, Saturation, and Value (brightness).
Hue is expressed in degrees between 0° and 360°, representing the colors on the circumference of the color wheel. Saturation is expressed as a percentage between 0% and 100% and indicates how much "rich" is a color, while Value, also expressed as a percentage, represents the brightness of the color. Using the CHSV object makes it easier to display rainbow colors, ie saturated colors, because we keep the saturation and brightness at their maximum and change only the hue from 0° to 360° degrees. However, the FastLED library uses values between 0 and 255 for hue, saturation, and brightness, for speed optimization.
Taking all this into account, it will be much easier to understand what happens with our rainbow() function:
- The variable hue is used to control the color cycle of the rainbow.
- The rainbow() function is responsible for creating the rainbow effect.
- The function increments the hue value by 2 in each call to cycle through the color wheel smoothly.
- The color of each LED in the strip is set using the CHSV() function, which represents colors using Hue, Saturation, and Value (brightness) in HSV color space. The hue value for each LED is calculated based on its position (index) in the strip, creating a gradient effect.
- The loop() function is the main loop that continuously updates the rainbow effect, displays it on the LED strip using FastLED.show(), and introduces a delay to control the animation speed.
- The rainbow effect is updated in every iteration of the loop, resulting in a continuously changing rainbow animation on the LED strip.
So, this is the first program we will try.
We connect the Arduino Nano module to the computer using the USB2miniUSB cable and we are ready to upload the first program. From the "boards manager," select "Arduino Nano," verify that the correct serial port is selected, then open a new file and copy the code. Click on "upload." You can read more about the process in detail here. If everything is okay, you will see your first rainbow effect displayed on the LED strip.
You can see the video with this effect and those that will follow, at step 6..
Step 4: More Effects
In the following effects, we only need to see what is different from the base effect, so there will be much fewer explanations.
The previous effect displayed an animation that rotated the rainbow in a single direction. In this effect, we use an additional variable called "direction" that changes its value from 1 to -1 when the hue of the first LED in the strip exceeds 255. "direction" changes its value from -1 to 1 when the hue of the first LED becomes less than 0. As a result, the animation becomes a rainbow that periodically "moves" back and forth like gentle waves caressing the shore. :)
RAINBOW WAVE
#include <FastLED.h>

// LED strip configuration
#define LED_PIN 4         // Define the pin to which the LED strip is connected (as in the schematics)
#define LED_TYPE WS2812   // Specify the type of LEDs used in the strip
#define COLOR_ORDER GRB   // Define the color order of the LEDs
#define BRIGHTNESS  120   // Set the brightness level (0-255) of the LED strip
#define NUM_LEDS 36       // Define the number of LEDs in the strip

// Initialize the LED array
CRGB leds[NUM_LEDS];

// Set the initial hue and direction
int hue = 0;
int direction = 2;

// Rainbow wave function
void RainbowWave() {
    // Cycle through the hues by incrementing/decrementing the hue value based on the direction
    hue += direction;
    if (hue > 255) {
        direction = -2; // Change the direction to negative (decrement hue) when it reaches 255
    } else if (hue < 0) {
        direction = 2;  // Change the direction to positive (increment hue) when it goes below 0
    }

    // Set the color of each LED
    for (int i = 0; i < NUM_LEDS; i++) {
        // Calculate the hue value for each LED in the strip, creating a gradient effect
        // Each LED has its hue offset based on its position (index) multiplied by 256/NUM_LEDS
        // This spreads out the colors smoothly across the strip
        leds[i] = CHSV(hue + (i * 256/NUM_LEDS), 255, 255); // Set the color of the LED using HSV representation
    }
}

// Setup
void setup() {
    // Add LED strip configuration to the FastLED library
    FastLED.addLeds<LED_TYPE, LED_PIN, COLOR_ORDER>(leds, NUM_LEDS);

    // Set the brightness of the LED strip
    FastLED.setBrightness(BRIGHTNESS);
}

// Main loop
void loop() {
    // Update the rainbow wave effect
    RainbowWave();

    // Show the rainbow wave on the LED strip
    FastLED.show();

    // Delay for a bit to control the animation speed
    delay(30);
}
Now we will display two rainbows, each on half of the LEDs. The first half will be in the direction from red to violet (hue range from 0 to 255), while the second half will be in the direction from violet to red (hue range from 255 to 0). The result is two animated rainbows that seem to blend into each other in a perpetual spiral...
RAINBOW SPIRAL
#include <FastLED.h>

// LED strip configuration
#define LED_PIN 4         // Define the pin to which the LED strip is connected (as in the schematics)
#define LED_TYPE WS2812   // Specify the type of LEDs used in the strip
#define COLOR_ORDER GRB   // Define the color order of the LEDs
#define BRIGHTNESS  255    // Set the brightness level (0-255) of the LED strip
#define NUM_LEDS 36       // Define the number of LEDs in the strip

// Initialize the LED array
CRGB leds[NUM_LEDS];

// Set the initial hue
int hue = 0;

// Rainbow spiral function
void RainbowSpiral() {
    // Cycle through the hues by incrementing the hue value
    hue += 2;
    if (hue > 255) {
        hue = 0; // Reset hue to 0 when it reaches 255 (wrap around the color wheel)
    }

    // Set the color of the first half of the LED strip
    for (int i = 0; i < NUM_LEDS / 2; i++) {
        // Calculate the hue value for each LED in the first half of the strip, creating a gradient effect
        // Each LED has its hue offset based on its position (index) multiplied by 256/NUM_LEDS
        // This spreads out the colors smoothly across the first half of the strip
        leds[i] = CHSV(hue + (i * 256/NUM_LEDS), 255, 255); // Set the color of the LED using HSV representation
    }

    // Reverse the hue for the LEDs on the other half of the strip
    for (int i = NUM_LEDS / 2 ; i < NUM_LEDS; i++) {
        // Calculate the reversed hue value for each LED in the second half of the strip
        // The hue is subtracted from 255 to reverse the color
        leds[i] = CHSV(255 - (hue + (i * 2 * 256/NUM_LEDS)), 255, 255); // Set the color of the LED using HSV representation
    }
}

// Setup
void setup() {
    // Add LED strip configuration to the FastLED library
    FastLED.addLeds<LED_TYPE, LED_PIN, COLOR_ORDER>(leds, NUM_LEDS);

    // Set the brightness of the LED strip
    FastLED.setBrightness(BRIGHTNESS);
}

// Main loop
void loop() {
    // Update the rainbow spiral effect
    RainbowSpiral();

    // Show the rainbow spiral on the LED strip
    FastLED.show();

    // Delay for a bit to control the animation speed
    delay(20);
}
The code for the following effect defines two variables, hue and bar_length. The hue variable stores the current hue value for the rainbow effect, while bar_length determines the number of LEDs in each rainbow bar (group of LEDs).
The function rainbow_bars function uses two nested for-loops to set the color of each LED in the strip. The outer loop iterates through the LEDs with a step of bar_length, which effectively groups LEDs into bars.The inner loop iterates through each LED within the current bar (group) and calculates its hue value based on the current hue and the starting LED index i. This creates a gradient effect, smoothly transitioning colors within each bar..
Overall, this code generates a visually appealing rainbow bars animation with smoothly changing colors.
RAINBOW BARS
#include <FastLED.h>

// LED strip configuration
#define LED_PIN 4         // Pin number to which the LED strip is connected (as in schematics)
#define LED_TYPE WS2812   // LED strip type (WS2812, WS2811, etc.)
#define COLOR_ORDER GRB   // LED color order (RGB, GRB, etc.)
#define BRIGHTNESS  120   // Global brightness of the LED strip (0 to 255)
#define NUM_LEDS 36       // Total number of LEDs in the strip

// Initialize the LED array
CRGB leds[NUM_LEDS];

// Declare a variable to store the current hue value
int hue = 0;

// Define the length of each rainbow bar (a group of LEDs)
int bar_length = 3;      // Note: to be visually ok, it must be a NUM_LED divider

// Rainbow bars function
void RainbowBars() {
  // Cycle through the hues by incrementing the hue value
  hue += 2;
  if (hue > 255) {
    hue = 0; // Reset hue to 0 when it reaches 255 (wrap around the color wheel)
  }

  // Set the color of each bar
  for (int i = 0; i <= NUM_LEDS - bar_length; i += bar_length) {
    for (int j = 0; j < bar_length; j++) {
      // Calculate the hue value for each LED in the bar, creating a gradient effect
      // Each bar has its hue offset based on its starting LED index (i) multiplied by 2 * 256/NUM_LEDS
      // This spreads out the colors smoothly across the strip
      leds[i + j] = CHSV(hue + (i * 2 * 256/NUM_LEDS), 255, 255); // Set the color of the LED using HSV representation
    }
  }
}

// Setup
void setup() {
  FastLED.addLeds<LED_TYPE, LED_PIN, COLOR_ORDER>(leds, NUM_LEDS);  // Initialize FastLED with LED strip configuration
  FastLED.setBrightness(BRIGHTNESS);                                // Set the global brightness of the LED strip
}

// Main loop
void loop() {
  // Update the rainbow bars
  RainbowBars();

  // Show the rainbow bars on the LED strip
  FastLED.show();

  // Delay for a bit to control the speed of the effect
  delay(50);
}
The chase effect is particularly simple. There are two variables: hue and led_index. They are used to control the color cycle and the current LED index for the chaser effect, respectively. The rainbow_chase function updates the led_index to move the chaser LED along the LED strip. When led_index exceeds the number of LEDs in the strip (NUM_LEDS), it is reset to 0, effectively wrapping around the strip to continue the chase effect.
RAINBOW CHASE
#include <FastLED.h>

// LED strip configuration
#define LED_PIN 4     // Define the pin to which the LED strip is connected (as in the schematics)
#define LED_TYPE WS2812  // Specify the type of LEDs used in the strip
#define COLOR_ORDER GRB  // Define the color order of the LEDs
#define BRIGHTNESS 120  // Set the brightness level (0-255) of the LED strip
#define NUM_LEDS 36    // Define the number of LEDs in the strip

// Initialize the LED array
CRGB leds[NUM_LEDS];

// Set the initial hue and LED index
int hue = 0;
int led_index = 0;

// Rainbow chase function
void RainbowChase() {
  // Cycle through the hues by incrementing the hue value
  hue += 2;
  if (hue > 255) {
    hue = 0; // Reset hue to 0 when it reaches 255 (wrap around the color wheel)
  }

  // Set the color of the current chaser LED
  leds[led_index] = CHSV(hue, 255, 255);

  // Update the chaser LED index
  led_index += 1;
  if (led_index >= NUM_LEDS) {
    led_index = 0; // Reset the chaser LED index when it exceeds the number of LEDs
  }
}

// Setup
void setup() {
  // Add LED strip configuration to the FastLED library
  FastLED.addLeds<LED_TYPE, LED_PIN, COLOR_ORDER>(leds, NUM_LEDS);

  // Set the brightness of the LED strip
  FastLED.setBrightness(BRIGHTNESS);
}

// Main loop
void loop() {
  // Update the rainbow chase effect
  RainbowChase();

  // Show the rainbow chase on the LED strip
  FastLED.show();

  // Delay for a bit to control the animation speed
  delay(25);
}
Step 5: ... and More Effects ...
A very beautiful and also very simple effect is the rainbow glitter effect. The only difference to the basic rainbow effect is made by a few lines of code that adds some random glitter by setting random LEDs to white. The probability of setting an LED to white is 10% (random number between 0 and 99 is checked against 10).
RAINBOW GLITTER
#include <FastLED.h>

// LED strip configuration
#define LED_PIN 4     // Define the pin to which the LED strip is connected (as in the schematics)
#define LED_TYPE WS2812  // Specify the type of LEDs used in the strip
#define COLOR_ORDER GRB  // Define the color order of the LEDs
#define BRIGHTNESS 120  // Set the brightness level (0-255) of the LED strip
#define NUM_LEDS 36    // Define the number of LEDs in the strip

// Initialize the LED array
CRGB leds[NUM_LEDS];

// Set the initial hue and LED index
int hue = 0;
int led_index = 0;

// Rainbow glitter function
void RainbowGlitter() {
  // Cycle through the hues by incrementing the hue value
  hue += 2;
  if (hue > 255) {
    hue = 0; // Reset hue to 0 when it reaches 255 (wrap around the color wheel)
  }

  // Set the color of each LED
  for (int i = 0; i < NUM_LEDS; i++) {
    // Calculate the hue value for each LED in the strip, creating a gradient effect
    // Each LED has its hue offset based on its position (index) multiplied by 256/NUM_LEDS
    // This spreads out the colors smoothly across the strip
    leds[i] = CHSV(hue + (i * 256/NUM_LEDS), 255, 255); // Set the color of the LED using HSV representation
  }

  // Add some random glitter by setting random LEDs to white
  for (int i = 0; i < NUM_LEDS; i++) {
    // Generate a random number between 0 and 99 and check if it is less than 10 (10% probability)
    // If true, set the LED to white
    if (random(100) < 10) {
      leds[i] = CRGB(255, 255, 255); //white
    }
  }
}

// Setup
void setup() {
  // Add LED strip configuration to the FastLED library
  FastLED.addLeds<LED_TYPE, LED_PIN, COLOR_ORDER>(leds, NUM_LEDS);

  // Set the brightness of the LED strip
  FastLED.setBrightness(BRIGHTNESS);
}

// Main loop
void loop() {
  // Update the rainbow glitter effect
  RainbowGlitter();

  // Show the rainbow glitter on the LED strip
  FastLED.show();

  // Delay for a bit to control the animation speed
  delay(50);
}
The next effect is also spectacular and simple. The variables speed and density are used to control the twinkling effect of the rainbow, The RainbowTwinkle() function iterates through each LED in the strip and generates a random value between 0 and 255 using the random8() function. If the generated random value is less than the value of density, the LED's color is set to a random hue value (also generated by random8()). This creates the twinkling effect. The twinkling speed is determined by the speed variable, used in the delay, where smaller values make the twinkling effect faster.
RAINBOW TWINKLE
#include <FastLED.h>

// LED strip configuration
#define LED_PIN 4     // Define the pin to which the LED strip is connected (as in the schematics)
#define LED_TYPE WS2812  // Specify the type of LEDs used in the strip
#define COLOR_ORDER GRB  // Define the color order of the LEDs
#define BRIGHTNESS 120  // Set the brightness level (0-255) of the LED strip
#define NUM_LEDS 36    // Define the number of LEDs in the strip

// Initialize the LED array
CRGB leds[NUM_LEDS];

// Define parameters for the twinkle rainbow effect
int speed = 50;   // Speed of the twinkling effect (lower value means faster twinkling)
int density = 10;  // Density of the twinkling effect (lower value means more frequent twinkling)

// Rainbow Twinkle effect function
void RainbowTwinkle() {
  for (int i = 0; i < NUM_LEDS; i++) {
    // Generate a random value between 0 and 255 (random8() function) and check if it is less than density
    // If true, set the LED color to a random hue (random8() function), creating the twinkling effect
    if (random8() < density) {
      leds[i] = CHSV(random8(), 255, 255); // Set the color of the LED using HSV representation
    }
  }
}

// Setup
void setup() {
  // Add LED strip configuration to the FastLED library
  FastLED.addLeds<LED_TYPE, LED_PIN, COLOR_ORDER>(leds, NUM_LEDS);

  // Set the brightness of the LED strip
  FastLED.setBrightness(BRIGHTNESS);
}

// Main loop
void loop() {
  // Update the twinkle rainbow effect
  RainbowTwinkle();

  // Show the twinkle rainbow effect on the LED strip
  FastLED.show();

  // Delay for a bit to control the animation speed
  // The smaller the value of 'speed', the faster the twinkling effect
  delay(speed);
}
The breathing effect uses the possibility to modify not only the hue but also the brightness of the LED colors. The variables hue, min_brightness, brightness, and breath_direction are used to control the rainbow breathing effect. The brightness of the LEDs is increased or decreased based on the breath_direction, making them breathe in and out. The direction of brightness change is reversed when the brightness reaches the boundaries (0-255) and the speed of the breathing effect is controlled by the delay value (30ms in this case).
RAINBOW BREATHING
#include <FastLED.h>

// LED strip configuration
#define LED_PIN 4     // Define the pin to which the LED strip is connected (as in the schematics)
#define LED_TYPE WS2812  // Specify the type of LEDs used in the strip
#define COLOR_ORDER GRB  // Define the color order of the LEDs
#define BRIGHTNESS 120  // Set the brightness level (0-255) of the LED strip
#define NUM_LEDS 36    // Define the number of LEDs in the strip

// Initialize the LED array
CRGB leds[NUM_LEDS];

// Define parameters for the rainbow breathing effect
int hue = 0;
int min_brightness = 100;
int brightness = min_brightness;
int breath_direction = 1;

// Rainbow breathing function
void RainbowBreathing() {
  // Set the color of each LED
  for (int i = 0; i < NUM_LEDS; i++) {
    // Calculate the hue value for each LED in the strip, creating a gradient effect
    // Each LED has its hue offset based on its position (index) multiplied by 256/NUM_LEDS
    // This spreads out the colors smoothly across the strip
    leds[i] = CHSV(hue + (i * 256/NUM_LEDS), 255, brightness); // Set the color of the LED using HSV representation
  }

  // Increase or decrease the brightness based on the breath_direction
  brightness += breath_direction;

  // Change the direction of brightness change when it reaches the boundaries (0-255)
  if (brightness >= 255) { //greater or equal to avoid some flickering
    breath_direction = -1;
  } else if (brightness < min_brightness) {
    breath_direction = 1;
  }

  // Cycle through the hues by incrementing the hue value
  hue += 2;
  if (hue > 255) {
    hue = 0; // Reset hue to 0 when it reaches 255 (wrap around the color wheel)
  }
}

// Setup
void setup() {
  // Add LED strip configuration to the FastLED library
  FastLED.addLeds<LED_TYPE, LED_PIN, COLOR_ORDER>(leds, NUM_LEDS);

  // Set the brightness of the LED strip
  FastLED.setBrightness(BRIGHTNESS);
}

// Main loop
void loop() {
  // Update the rainbow breathing effect
  RainbowBreathing();

  // Show the rainbow breathing effect on the LED strip
  FastLED.show();

  // Delay for a bit to control the animation speed
  delay(30);
}
This last effect may seem a little more complicated, but if you understood how the previous effects work, you won't have any issues with its logic. The variables hue, rippleCenter, and speed are used to control the rainbow ripple effect..The function calculates the ripple phase based on the elapsed time and the speed variable then fills the LED array with the ripple effect by adjusting the hue value for each LED based on its distance from the rippleCenter and the ripple phase. This creates the ripple effect on the LED strip. The hue value is incremented for the next iteration to change the color of the ripple. The speed of the effect is controlled by the speed variable and the delay value.
RAINBOW RIPPLE
#include <FastLED.h>

// LED strip configuration
#define LED_PIN 4     // Define the pin to which the LED strip is connected (as in the schematics)
#define LED_TYPE WS2812  // Specify the type of LEDs used in the strip
#define COLOR_ORDER GRB  // Define the color order of the LEDs
#define BRIGHTNESS 120  // Set the brightness level (0-255) of the LED strip
#define NUM_LEDS 36    // Define the number of LEDs in the strip

// Initialize the LED array
CRGB leds[NUM_LEDS];

int hue = 0;
int rippleCenter = NUM_LEDS / 2;
int speed = 30;

// Function to create the rainbow ripple effect
void RainbowRipple() {
  // Calculate the ripple phase based on the elapsed time and speed
  int phase = millis() / speed;

  // Fill the LED array with the ripple effect
  for (int i = 0; i < NUM_LEDS; i++) {
    int distanceFromCenter = abs(rippleCenter - i);
    int wavePosition = distanceFromCenter + phase;
    int hueValue = hue + (wavePosition * 256 / 16); // You can adjust the "16" to control the number of ripples
    leds[i] = CHSV(hueValue, 255, 255); // Set the color of the LED using HSV representation
  }

  // Increment the hue value for the next iteration
  hue += 1;
  if (hue >= 255) {
    hue = 0; // Reset hue to 0 when it reaches 255 (wrap around the color wheel)
  }
}

// Setup
void setup() {
  // Add LED strip configuration to the FastLED library
  FastLED.addLeds<LED_TYPE, LED_PIN, COLOR_ORDER>(leds, NUM_LEDS);

  // Set the brightness of the LED strip
  FastLED.setBrightness(BRIGHTNESS);
}

// Main loop
void loop() {
  // Update the rainbow ripple effect
  RainbowRipple();

  // Show the rainbow ripple effect on the LED strip
  FastLED.show();

  // Delay for a bit to control the animation speed
  // The smaller the value of 'speed', the faster the effect
  delay(60);
}
Step 6: Some Videos
And because a video material is worth many, many words, I have attached above two recordings: one with all the effects described in steps 3 and 4, and the other with a few effects that I like more, a Rainbow Demo Reel :)
These effects are displayed periodically on the lamp using the code below:
#include <FastLED.h>

// LED strip configuration
#define LED_PIN 4     // Define the pin to which the LED strip is connected (as in the schematics)
#define LED_TYPE WS2812  // Specify the type of LEDs used in the strip
#define COLOR_ORDER GRB  // Define the color order of the LEDs
#define BRIGHTNESS 120  // Set the brightness level (0-255) of the LED strip
#define NUM_LEDS 36    // Define the number of LEDs in the strip

// Initialize the LED array
CRGB leds[NUM_LEDS];

// Define parameters for the effects
int hue = 0;
int rippleCenter = NUM_LEDS / 2;
int speed = 50;
int density = 10;
int led_index = 0;
int direction = 2;

// Function to create the Rainbow Wave effect
void RainbowWave() {
  // Cycle through the hues by incrementing/decrementing the hue value based on the direction
  hue += direction;
  if (hue > 255) {
    direction = -2; // Change the direction to negative (decrement hue) when it reaches 255
  } else if (hue < 0) {
    direction = 2; // Change the direction to positive (increment hue) when it goes below 0
  }

  // Set the color of each LED
  for (int i = 0; i < NUM_LEDS; i++) {
    // Calculate the hue value for each LED in the strip, creating a gradient effect
    // Each LED has its hue offset based on its position (index) multiplied by 256/NUM_LEDS
    // This spreads out the colors smoothly across the strip
    leds[i] = CHSV(hue + (i * 256/NUM_LEDS), 255, 255); // Set the color of the LED using HSV representation
  }
}

// Function to create the Rainbow Bars effect
void RainbowBars() {
  // Cycle through the hues
  hue += 2;
  if (hue > 255) {
    hue = 0;
  }

  // Set the color of each bar
  int bar_length = 3; // You can adjust the length of each bar
  for (int i = 0; i < NUM_LEDS; i += bar_length) {
    for (int j = 0; j < bar_length; j++) {
      leds[i + j] = CHSV(hue + (i * 2 * 256 / NUM_LEDS), 255, 255);
    }
  }
}

// Function to create the Rainbow Chase effect
void RainbowChase() {
  // Cycle through the hues
  hue += 2;
  if (hue > 255) {
    hue = 0;
  }

  // Set the color of the chaser LED
  leds[led_index] = CHSV(hue, 255, 255);

  // Update the chaser LED index
  led_index += 1;
  if (led_index >= NUM_LEDS) {
    led_index = 0; // Reset the chaser LED index when it exceeds the number of LEDs
  }
}

// Function to create the Rainbow Glitter effect
void RainbowGlitter() {
  // Cycle through the hues
  hue += 2;
  if (hue > 255) {
    hue = 0;
  }

  // Set the color of each LED
  for (int i = 0; i < NUM_LEDS; i++) {
    // Calculate the hue value for each LED in the strip, creating a gradient effect
    // Each LED has its hue offset based on its position (index) multiplied by 256/NUM_LEDS
    // This spreads out the colors smoothly across the strip
    leds[i] = CHSV(hue + (i * 256 / NUM_LEDS), 255, 255);
  }

  // Add some random glitter
  for (int i = 0; i < NUM_LEDS; i++) {
    if (random8() < density) {
      leds[i] = CRGB(255, 255, 255);
    }
  }
}

// Function to create the Rainbow Twinkle effect
void RainbowTwinkle() {
  for (int i = 0; i < NUM_LEDS; i++) {
    if (random8() < density) {
      leds[i] = CHSV(random8(), 255, 255);
    }
  }
}

// Function to create the Rainbow Ripple effect
void RainbowRipple() {
  // Calculate the ripple phase based on the elapsed time and speed
  int phase = millis() / speed;

  // Fill the LED array with the ripple effect
  for (int i = 0; i < NUM_LEDS; i++) {
    int distanceFromCenter = abs(rippleCenter - i);
    int wavePosition = distanceFromCenter + phase;
    int hueValue = hue + (wavePosition * 256 / 16); // You can adjust the "16" to control the number of ripples
    leds[i] = CHSV(hueValue, 255, 255);
  }

  // Increment the hue value for the next iteration
  hue += 1;
  if (hue >= 255) {
    hue = 0;
  }
}

// Function to select and display an effect for a specific duration
void displayEffect(int effect, int duration) {
  unsigned long startTime = millis(); // Record the start time of the effect
  while (millis() - startTime < duration) {
    // Call the selected effect function
    switch (effect) {
      case 0:
        RainbowWave();
        break;
      case 1:
        RainbowBars();
        break;
      case 2:
        RainbowChase();
        break;
      case 3:
        RainbowGlitter();
        break;
      case 4:
        RainbowTwinkle();
        break;
      case 5:
        RainbowRipple();
        break;
      default:
        break;
    }

    // Show the effect on the LED strip
    FastLED.show();
    delay(50);
  }
}

//Setup
void setup() {
  // Add LED strip configuration to the FastLED library
  FastLED.addLeds<LED_TYPE, LED_PIN, COLOR_ORDER>(leds, NUM_LEDS);
  // Set the brightness of the LED strip
  FastLED.setBrightness(BRIGHTNESS);
}

// Main loop
void loop() {
  // Display each effect periodically with a specific duration
  displayEffect(0, 30000); // Rainbow Wave effect for 30 seconds
  displayEffect(1, 30000); // Rainbow Bars effect for 30 seconds
  displayEffect(2, 30000); // Rainbow Chase effect for 30 seconds
  displayEffect(3, 30000); // Rainbow Glitter effect for 30 seconds
  displayEffect(4, 30000); // Rainbow Twinkle effect for 30 seconds
  displayEffect(5, 30000); // Rainbow Ripple effect for 30 seconds
}
Some short explanations...The variables hue, rippleCenter, speed, density, led_index, and direction are used to control the rainbow effects and separate functions are created for each rainbow effect, including RainbowWave(), RainbowBars(), RainbowChase(), RainbowGlitter(), RainbowTwinkle(), and RainbowRipple(). The displayEffect() function is defined to select and display the desired effect for a specific duration. It uses a while loop to display the effect for the specified duration, making use of the millis() function to measure the elapsed time.
The main loop calls the displayEffect() function for each effect and specifies the duration in milliseconds (e.g., 30000ms for 30 seconds). This allows to display each effect periodically and continuously switch between them. Each effect is displayed for 30 seconds in this example before moving on to the next one. We can adjust the duration to suit our needs.
Step 7: Conclusions
What else could I add? The project is exceptionally simple, and I believe that even beginners, with the desire to learn along the way, will be able to successfully build and operate it. I hope there will be many who will give it a try. Also, don't be afraid to experiment with the codes I proposed; you can change parameters, make modifications here and there as you see fit, and achieve even better results than mine :)
I am sure that my project has its weaknesses, but, for instance, the 3D printable components are 100% editable on Tinkercad, and the Arduino Nano can be replaced, for example, with a Wemos D1 Mini module loaded with the WLED firmware. Therefore, the project is suitable for various changes and customizations.
Thank you to those who have read up to this point, and as always, I am available to be contacted if you have any doubts or questions.

Finalist in the
Colors of the Rainbow Contest


9 Comments
Question 5 days ago on Introduction
Don't put much weight to my question because I am just looking. But when i first saw it I thought it was a clock. And I imagined pulsed white led for the minute location and the hour location being solid.
Would that be possible?
Or may I suggest that as an extension.
And a second suggestion is to maybe filter the color palette to specific colours.
Neat project and thank you for sharing
Answer 3 days ago
Hi,
Thank you for your message and your kind words.
Regarding your questions, the answer is - of course, it is possible 🙂
A clock can be made (as I mentioned in the introduction).
A different color palette can be used.
A lot of things can be done, but the LEDs need to be properly programmed and suitable microcontroller modules need to be used.
However, in this article, I wanted to present only effects using rainbow colors.
Reply 3 days ago
Ha ha - I am sure I saw it and when i looked i didn't see it - of course you said it. What a great idea:-)
5 days ago
Very cool!
Reply 3 days ago
Thanks!
7 days ago
This is great! It actually has several elements I need to apply to other projects, but is also something I want to build.
Reply 7 days ago
Thanks! :)
9 days ago on Step 7
As a person who loves rainbows and LEDs that change color, this is amazing. And I loved your demo videos, with that soothing music, and the grass waving in the breeze. I showed it to my mom (who graciously lets me craft in her home) and she said "it would be cool to make one of those that was like six feet across, and put it in the livingroom" and I said "we could mount it to the ceiling, that way it wouldn't take up floor space" and she nodded approvingly.
Reply 7 days ago
Thank you very much!