
Introduction: Sacramento Enliven Bridge: a Kaleidoscope of Unity, Art, and Nature


Hello, I'm Bryce, a passionate Junior at West Campus High School in Sacramento, California. Throughout my high school journey, I have delved deep into the world of engineering, exploring various software platforms and gaining valuable skills, another asptect that I have grown and learned from is my participating in my schools CREATE program. CREATE is an innovative program that fosters creativity, problem-solving, and collaboration through hands-on experiences in engineering and architecture. In the CREATE program, we were presented with real-life design challenges and tasked with creating structures that solve these problems. We get the incredible opportunity to work with mentors from various fields, from mechanical engineering to architecture, who have guided and inspired us throughout the process. However, it was my participation in the Make it Modular challenge last year that sparked a profound passion for meaningful, sustainable, and inclusive architecture. I am excited to share my latest project, which I am submitting to the Make it Bridge competition, where innovation and design intersect to create a better future.
A Journey of Transformation:
Since my involvement in Make it Modular, my world has been filled with architecture-related content. Immersing myself in architectural concepts, exploring renowned designs, and studying the works of visionaries have deepened my understanding of the transformative power of architecture. My school papers have become a canvas for sketches of buildings, reflecting my passion for creating spaces that inspire, connect, and uplift communities.
Make it Bridge: Unleashing Innovation
Building upon my newfound passion, I am excited to present my submission for the Make it Bridge competition. Inspired by the ethos of sustainability and inclusivity, my design aims to revolutionize the concept of bridges, transforming them into more than just physical connectors.
My design concept centers around three core pillars: sustainability, accessibility, and community engagement. By incorporating renewable materials, efficient structural systems, and nature-inspired elements, my bridge design aims to minimize environmental impact while blending harmoniously with its surroundings.
Moreover, inclusivity is at the heart of my design. I envision a bridge that caters to the diverse needs of all individuals, including those with disabilities. By integrating accessible ramps, tactile indicators, and sensory elements, my bridge promotes universal accessibility and fosters a sense of belonging for everyone.
The Power of Architecture in Problem-Solving:
Architecture goes beyond aesthetics; it has the power to address societal challenges and transform communities. Through my participation in the Make it Bridge competition, I aspire to contribute to the collective effort of building a more sustainable and inclusive future. By combining innovative design, cutting-edge technology, and a human-centered approach, I aim to create a bridge that not only connects physical spaces but also bridges gaps in society.
The Make it Modular Experience:
Last year, I had the incredible opportunity to participate in the Make it Modular challenge, an experience that forever transformed my perspective on architecture. Collaborating with fellow aspiring architects and engineers, I discovered the immense potential of modular design in creating flexible, adaptable, and sustainable structures. This eye-opening experience kindled a fire within me, pushing me to explore the possibilities of architecture further.
Supplies
Revit/Online -
Standard Structure:
- I would reccomend Revit forn the software, and use its modeling tools to create the main structure of the bridge, including the deck, railings, and supporting columns.
Shade Canopies (8x):
- Create a custom family in Revit to represent the shade canopies. Ensure they are accurately placed and sized to match the design. I used this video https://www.youtube.com/watch?v=yWgvBJbHOL0
Trees and Bushes (Tons of):
- Revit offers a variety of tree and plant families in its library. Choose the appropriate ones that match the native plants and trees area.
Square Lighted Benches (4x):
- Create a custom family or use existing bench families in Revit. Add lighting elements to the benches if necessary. I followed this video https://www.youtube.com/watch?v=D1cYzvvnspA
Circular Benches for Lookouts (6x):
- Similar to the square benches, create a custom family or use existing ones to represent the circular benches. I used existing one from revit city.
Tree Circular Benches (5x):
- Again, create custom families or use existing bench families to represent the benches with integrated trees. I used existing from revit city.
Bike Racks (4x sets):
- Use Revit's families or revit city to find one and place them at appropriate locations.
Interactive Art Installations (3x):
- Depending on the complexity of the art installations, you can use a combination of Revit families and imported 3D models to represent them. I got some from revit city.
Real life - Recommendations (NOT a professional here :)
Please note that this is a generalized list, for what is needed to make this Bridge a reality (its based on my reseach and vision that you will see in the upcoming steps)
Structural Components:
- Steel beams: Used for the main support structure of the bridge.
- Concrete elements: For the bridge deck, abutments, and foundation.
- Sustainable concrete alternatives: Low-carbon concrete options, such as fly ash or slag-based mixes.
- Reclaimed and recycled materials: Salvaged timber, steel, or other materials for sustainable construction.
Green Hills and Vegetation:
- Native plants and trees: Choose local species suitable for Sacramento's climate.
- Turf and sod: For the cascading green hills on the walkways.
- Planting soil and mulch: To support the growth of vegetation.
- Irrigation system: Essential for watering the plants and trees.
Motion-Filled Walkways:
- Specialized walkway materials: Choose appropriate materials for the dynamic and interactive elements.
- Interactive lighting elements: For creating an engaging atmosphere.
- Motion sensors: To detect pedestrian movement for interactive features.
Lookouts:
- Steel or other structural materials: To build the lookout structures.
- Safety railings: For the lookout areas.
- Anti-slip surface materials: To ensure safety for users.
Sustainable and Eco-Friendly Features:
- Eco-friendly composites: For various components that require composite materials.
- Recycled plastic or composite lumber: For benches, railings, and other elements.
- Rainwater harvesting system: For irrigation and other non-potable water needs.
Extra:
- Shade canopies
- Benches
- Tons of native trees and plants
- bikeracks
- iInteractive Art Installations (from local artists)
Step 1: Vision
Imagine a pedestrian bridge in Sacramento that goes beyond its functional purpose, igniting a sense of unity, sustainability, and innovation. My vision is to create a bridge that serves as a symbol of community engagement, connecting people and ideas. By embracing the spirit of Sacramento and its commitment to sustainability, I want this Bridge to inspire passion, spark creativity, and become an iconic landmark.
- - - - -
At the heart of my pedestrian bridge concept lies a creative tapestry that weaves together the vibrant threads of Sacramento's diverse community. This bridge will be an artistic masterpiece, an expression of unity and inclusivity that transcends the boundaries of conventional design.
Imagine a bridge adorned with colorful murals that depict the rich tapestry of cultures and histories that coexist within Sacramento. Each brushstroke will tell a story, a narrative of resilience, strength, and shared heritage. As pedestrians traverse the bridge, they will be enveloped in an immersive experience, surrounded by the visual symphony of art that celebrates the city's creative spirit.
To further ignite the senses, the bridge will incorporate innovative elements that enchant and captivate. Imagine interactive light installations that respond to the movements and energy of those crossing the bridge. With each step, the bridge will come alive, illuminating the night sky with a mesmerizing dance of colors and patterns. This interplay between art and technology will create a dynamic and ever-changing experience, captivating both residents and visitors alike.
In a nod to sustainability, the bridge will seamlessly merge with its natural surroundings, embracing the beauty of Sacramento's landscapes. Native plants and cascading greenery will intertwine with the bridge structure, creating a harmonious fusion of urban architecture and nature's splendor. The bridge will be a sanctuary, a serene oasis where pedestrians can escape the hustle and bustle of the city and reconnect with the tranquility of the natural world.
Community engagement will be at the forefront of the bridge's purpose. Picture designated spaces that invite spontaneous performances, from impromptu street musicians to passionate poets sharing their verses. These platforms will act as catalysts for connection and collaboration, fostering a sense of shared creativity and empowering local talent. Community workshops and art festivals will flourish on the bridge, nurturing a sense of belonging and encouraging active participation in shaping the city's artistic landscape.
Imagine a bridge where cars are absent, replaced instead by wide walkways, spacious cycling lanes, and inviting seating areas. The bridge will invite individuals to slow down, breathe in the fresh air, and truly appreciate the beauty of their surroundings. It will be a sanctuary away from the chaos of urban life, a place where people can find solace, gather their thoughts, and engage in meaningful interactions.
Note: This is me after finishing this project, and due to technical constraints (computer overloading) I did not add all the components above, but still added most of them. Despite this, I believe it still fulfilled my vision, and hopefully, you can see that as well.
Step 2: Why the Name?
The name "Sacramento Enliven Bridge" I chose to convey the bridge's unique and transformative nature.
Let's break down the significance of the name:
- Sacramento: The name starts with "Sacramento," which identifies the location of the bridge. It symbolizes a connection to the city that I call home, indicating that this bridge is an integral part of the urban landscape and infrastructure. (more on this in the future Steps)
- Enliven: The word "Enliven" is a central concept of the bridge's design and purpose. It suggests that the bridge is more than just a physical structure; it's a living, dynamic space that comes alive with artistic elements, interactive technology, and greenery. It implies that crossing this bridge is an engaging and immersive experience, stimulating the senses and emotions of pedestrians and visitors.
- Bridge: The term "Bridge" is self-explanatory, representing the functional aspect of the structure, which is to provide a passage across a river, road, or any other obstacle. However, combined with "Enliven," it suggests that this is not an ordinary bridge; it's a bridge reimagined as a vibrant and inspiring space.
- A Kaleidoscope of Unity, Art, and Nature: The subtitle emphasizes the bridge's multifaceted nature. It implies that the Sacramento Enliven Bridge is a harmonious blend of diverse elements - unity, representing its role as a unifying element in the city; art, highlighting the incorporation of artistic installations and interactive features; and nature, signifying the integration of green spaces and sustainable practices.
Step 3: Inspiration
When I stumbled upon this challenge, it immediately took me back to a moment in class when I was captivated by the incredible designs of innovative bridges. It was a time when we weren't engaged in anything significant, so I decided to explore the internet. I spent the entire class period scrolling through images and taking screenshots, completely absorbed by the innovative and flowing designs that these bridges presented. What struck me most was how every aspect seemed to be meticulously crafted with the people and their experience in mind. Every detail served multiple purposes, solving various problems simultaneously. It was in this moment that I found my inspiration, not only for the design of bridges, but also for the underlying philosophy and approach.
The bridges I came across were more than just structures; they were transformative experiences. They seamlessly integrated with their surroundings, whether it was a bustling cityscape or a serene natural environment. These bridges showcased unique architectural elements, captivating aesthetics, and ingenious functionalities. What fascinated me was the careful consideration given to every aspect, from the walkways and seating areas to the lighting and interactive features. It was evident that these bridges were designed to enhance the human experience, facilitating connections, and fostering a sense of unity among individuals.
The innovative designs I encountered were not limited to one purpose or function. They were versatile and adaptable, catering to various needs and preferences. Some bridges incorporated green spaces, inviting pedestrians to engage with nature and promoting environmental sustainability. Others featured art installations and cultural spaces, celebrating local heritage and promoting community engagement. I was inspired by how these bridges went beyond being mere means of transportation; they became vibrant hubs where people could gather, interact, and be immersed in a world of creativity and innovation.
The attention to detail and the commitment to serving the needs of the people was truly inspiring. The designers had a profound understanding of the importance of human connection and the impact that well-designed spaces can have on individuals and communities. These bridges showcased the potential to transform mundane journeys into extraordinary experiences, elevating the quality of life for those who traversed them.
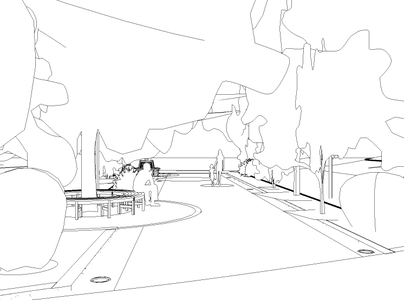
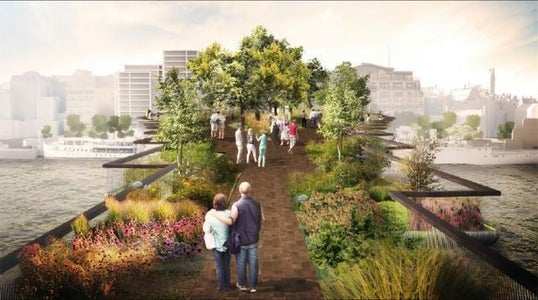
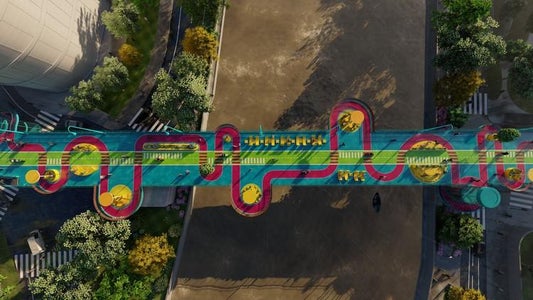
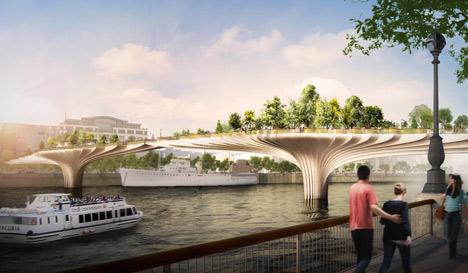
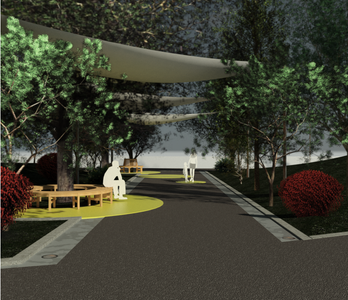
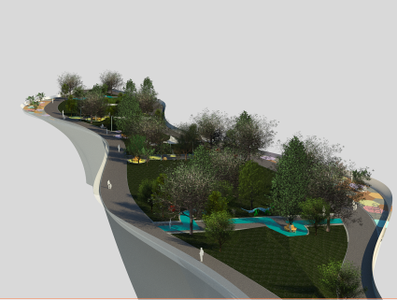
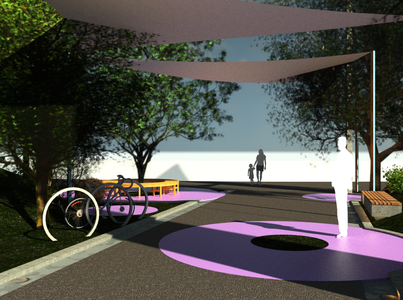
Images:
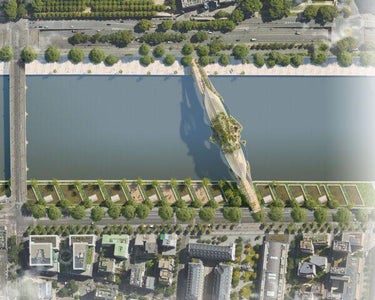
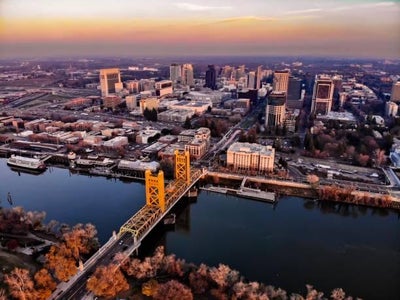
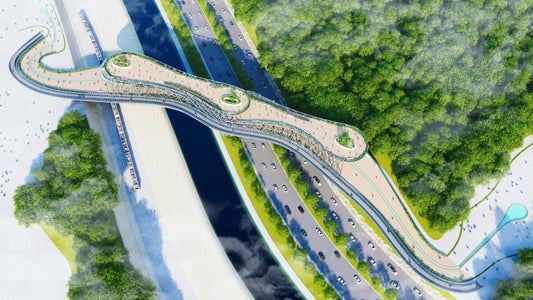
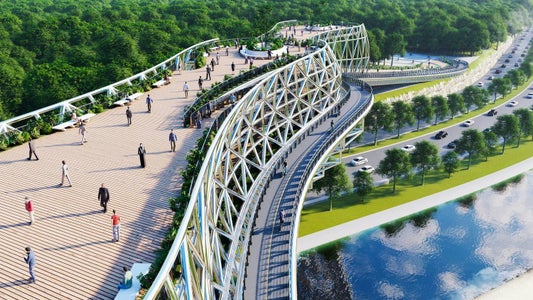
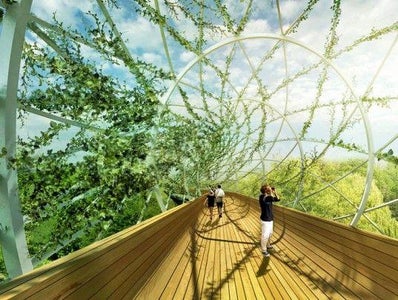
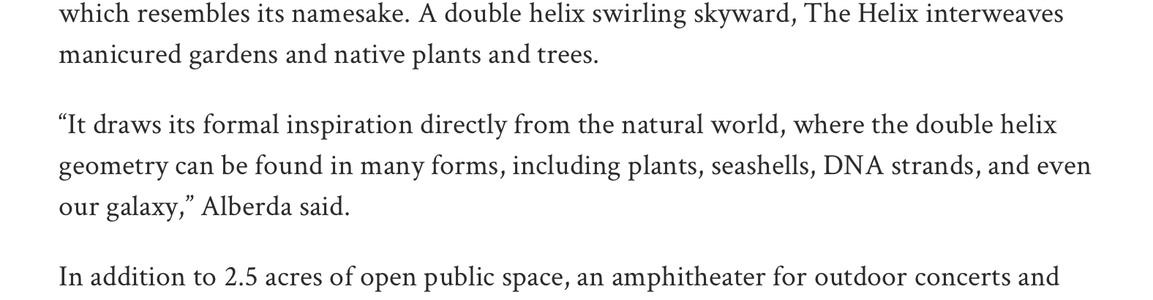
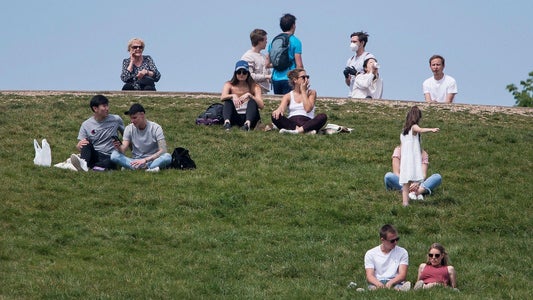
I drew inspiration from various elements showcased in the provided images, combining the features from picture one with the incorporation of greenery and trees in my design. Additionally, I integrated the color scheme from image two to create visually appealing walkways.
Step 4: Location - Why Sacramento?
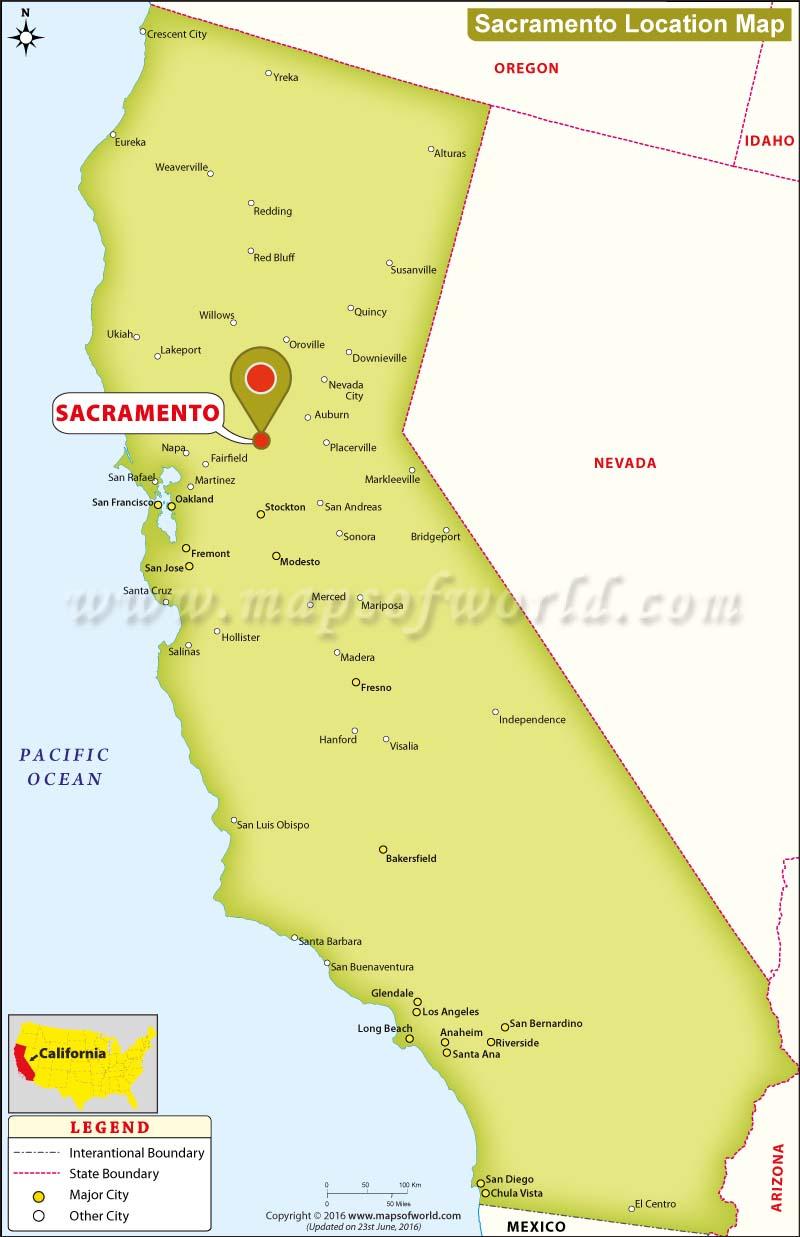
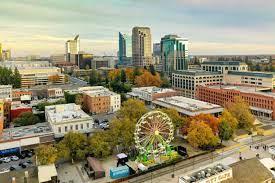
Sacramento is vibrant and rich in diversity and innovation. I wanted to create something that would directly impact the city that I know and love. I have spent my entire life in this city, seeing it as it has grown, so I know Sacramento is the ideal location for this visionary pedestrian bridge.
The city's commitment to sustainability aligns perfectly with my vision for the bridge. Sacramento's diverse and passionate community will embrace and contribute to the bridge's vision, creating a sense of ownership and pride. As the capital of California, Sacramento has the potential to set an example for other cities, showcasing how sustainability, innovation, and community engagement can coexist and thrive.
By creating this visionary pedestrian bridge in Sacramento, I aim to inspire other cities to follow suit and reimagine the possibilities of public infrastructure. It will be a landmark that symbolizes unity, sustainability, innovation, and passion, reflecting the values and aspirations of the Sacramento community.
Step 5: Location - Site (why Here)

Just like the innovative bridges I encountered, I aimed to locate a site that would benefit everyone and where every detail would serve multiple purposes. The careful selection of the site for my pedestrian bridge is crucial to ensure its alignment with the overarching goals of unity, sustainability, and community engagement. I sought a location that would be connected to the city in a meaningful way, not merely a bridge, but a true connection for the people and the land. As I explored Google Earth, I scanned along the American River, which borders Sacramento. I was searching for a place that would foster connection, particularly in an area lacking pedestrian bridges. Once I identified the general area, I began further exploration.
----
After further research and exploration, I discovered that the area I had identified for the pedestrian bridge was undergoing significant construction and new development within a 0.5-mile radius. I delved deeper into these projects, particularly focusing on a state development located right next to the potential bridge site. I also examined the environmental report of these new building complexes to gather more information and insights.
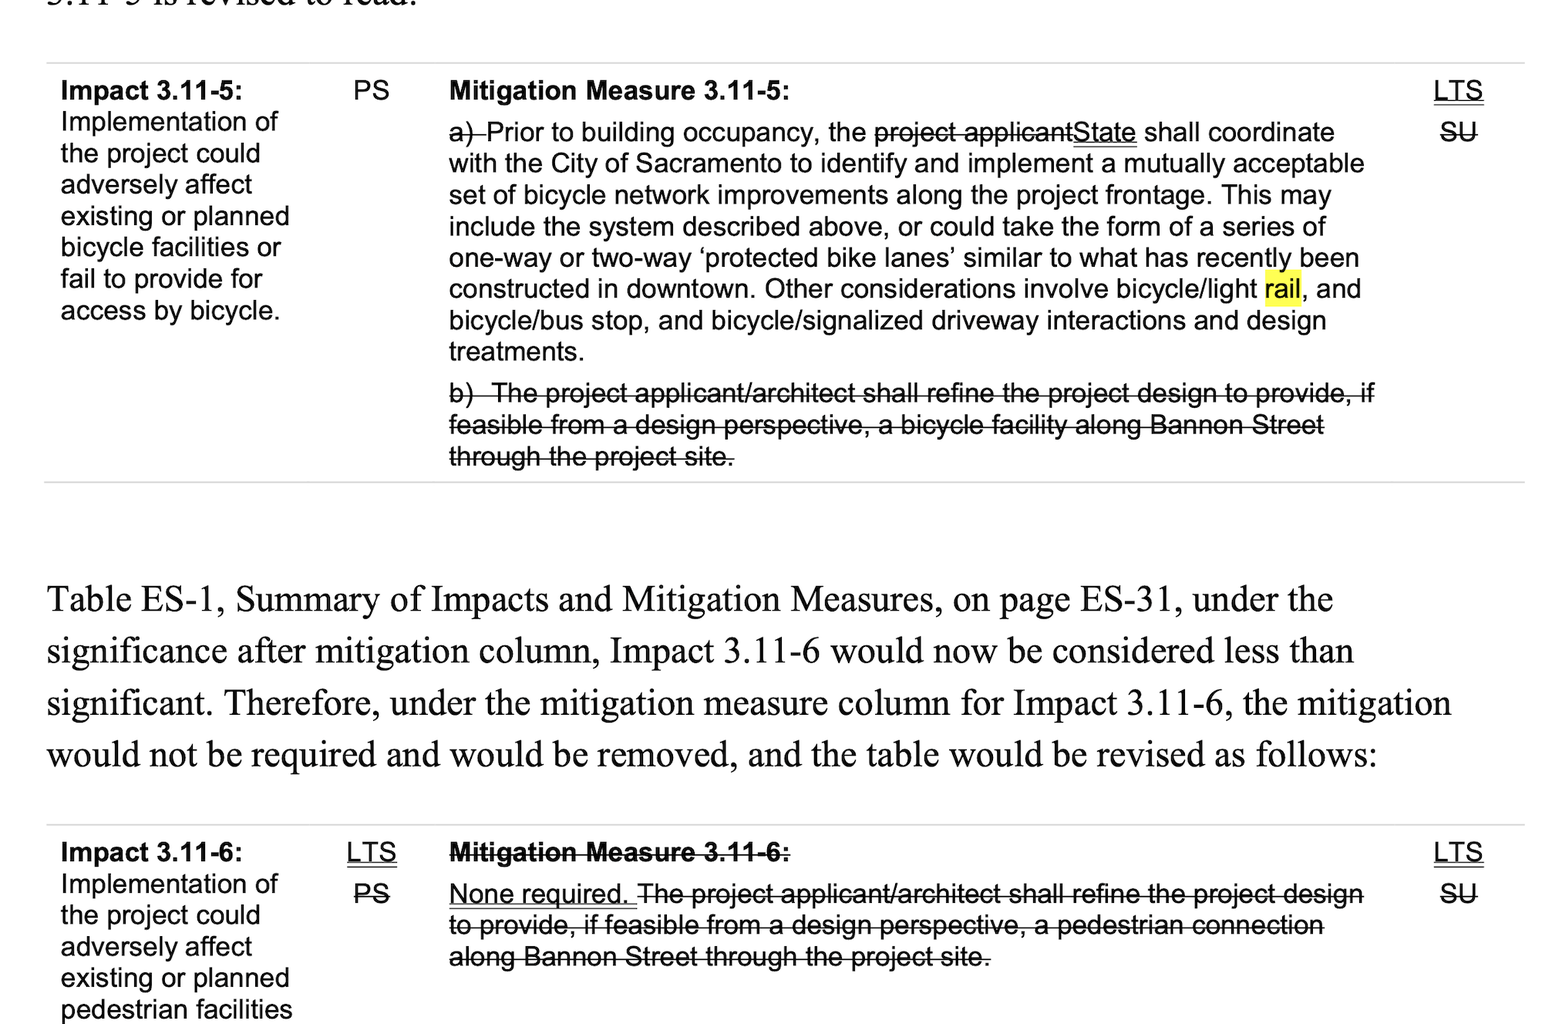
During my investigation, I came across three quotes that strongly support the inclusion of a comprehensive network for Bikes and people and aim to promote and be a lead in sustainability which strongly support the goal of my pedestrian bridge:
- "Include the system described above, or could take the form of a series of one-way or two-way ‘protected bike lanes’ similar to what has recently been constructed downtown. Other considerations involve bicycle/light rail, bicycle/bus stop, and bicycle/signalized driveway interactions and design treatments."
- "Prior to building occupancy, the project applicant state shall coordinate with the City of Sacramento to identify and implement a mutually acceptable set of bicycle network improvements along the project frontage. This may include the system described above or could take the form of a series of one-way or two-way ‘protected bike lanes’ similar to what has recently been constructed downtown. Other considerations involve bicycle/light rail, bicycle/bus stop, and bicycle/signalized driveway interactions and design treatments."
- "The project is being designed to achieve zero net energy (ZNE) and zero net carbon (ZNC) for the entire site through State-purchased carbon free green power and is also seeking a LEED Gold Certification through the US Green Building Council."
These quotes come from this environmental report https://www.cityofsacramento.org/-/media/Corporate/Files/CDD/Planning/Major-Projects/Railyards---1/R2016-0388-Conditional-Permit-for-Sports-Complex-Sacramento-Railyards.pdf?la=en Which mainly focus on a huge state building under construction called the "Richards Boulevard Office Complex" (more links at end of slide) which is around 0.3 miles away from the location of the Bridge. I also had the great opportunity to actually tour when it was first under construction about 2 years ago, and it was stuck in my mind ever since.
This bridge would not only provide a means of crossing the American River not on a car but would also serve as a vital link in the transportation network, connecting various destinations and promoting multi-modal transportation and health. (more on it down below)
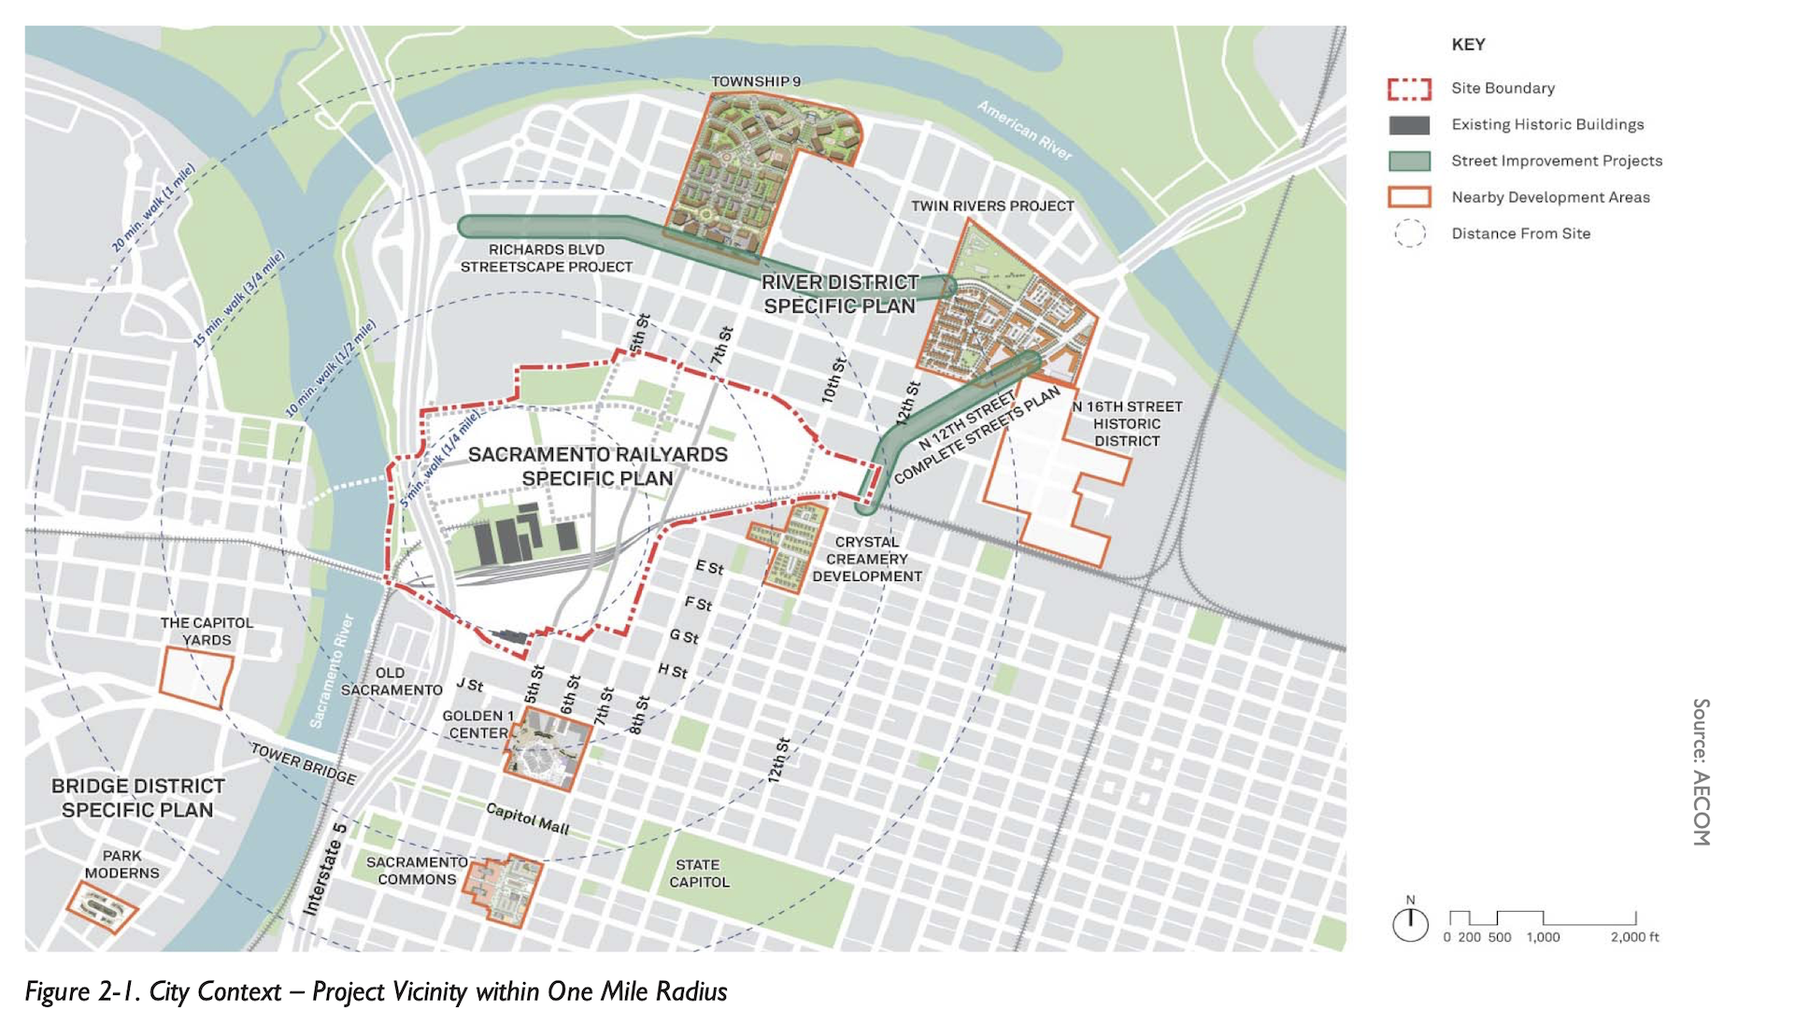
Furthermore, with the proximity of the new soccer stadium and the ongoing development of the rail yard district, Richards Boulevard Office Complex, lots of new housing developments, State lottery office, within 0.5 miles of Downtown and so much more this pedestrian bridge would play a crucial role in facilitating access to these significant destinations. It would provide a direct connection for visitors, residents, and employees, contributing to the overall accessibility and vibrancy of the area.
Links/Summaries of New Developments
I did not want to bombard you with a tone of information above so if you want more please write to me in the comments or follow the link down below.
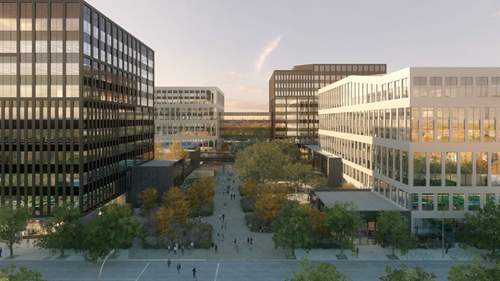
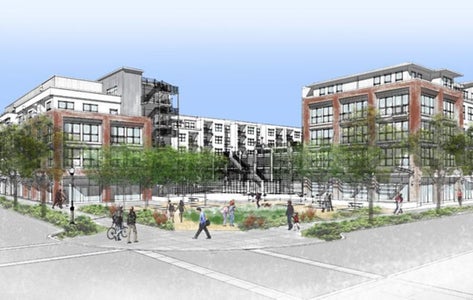
Richards Boulevard Office Complex (images 1-2): The Richards Boulevard Office Complex (RBOC) in Sacramento's River District covers a 17.3-acre site with four office towers, amenities, and more. It is part of the Department of General Services' Ten Year Sequencing Plan to renovate state office buildings.https://www.dgs.ca.gov/RESD/Projects/Page-Content/Projects-List-Folder/Richards-Boulevard-Office-Complex-RBOC
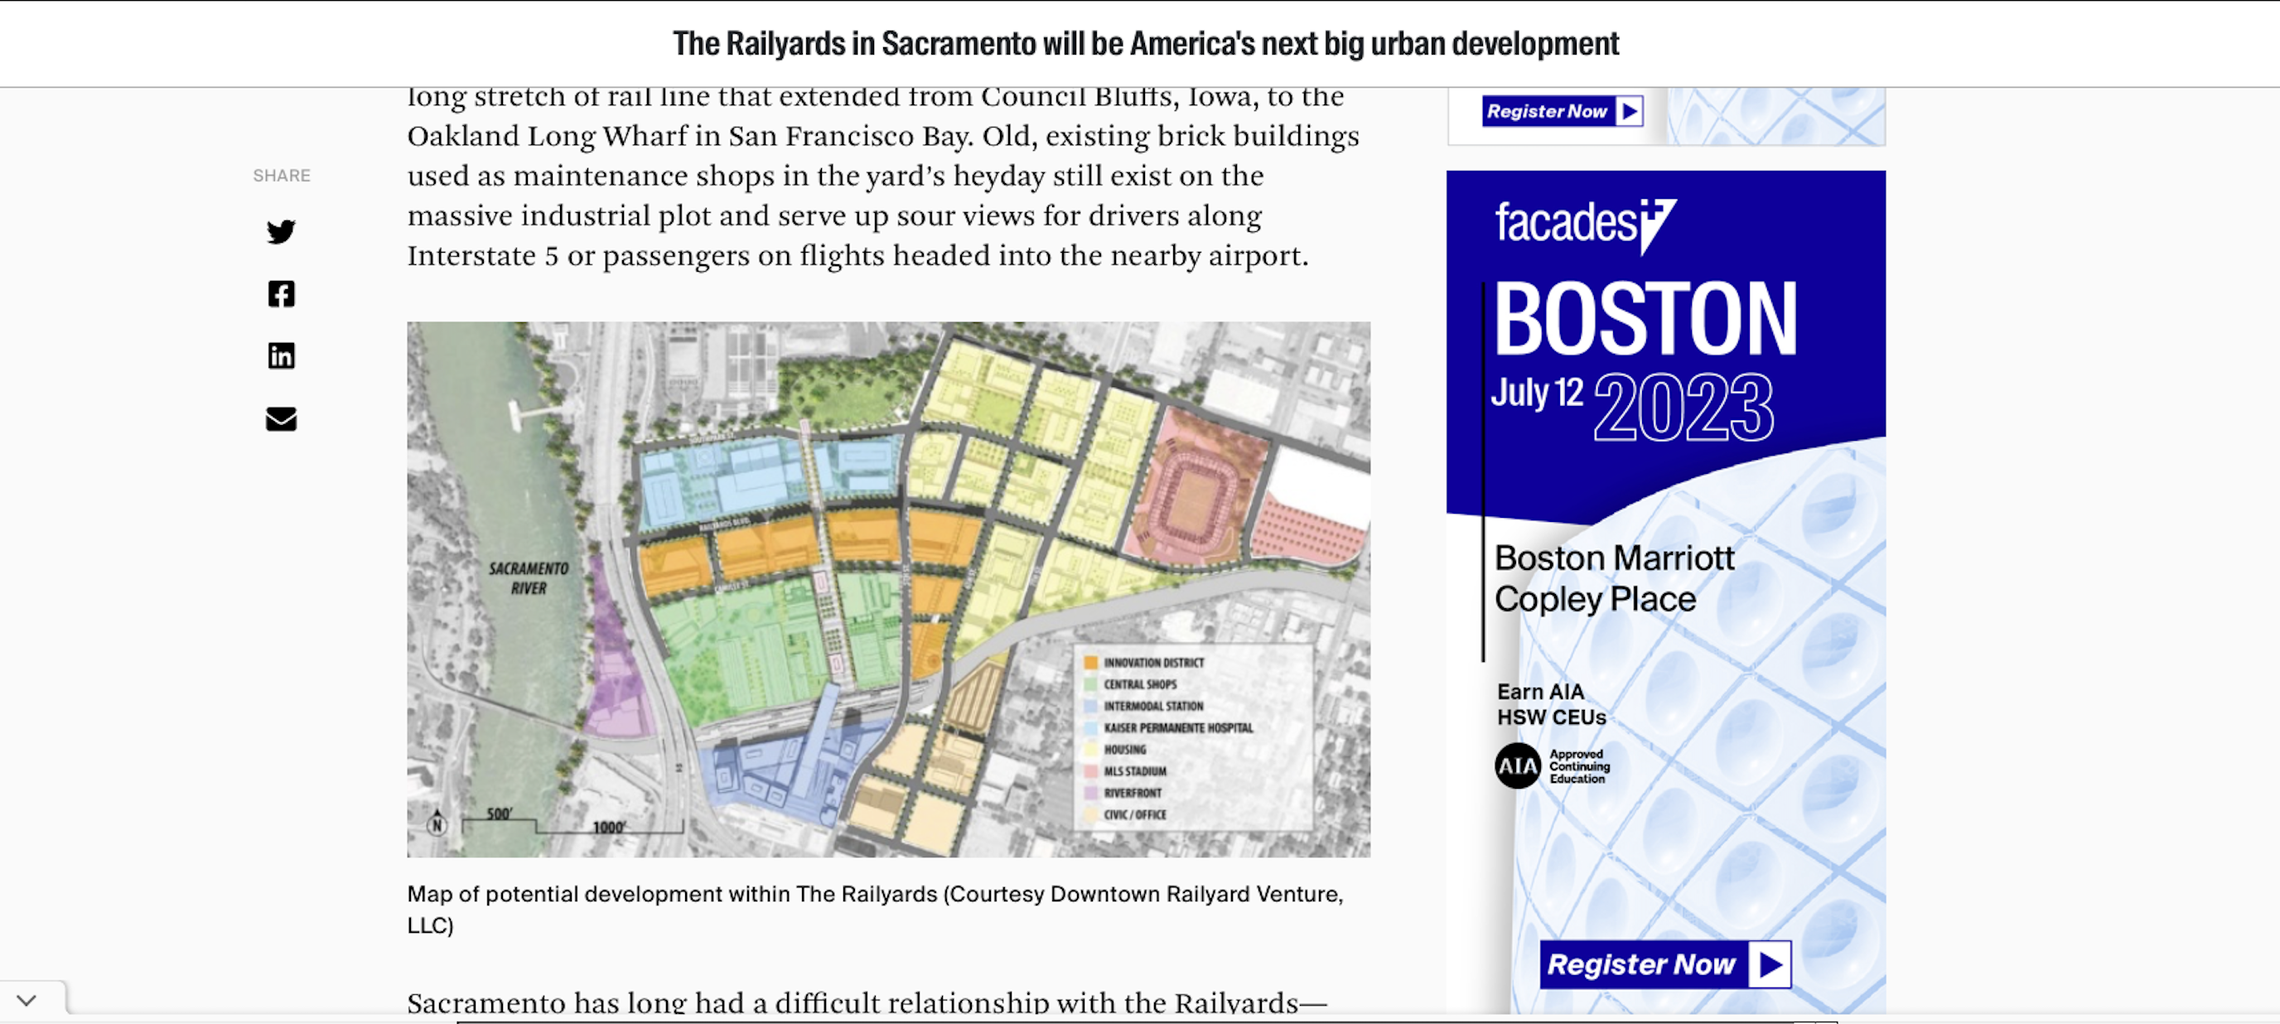
The Railyards in Sacramento (images 3-4): Sacramento is eagerly anticipating a transformative development that includes a new $250 million soccer stadium for a potential MLS franchise, and plans to elevate its own team, Republic FC, to major league status. The stadium will be accompanied by 17 acres of commercial and retail space in the Railyards area. Additionally, the development will feature a state-of-the-art medical facility by Kaiser Permanente, a museum, office and retail buildings, and a 17-story complex for the Sacramento County Courthouse. The project is set to revitalize the area and enhance accessibility with the addition of a light rail stop. https://www.archpaper.com/2019/09/the-railyards-in-sacramento/#:~:text=The%20Railyards%20in%20Sacramento%20will%20be%20America%27s%20next%20big%20urban%20development,-By%20Sydney%20Franklin&text=A%20neglected%20parcel%20of%20land,development%20in%20the%20United%20States.
Township 9 (images 5-7): Township 9, located in the Sacramento River District, is an ambitious development spread over 65 acres. The project aims to create a pedestrian-friendly environment with nearly 3,000 housing units, 800,000 square feet of office space, and 100,000 square feet of urban retail. The ultimate goal is to reduce car usage and promote walkability. A light rail stop is planned at Richards Boulevard and Seventh Street to enhance accessibility. Phase I, completed by 2014, will provide 139 residential units, and Phase II, starting in 2015, will include a riverfront park, additional infrastructure, market-rate apartments, and townhomes, with the rest of the project unfolding over the next decade. https://www.downtownsac.org/project/township-9/
Step 6: More on Why Here
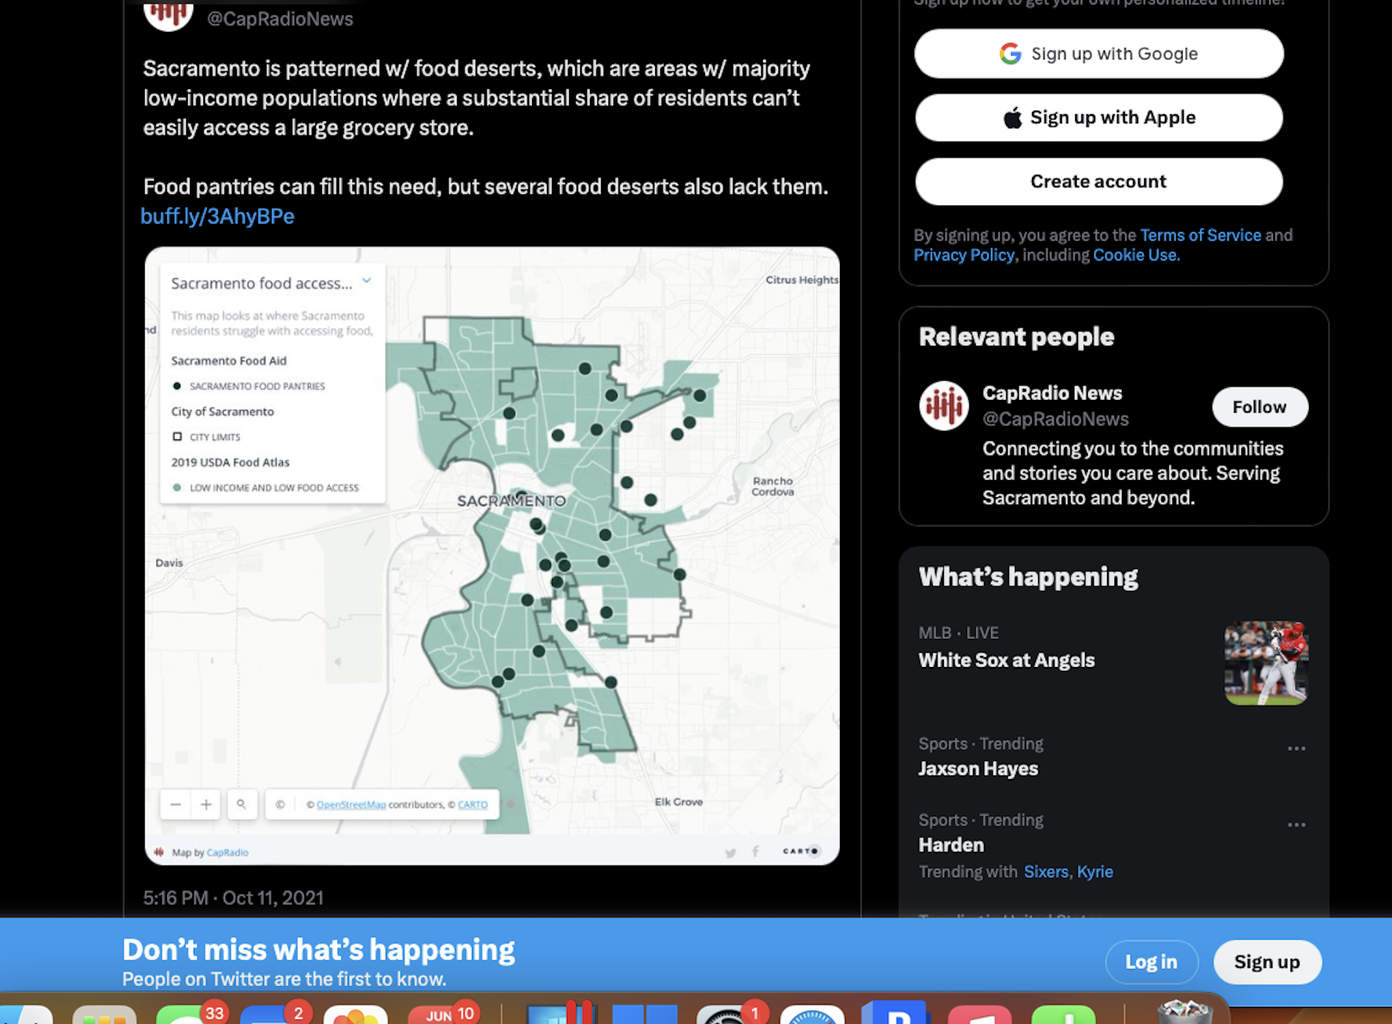
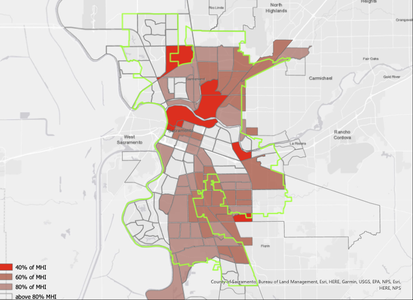
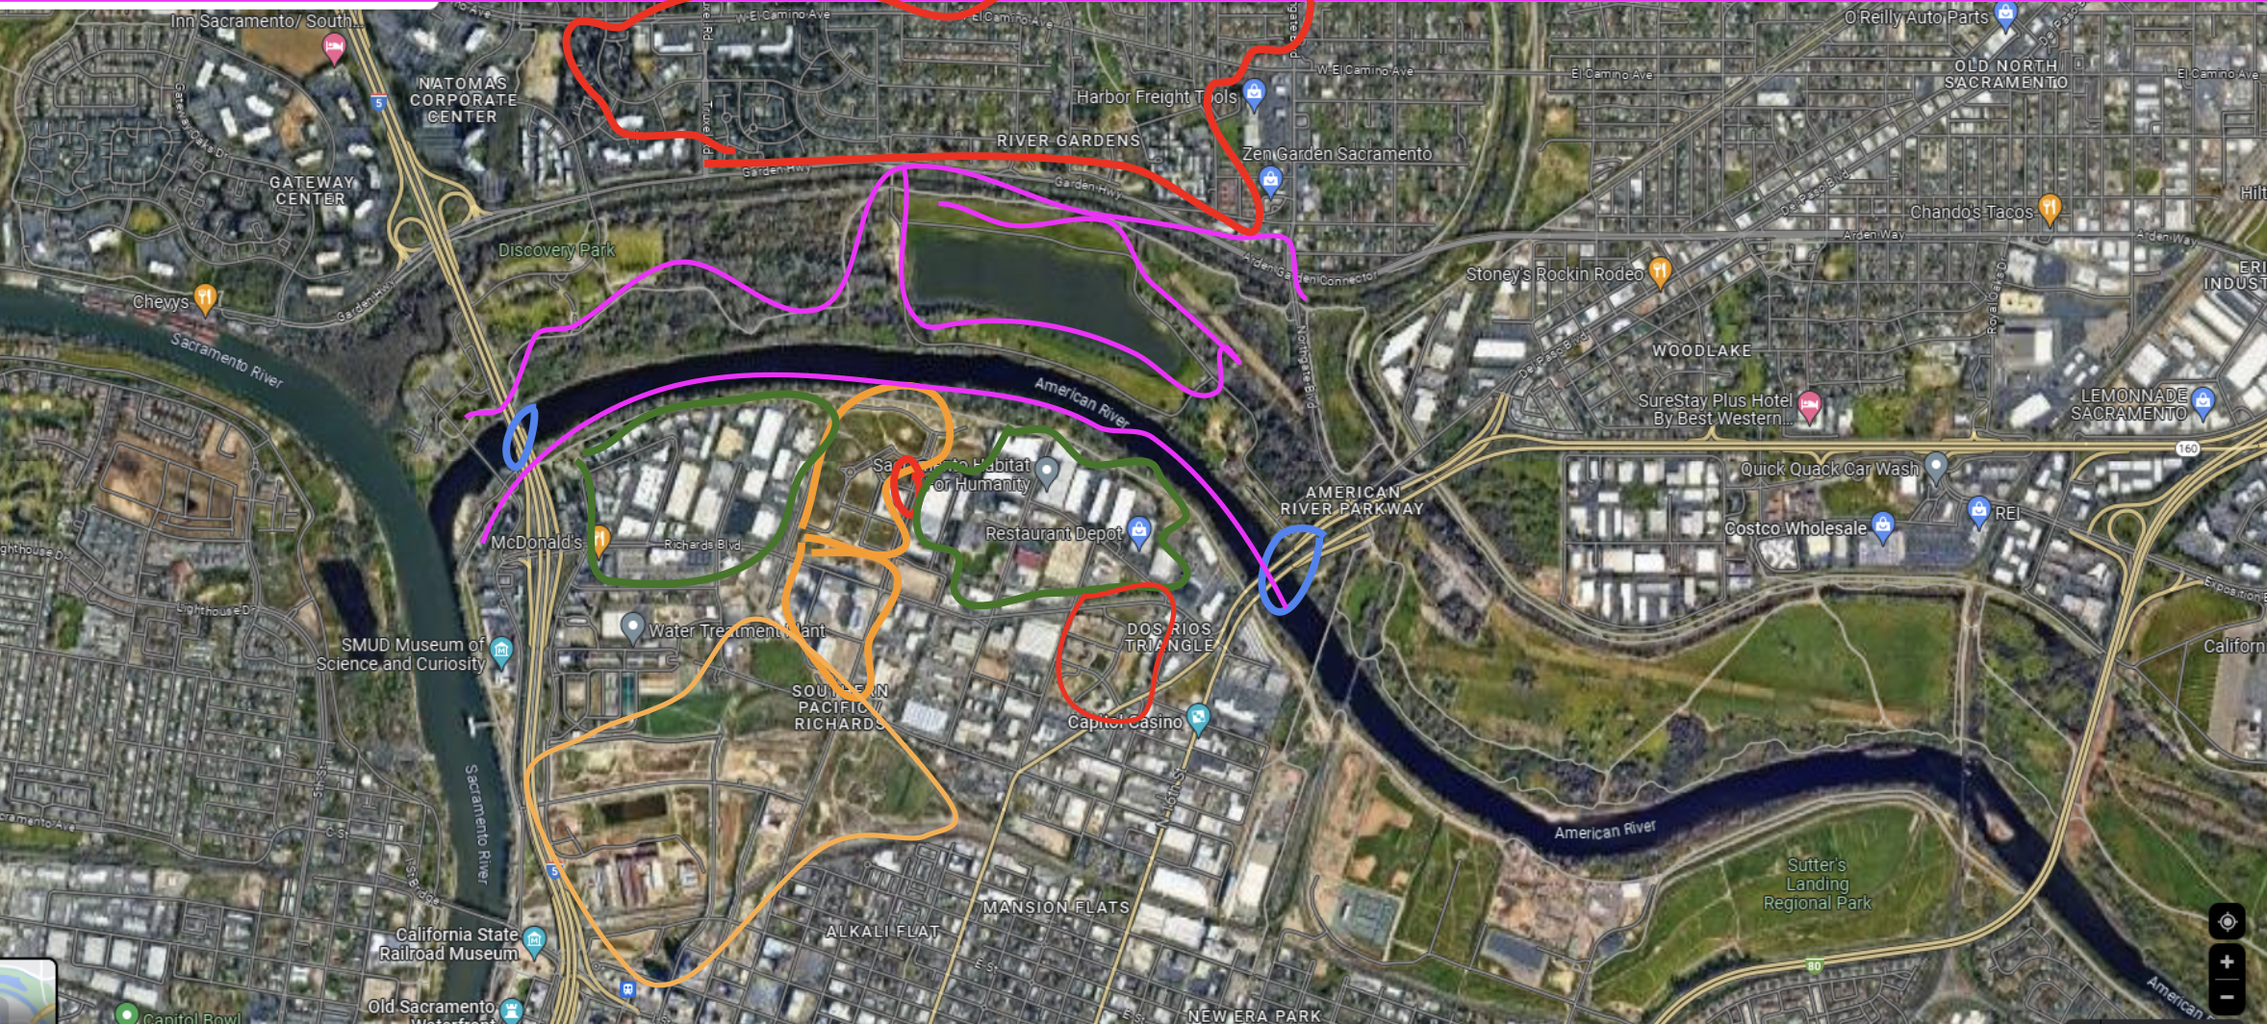
Image 1-2: Food Dessert/Low-Income Communities
One of the compelling reasons that drew me to this location was the opportunity to make a positive impact on the issue of food deserts and create real change in the lives of residents in the low-income community.
Upon exploring the neighborhood, I noticed the lack of nearby grocery stores and fresh food markets. Residents had to travel long distances to access nutritious food options, which was a significant burden, especially for those without reliable transportation. It was evident that this community was suffering from the effects of a food desert, and I knew the pedestrian bridge could play a crucial role in alleviating this challenge.
I wanted the pedestrian bridge to be a catalyst for positive change and empowerment. By tackling the issue of food deserts and providing access to fresh, nutritious food, the bridge would become a symbol of hope, resilience, and community-driven progress.
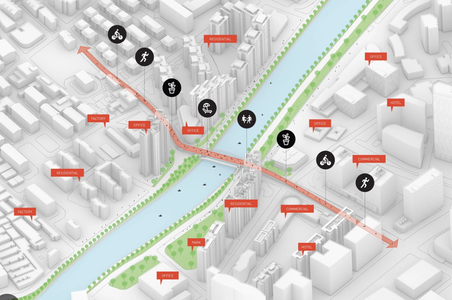
Images 3:(better visualization of developments and old developments and other aspects all put together)
Red - Residential
Pink - Existing Walkways
Blue - Non-Pedestrian River Crossing
Orange - New Developments
Green - Offices
Sources:
Image 1: https://gettingaroundsac.blog/2022/03/06/saccity-low-income-census-tracts/
Image 2:https://twitter.com/CapRadioNews/status/1447717672330928155
Image 3: Look at the above slide
Step 7: How It Connects With Its Surroundings
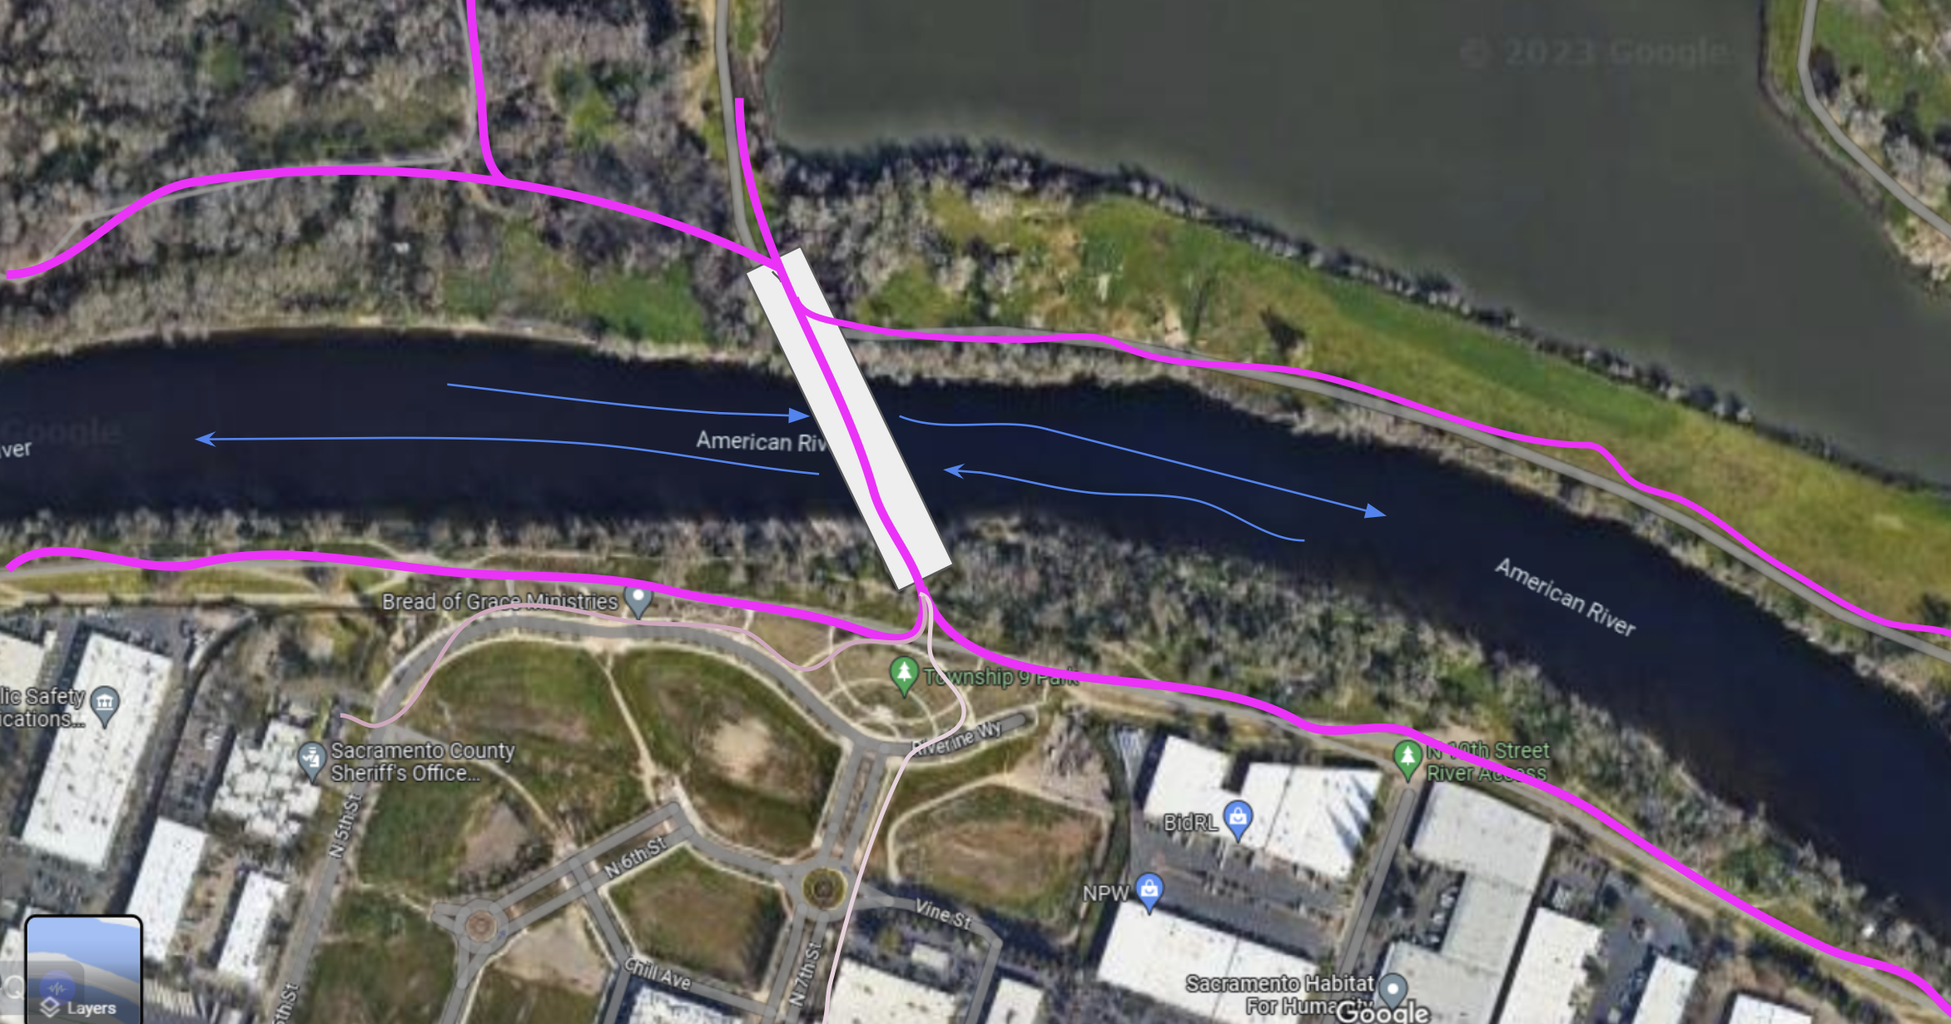
One of my utmost priorities was to ensure that the bridge seamlessly connected and flowed with both pedestrian and water traffic in the area. Taking into account the natural beauty of the surroundings and the proximity to the river, I designed the bridge to harmoniously integrate with the flow of people and watercraft.
For pedestrians, the bridge's pathway was carefully planned to align with existing walkways/bike trails, creating a smooth transition for those traversing the area on foot. By extending these pathways onto the bridge, I sought to enhance the overall pedestrian experience, making it easy and convenient for people to access the bridge from different parts of the neighborhood.
To accommodate water traffic, I incorporated a spacious and well-designed underpass beneath the bridge. This passage allowed boats and water vessels to pass through without disrupting pedestrian flow, ensuring safe and efficient navigation for both people and watercraft.
Image 1: How Bridge Would connect and Flow with the correct traffic of people and Boats/Water
Pink - Current walkways
Blue - Water traffic flow (river crossing, if any)
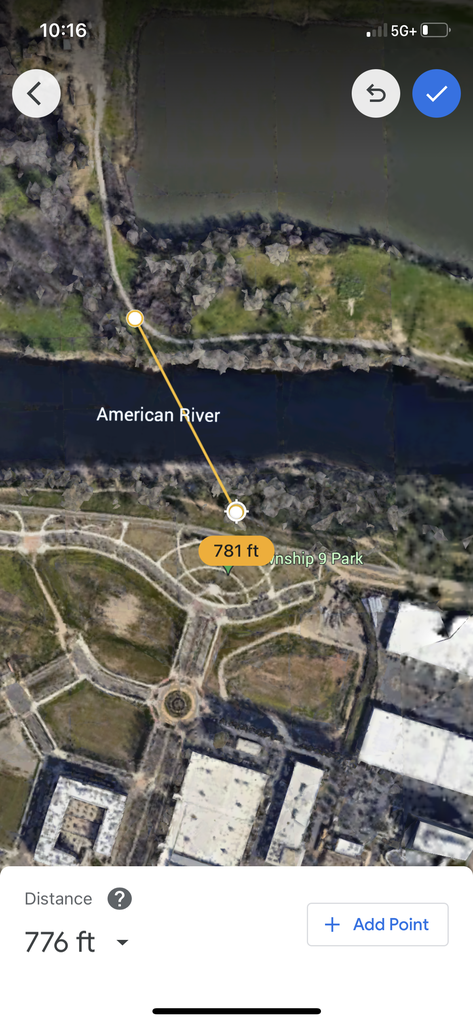
Step 8: The Size/Dimensions
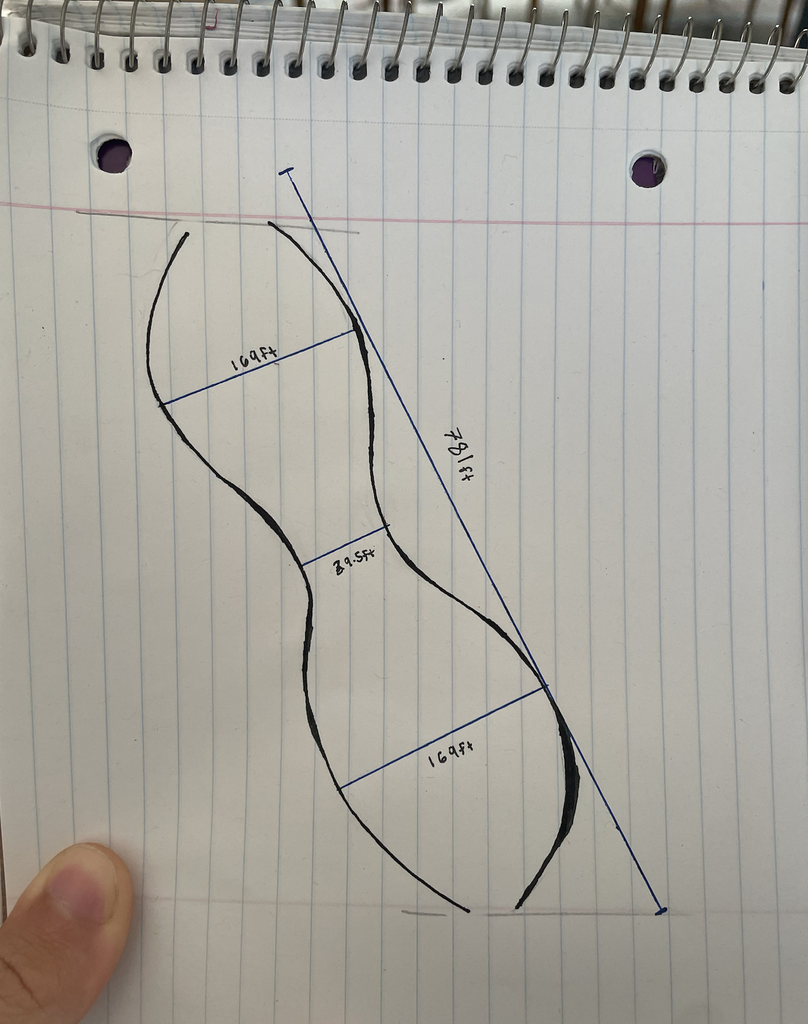
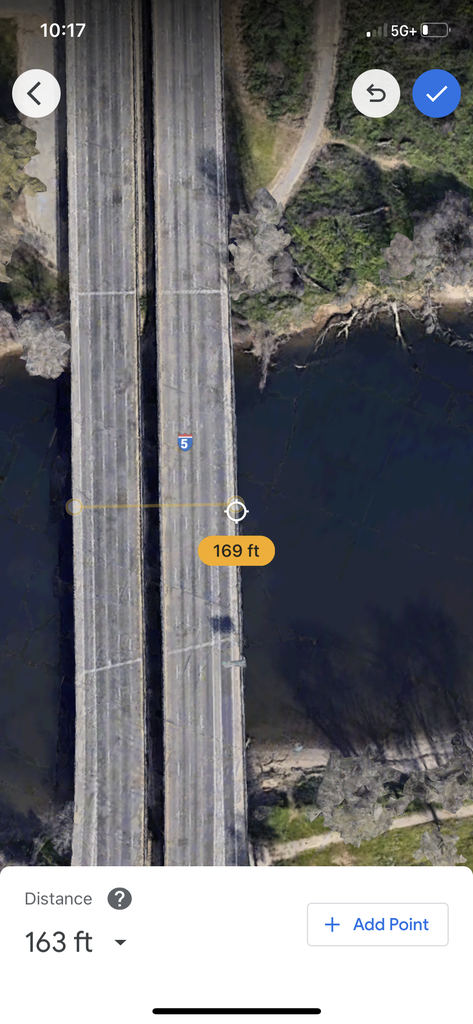
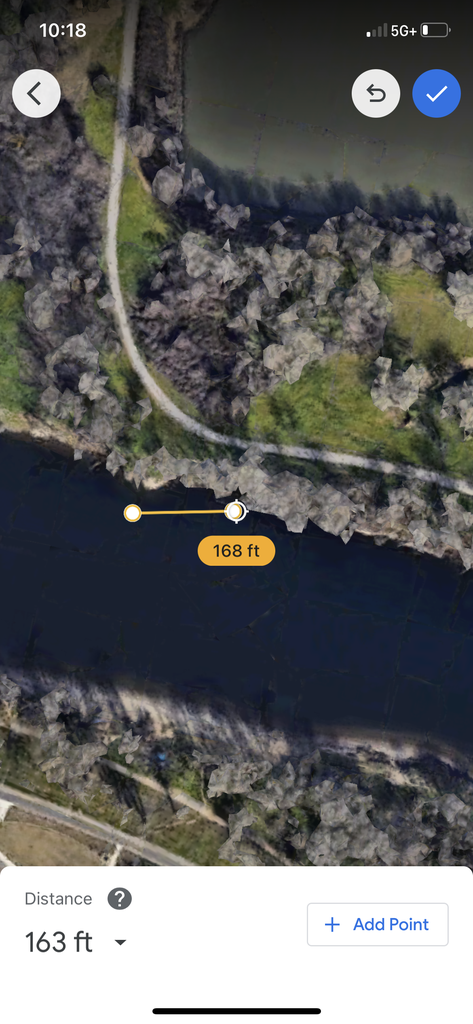
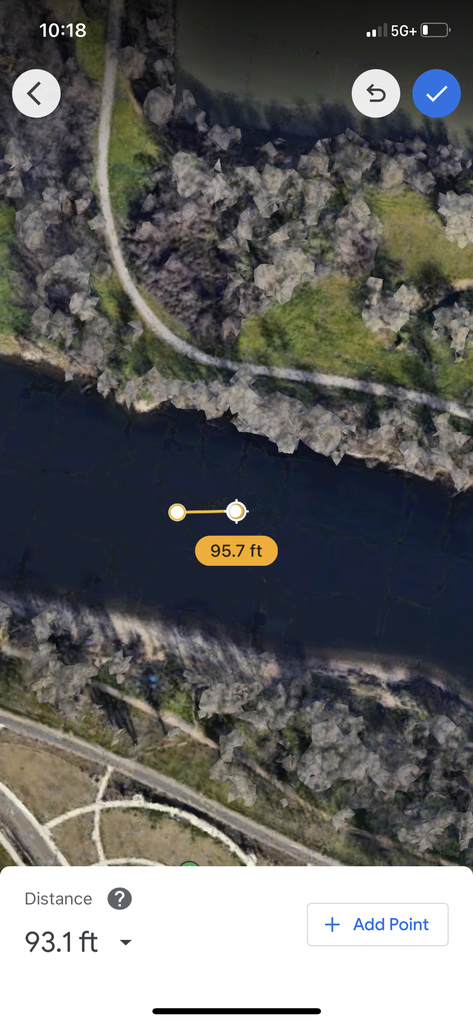
To ensure that the bridge that I designing is proportionally correct and complements the surrounding environment, I followed follow these steps:
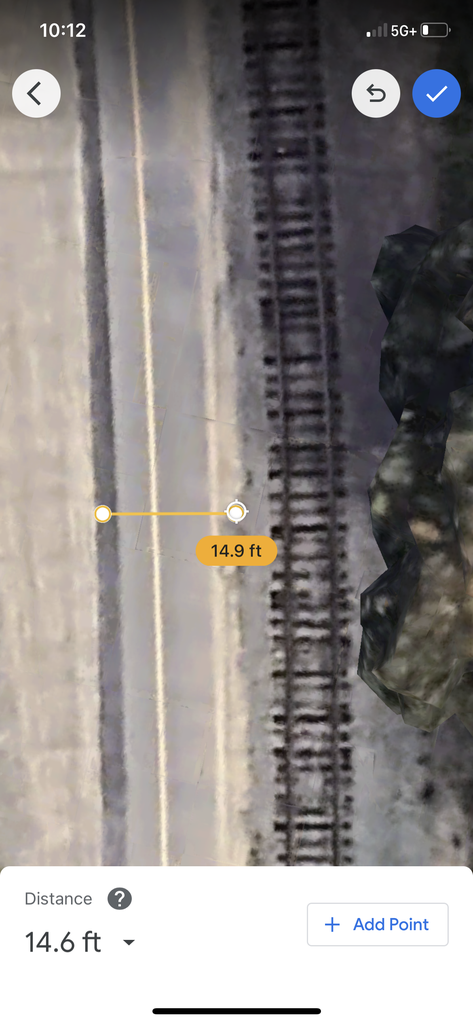
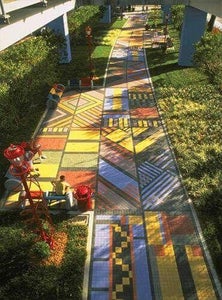
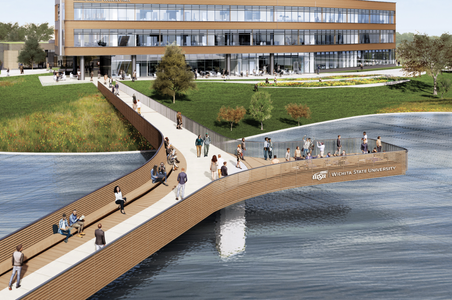
- Study Existing Bridges (images 3-4): I examined the nearby bridges and walkways. Taking note of their dimensions, proportions, materials used, and architectural features. This gave me a better understanding of what fits harmoniously with the surroundings.
- Consider the Environment (image 2): I took into account the natural surroundings, such as the landscape, nearby buildings, and any geographical features. I wanted this new bridge should blend in with the existing surroundings rather than stand out as an eyesore.
- Scale and Proportions (images 3-6): I paid close attention to the scale and proportions of the surrounding bridges. Measure the width, length, and height of the existing structures to get a sense of their relative dimensions. I used these measurements as a reference when designing your new bridge as you can see on images 4-5.
- Finalized Dimensions based on above (image 1): Taking into consideration all the dimensions above and what I wanted to do with the sight here are the final dimensions I used in my Revit model.
Step 9: Goal - Sustainability
Sustainability In designing my bridge, my primary goal is to prioritize usability while adhering to sustainability principles. I firmly believe that a bridge should not only be environmentally friendly but also serve the needs of the community effectively.
- To ensure usability, I draw inspiration from the words of William McDonough, a renowned architect, and sustainability advocate: "Design is the first signal of human intention." By incorporating this mindset into the bridge's design, I aim to create a structure that seamlessly integrates into its surroundings, providing a safe and efficient passage for pedestrians and cyclists.
- One of the key considerations for usability is accessibility. I strongly believe in the principles of universal design, as outlined by Ronald Mace, who stated, "The goal of universal design is to simplify life for everyone by making products, communications, and the built environment more usable by as many people as possible." With this in mind, I will ensure that the bridge features accessible ramps, and pathways that cater to individuals of all abilities, promoting inclusivity and equal access.
- Additionally, I will prioritize durability and ease of maintenance, keeping in mind the words of Buckminster Fuller: "When I am working on a problem, I never think about beauty. I only think about how to solve the problem. But when I have finished, if the solution is not beautiful, I know it is wrong." By utilizing sustainable materials and construction techniques, I will ensure the bridge's longevity, reducing the need for frequent repairs and minimizing disruption to its users.
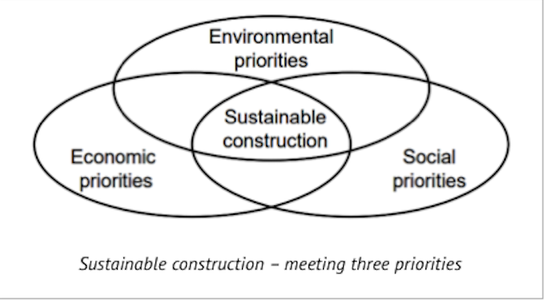
Image 1 - This was the structure of my thinking every aspect of my design, the location, etc.. I tried to bring back these principles:
- "Being economical in terms of their entire lifetime, including decommissioning, and also considering the effects of user disruption during construction and maintenance."
- "Meeting social priorities, considering both the construction workers and the people living near to and using the bridge."
- "Minimizing environmental impact in terms of carbon dioxide emissions and embodied energy during fabrication and construction and ensuring as many bridge components as possible are recyclable and preferably reusable at the end of the bridge’s life."
source:https://www.shortspansteelbridges.org/sustainable-bridge/
More info down below (learn more):
images (2-3 ) - https://amazingarchitecture.com/bridge/life-bridge-in-shiraz-iran-by-milad-eshtiyaghi
image (4) - https://www.pinterest.com/pin/5136987048681727/
https://www.hdrinc.com/insights/experts-talk-sustainable-bridge-design-rob-richardson-and-don-nguyen
https://inhabitat.com/top-5-most-innovative-green-bridges-on-the-planet/
Step 10: Hedonistic Sustainability
In designing the bridge with a hedonistic approach to sustainability, our main objective was to prioritize not only the practical function of the structure but also its potential to evoke pleasure, joy, and a sense of well-being among its users and the broader community.
Hedonistic sustainability refers to a design philosophy that seeks to maximize happiness, enjoyment, and overall quality of life while maintaining ecological balance and minimizing the negative impact on the environment. It focuses on creating spaces and structures that not only fulfill their intended purpose but also elevate the human experience, fostering a deeper connection with nature and promoting a positive emotional response.
- In the context of bridge design, this means paying careful attention to the aesthetics and user experience. I wanted my bridge to be visually appealing, evoking a sense of awe and wonder, and seamlessly blending with the natural surroundings. Incorporating art installations, vibrant colors, and creative designs can spark joy and delight in those who interact with the bridge.
- Additionally, the bridge's functionality should be optimized to enhance convenience and comfort for its users. Smooth and accessible pathways, seating areas, and viewpoints can encourage people to linger, enjoy the scenery, and forge connections with others. Providing spaces for social interaction, such as gathering spots or community events, fosters a sense of belonging and happiness within the community.
- Integrating nature into the bridge's design is another crucial aspect of hedonistic sustainability. Incorporating green spaces, planters, and natural elements allows users to connect with nature, promoting a sense of calm and tranquility. Greenery also improves air quality and contributes to the overall well-being of the surrounding ecosystem.
- Engaging the local community in the design process is vital for achieving hedonistic sustainability. Understanding the needs, preferences, and aspirations of the community helps tailor the bridge's design to resonate with its users. Collaborative efforts can lead to a bridge that becomes a cherished landmark, contributing positively to the collective happiness and pride of the community.
Video - this is where I got this ideas, this is where my love and passion for something I just heard about, Hedonistic sustainability started.
- Go to 1:23 where he starts talking about it in depth -
sources :
Step 11: Inspiration for Sustainability - Why a Bridge
This video opened my mind to how bridges can be sustainable, going beyond just concrete and steel. They can integrate eco-friendly materials, renewable energy sources, and green spaces, becoming more than transportation routes. Sustainable bridges symbolize innovation and environmental consciousness, inspiring greener urban planning.
Step 12: The Design
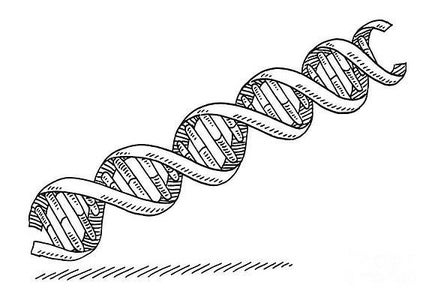
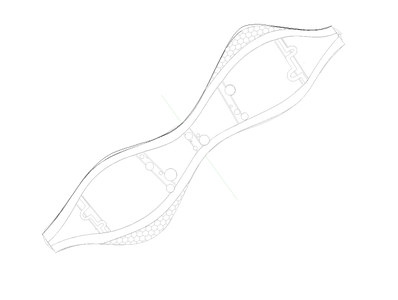
Inspired by the beauty and symbolism of DNA, I wanted to formulate a visionary pedestrian bridge in the shape of a double helix, with the intention of representing connectivity and unity through its structure and purpose. The structure of DNA holds the blueprint of life, encoding the genetic information that connects all living beings. By incorporating this iconic shape into the design of the bridge, I aim to symbolize the inherent interconnectedness of individuals within the community.
The double helix design serves a dual purpose. Firstly, it enhances the flow of pedestrian and cyclist traffic across the bridge. The intertwined pathways create a natural and intuitive movement for users, guiding them along a smooth and continuous path. This design eliminates abrupt turns or congested areas, ensuring a seamless and efficient experience for those crossing the bridge.
Additionally, the double helix represents a visual representation of unity and collaboration. Just as the two strands of DNA intertwine to form a stable and cohesive structure, the bridge signifies the connection between diverse individuals, communities, and ideas. It symbolizes the strength and resilience that can emerge when people come together, transcending differences and working towards a common goal.
Moreover, the shape of the double helix allows for the incorporation of various features that enrich the user experience. As pedestrians and cyclists traverse the bridge, they will encounter interactive installations, art exhibits, and gathering spaces strategically placed along the helix structure. These elements will foster engagement, spark creativity, and provide opportunities for spontaneous interactions among bridge users.
Overall, the DNA-inspired design of the visionary pedestrian bridge embodies the principles of connectivity, flow, and unity. By integrating the double helix structure, the bridge becomes a symbol of the interwoven fabric of the community, fostering collaboration, and celebrating diversity. The design not only prioritizes the functionality and efficiency of the bridge but also embraces the artistic, sustainable, and inclusive aspects that define Sacramento's spirit.
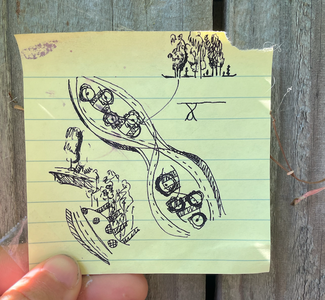
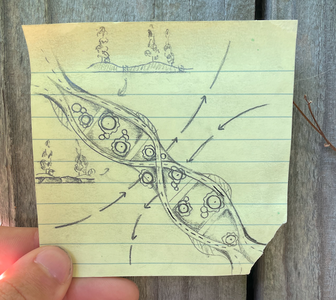
Images -
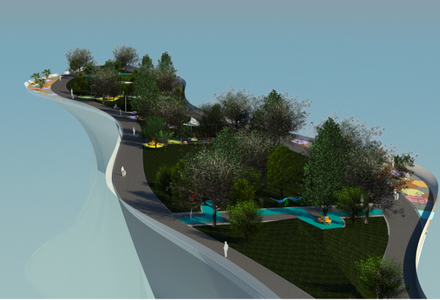
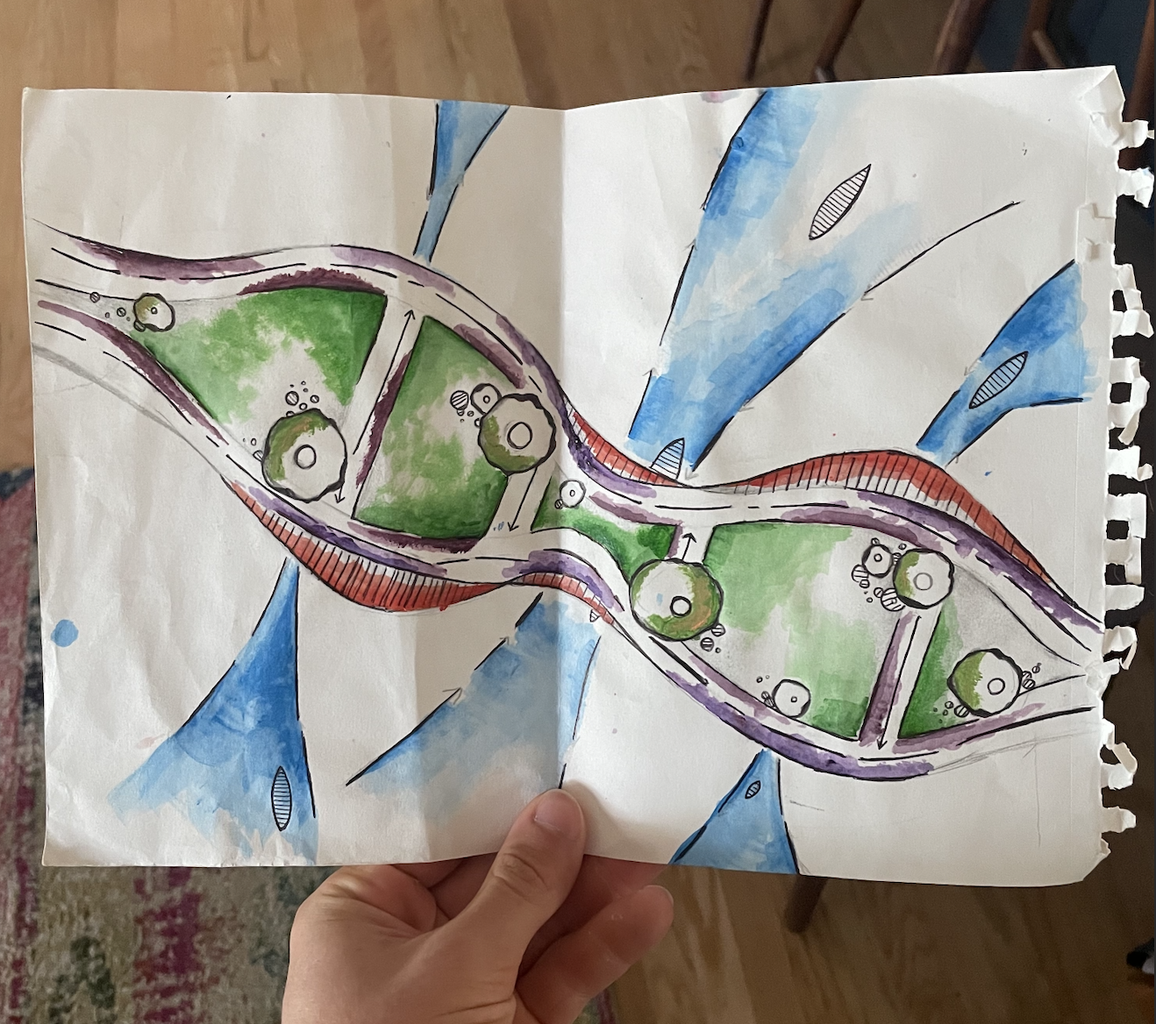
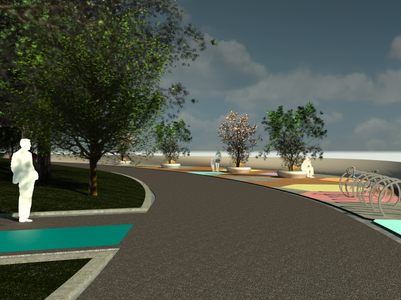
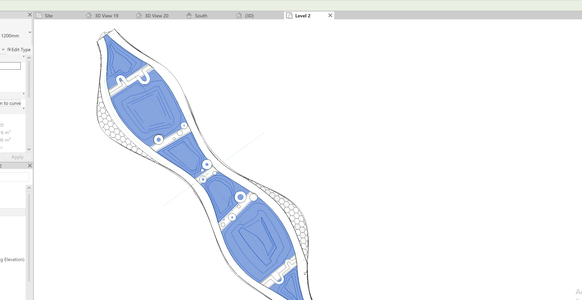
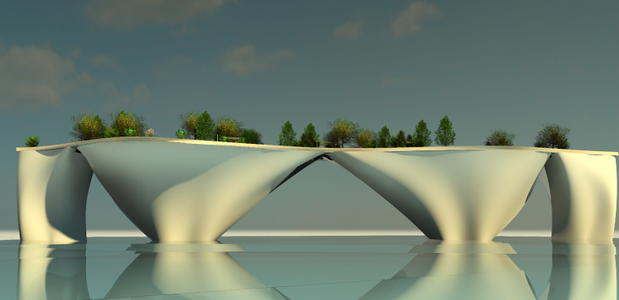
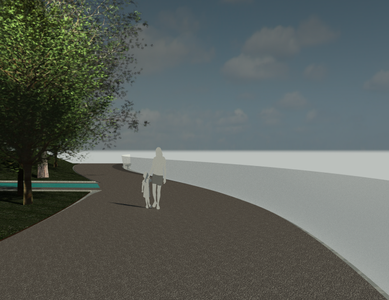
image 1 - The final (despite not incorporating all the assets that you will see later on, this is my representation that I painted to show the overall shape and feel of this bridge)
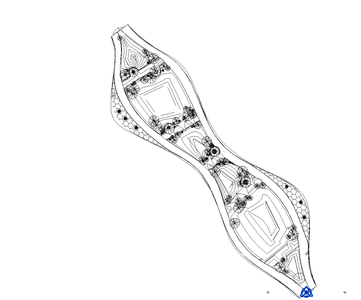
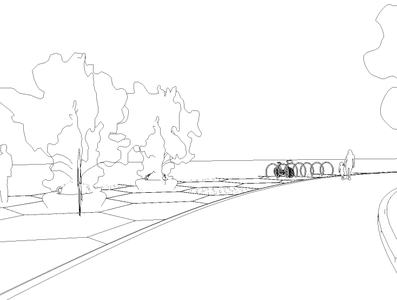
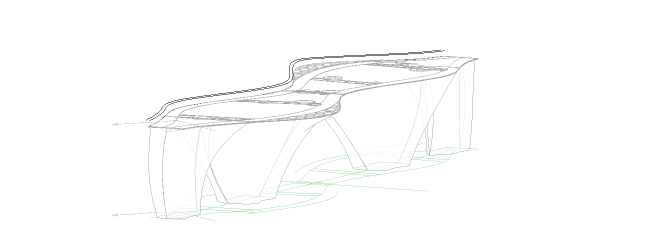
Images 2-3 - Progression (these images show the overall progression of my ideas, these are my first sketches that eventually led to what you see in image 2)
Step 13: More Than Just a Helix


After Researching this manful and intricate shape, this is what I found:
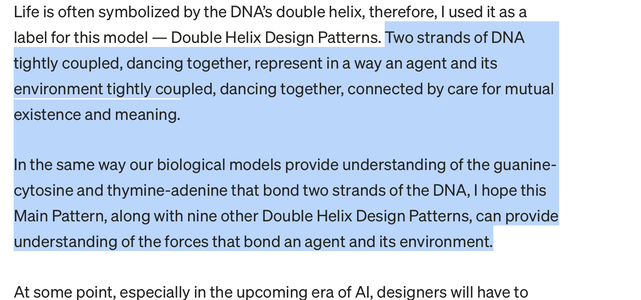
Alberda eloquently states, "Nowadays, the DNA double-helix is not just a model of a microscopic organic structure: it symbolizes the backbone of our current understanding of ourselves. It's the main pillar of evolution, which represents our history, influences our behavior, and gives us clues to our future."
Drawing inspiration from the inherent strength and elegance of the curved DNA molecule, the bridge becomes a captivating embodiment of nature's design. As Alberda further explains, "It draws its formal inspiration directly from the natural world, where the double helix geometry can be found in many forms, including plants, seashells, DNA strands, and even our galaxy."
The intertwining strands of the DNA double-helix serve as a powerful metaphor for the intricate relationship between individuals and their environment. Just as the strands are tightly coupled, dancing together, connected by care for mutual existence and meaning, the bridge represents the interplay between humanity and nature. It reflects the profound interconnectedness we share, as emphasized by Alberda's insight that "two strands of DNA tightly coupled, dancing together, represent in a way an agent and its environment tightly coupled, dancing together."
The curved structure of the DNA molecule not only serves as an aesthetic inspiration but also signifies strength and resilience. It is a reminder that life's journey is not without challenges, but through perseverance, we can overcome obstacles and transform adversity into triumph.
Overall in using this shape, I hope to create a bridge that reminds us of our shared history, the boundless potential that lies within us, and the imperative to nurture and preserve our world. In the words of Richard Wilkinson, "The average well-being of our societies is no longer dependent on national income or economic growth, instead the differences between us and where we are in relation to one another matter very much." Let this bridge be a testament to our collective pursuit of unity, progress, and a brighter future.
Step 14: Design Components
Note - All the images above were my inspirations, I did not want to directly copy them, they just helped give me ideas that I could implement on the bridge.
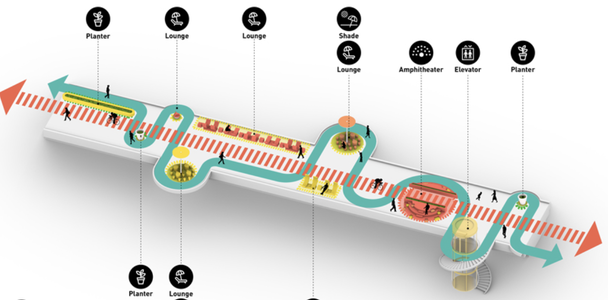
Green Hills:(Image 1) The walkways of the pedestrian bridge are beautifully adorned with cascading green hills, which harmoniously merge with the natural landscape. These verdant hills, meticulously designed with native plants and trees, breathe life into the structure and provide a tranquil sanctuary for both pedestrians and wildlife. The lush greenery enhances the aesthetic appeal of the bridge and promotes sustainability, contributing to improved air quality and the preservation of local ecosystems.
Motion-Filled Walkways(Image 2): The walkways of the bridge are designed to evoke a sense of continuous movement and vibrant energy. The architectural layout features fluid lines and dynamic curves, inviting pedestrians and cyclists to embark on a captivating journey. As individuals traverse the bridge, the walkways respond to their motion, subtly incorporating interactive elements that create an engaging and immersive experience. This interplay of motion infuses the bridge with a lively atmosphere, making every crossing a unique and memorable event.
Lookouts: (image 3) Strategically positioned along the bridge, innovative lookouts provide panoramic views of the surrounding landscapes while respecting the uninterrupted flow of movement. These thoughtfully designed lookout points are carefully angled away from the main walkways, allowing individuals to pause, admire the scenery, and appreciate the architectural marvel before them. These colorful lookouts provide spaces for contemplation, reflection, and a deep connection with the environment while ensuring that the bridge's fluidity and functionality remain uncompromised.
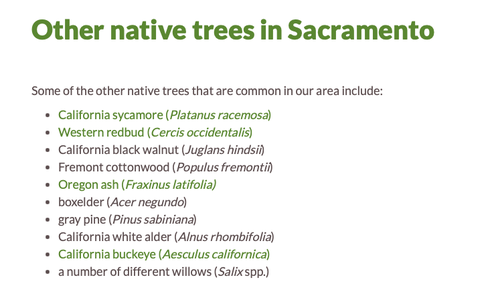
Native Plants and Trees (Image 4): The bridge design prioritizes sustainability by incorporating native plants and trees throughout its structure. These carefully selected species not only add visual appeal but also serve practical purposes. They provide shade and create natural microclimates that enhance the comfort of bridge users. Furthermore, the native vegetation helps reduce the bridge's environmental impact by providing habitat for local wildlife, conserving water through efficient irrigation systems, and contributing to the overall ecological balance of the area. (although they were not all in Revit I tried my best to use the closes ones possible to the real things) What kind of trees grow in Sacramento? Palms, oak, moreThe Sacramento Beehttps://www.sacbee.com › news › article257008732
Sustainable Materials: A commitment to sustainability permeates the bridge's design, including the materials chosen for its construction. Embrace reclaimed and recycled materials, giving new life to forgotten resources. Sustainable concrete alternatives reduce carbon emissions while ensuring the bridge's longevity. By incorporating eco-friendly composites and advanced materials, the bridge minimizes its environmental impact while promoting responsible design. These sustainable materials not only reduce waste but also imbue the bridge with character and a sense of history.
Step 15: The Flow

The Flow: Embracing the Helix Design and Serene Spaces for Harmonious Movement
In crafting the visionary pedestrian bridge, "The Flow," the helix design takes center stage, symbolizing connectivity and unity while embracing the principles of fluid movement. The intertwining double helix represents the seamless flow of both pedestrians and cyclists, guiding them along a continuous and intuitive pathway.
The helix design not only enhances traffic flow but also serves as a visual representation of unity and collaboration. Just as the two strands of DNA intertwine, the bridge signifies the connection between diverse individuals and communities, fostering a sense of togetherness and strength.
To ensure the smooth flow of people and prevent congestion, serene spaces (overlooks, hills, separate paths, etc..) are thoughtfully integrated throughout the bridge's design. These spaces act as tranquil sanctuaries, inviting pedestrians to pause, appreciate the surroundings, and interact with one another. By strategically placing these areas, we encourage spontaneous connections and create a harmonious balance between movement and moments of contemplation.
Moreover, the bridge features wide paths that accommodate both cyclists and pedestrians in each direction. Cyclists and pedestrians can journey side by side, fostering a sense of shared community and encouraging a mode of transportation that is both sustainable and healthy.
The two-way wide paths, each one on a different side, exemplify the bridge's commitment to inclusivity and accessibility. By welcoming individuals of all abilities, we create an environment where everyone can experience the beauty and symbolism of "The Flow." This dedication to universal design ensures that the bridge serves as an equalizer, uniting people from all walks of life.
Image: 1
Light Blue (Flow of People/Bikes):
- Ensure that the walkway is wide enough to accommodate both pedestrians and cyclists comfortably without interference.
- each lane on opposite lines of the bridge go in different directions to allow fro what was mentioned above
Dark Blue (Flow of Water and Boats):
- I designed the bridge's supports and foundation to allow for a clear waterway passage for boats, avoiding any obstruction to navigation.
Green (Green Areas):
- green spaces along the sides of the bridge or nearby areas to enhance the visual appeal and promote a sense of harmony with nature.
- Plant native trees, shrubs, and other vegetation to create an eco-friendly environment and contribute to the local ecosystem.
Red (Lookouts and Resting Spots):
- Lookouts provide a place to stop and rest for people that do not disrupt the flow of traffic. make this better and assent it with the bridge
Images: 2-3
These are what I used as inspiration and reference in the research process
Step 16: Accessibility and Inclusivity
The Sacramento Enliven Bridge prides itself on being a model of accessibility and inclusivity, ensuring that everyone can enjoy its beauty and functionality. From its inception, the bridge's design prioritized the needs of people of all ages and abilities, making it an exemplary symbol of universal access.
Section 1: Thoughtful Pathway Design
The Sacramento Enliven Bridge prioritizes accessibility through its carefully planned pathway system. Wide, smooth, and slip-resistant pathways accommodate pedestrians of all ages and abilities, including wheelchair users and stroller pushers. The pathways ensure a free and comfortable flow of foot traffic, creating a welcoming experience for all visitors.
Section 2: Embracing Seamless Mobility
To ensure uninterrupted movement for individuals with mobility challenges, the bridge incorporates zero stairs, making each walkway accessible to everyone. These slopes adhere to the highest accessibility standards, providing gentle slopes and ample space for easy maneuverability.
Section 3: Creating a Sensory-Inclusive Environment
In consideration of individuals with sensory sensitivities, the bridge's lighting system is thoughtfully designed to minimize glare and create a serene ambiance during both daytime and nighttime. This sensory-friendly approach ensures a comfortable and enjoyable experience for all visitors.
Section 4: A Commitment to Community Inclusivity
The Sacramento Enliven Bridge's dedication to accessibility goes beyond mere compliance with regulations; it fosters a sense of community and belonging for all members of society. The bridge's welcoming design creates a space where people from diverse backgrounds can gather, celebrate, and appreciate its beauty. By championing universal access, the bridge stands as a symbol of progress and social equity, inspiring future architectural endeavors to embrace the principles of inclusivity. Its legacy enriches the lives of countless individuals for generations to come.
Regulatory measures followed -
Americans with Disablities Act - https://nfda.org/resources/legal-compliance/other-compliance/americans-with-disabilities-act-ada-compliance-summary#:~:text=Compliance%20with%20the%20public%20accommodations,barrier%20removal.
https://www.cityofsacramento.org/Community-Development/Building/Plan-Review/Disabled-Access
Step 17: Digital Model - Overview

For this project I used Revit. And thank god I did because I believe it gave me the opportunity to show my vision as clearly as possible compared to some other programs. Despite this not being my first time using this platform, It also acted as a challenge to figure out tools I had never used before, commands I didn't even know existed and so much more.
Note: Due to a lack of storage and other technical barriers, I was unable to create some small features that I wished to create, but despite this, I strongly believe you will still be able to see, I vision that I had, and hope it allows you to put your feet inside my shoes and see what I see in my mind.
Step 18: The Canvas

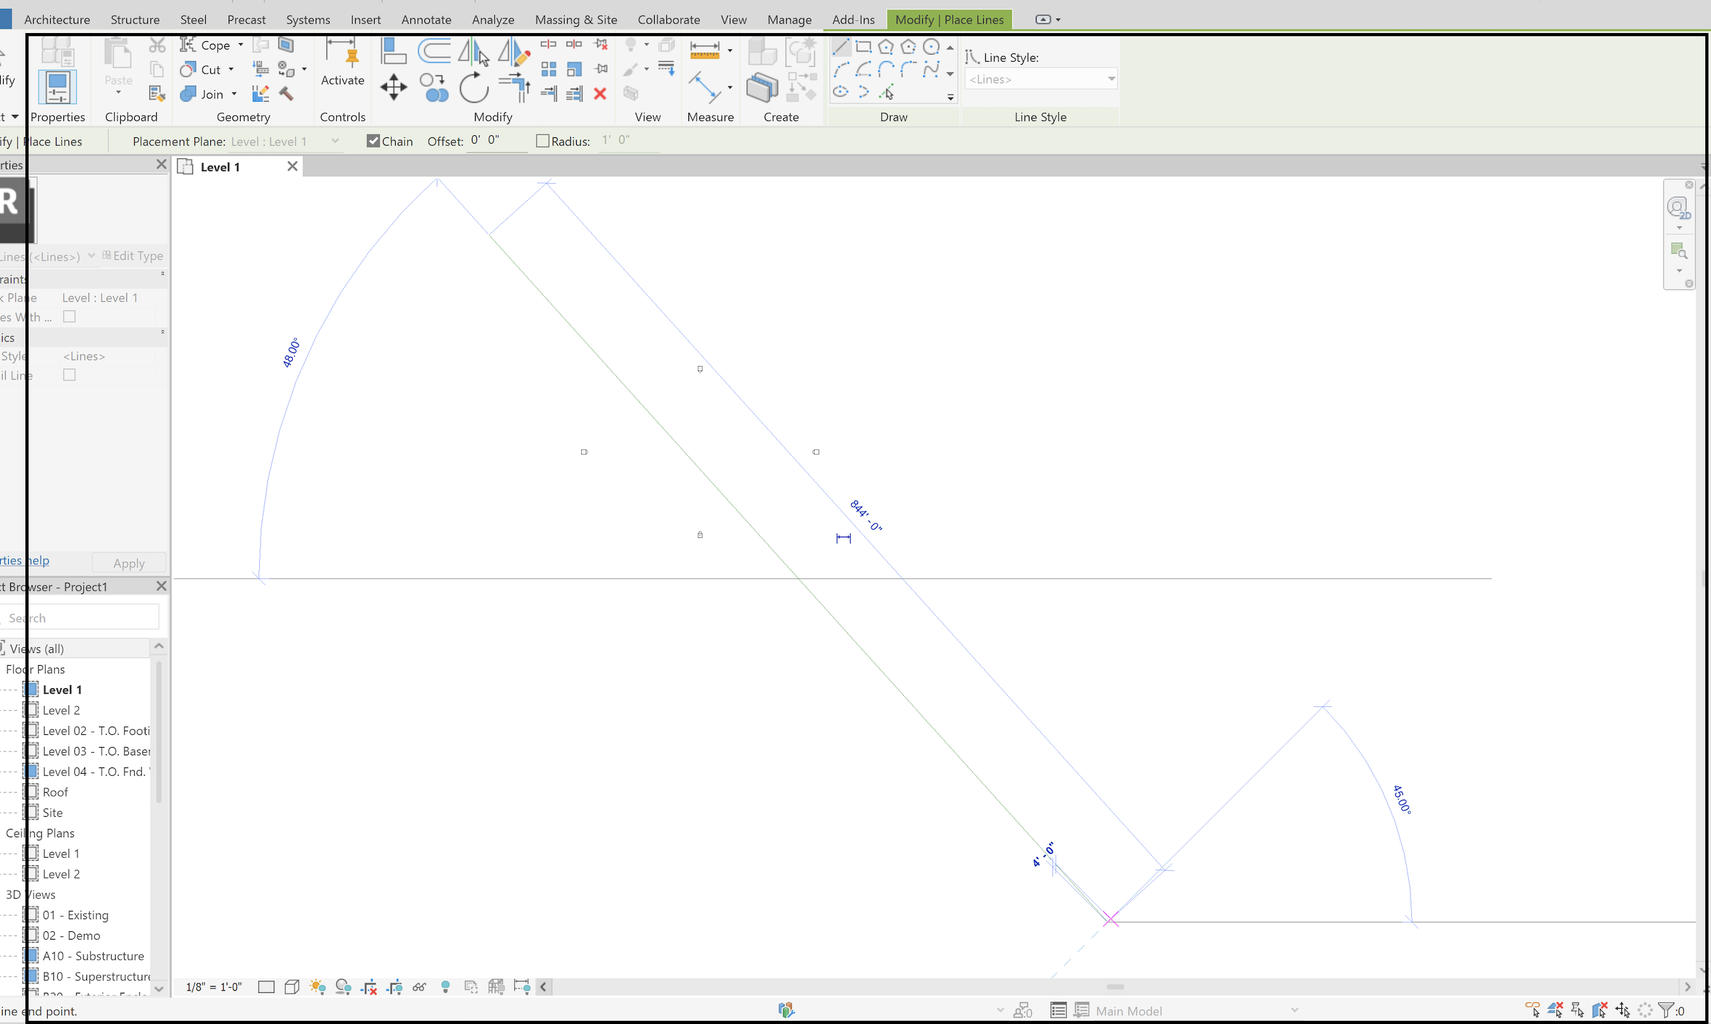
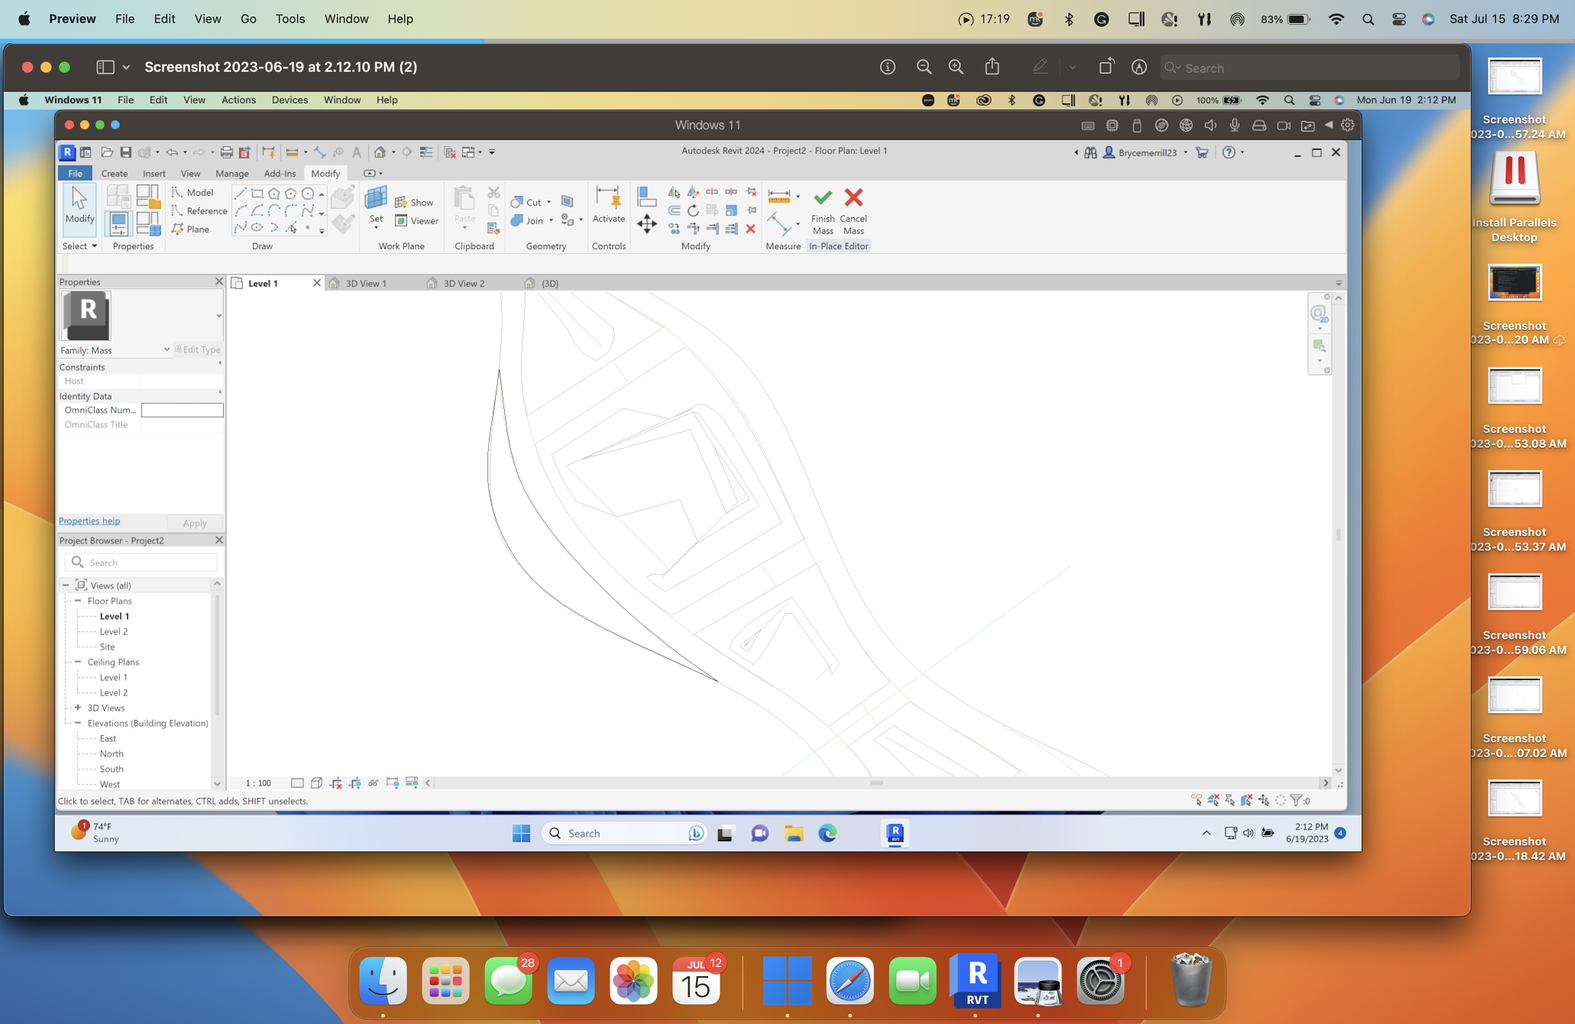
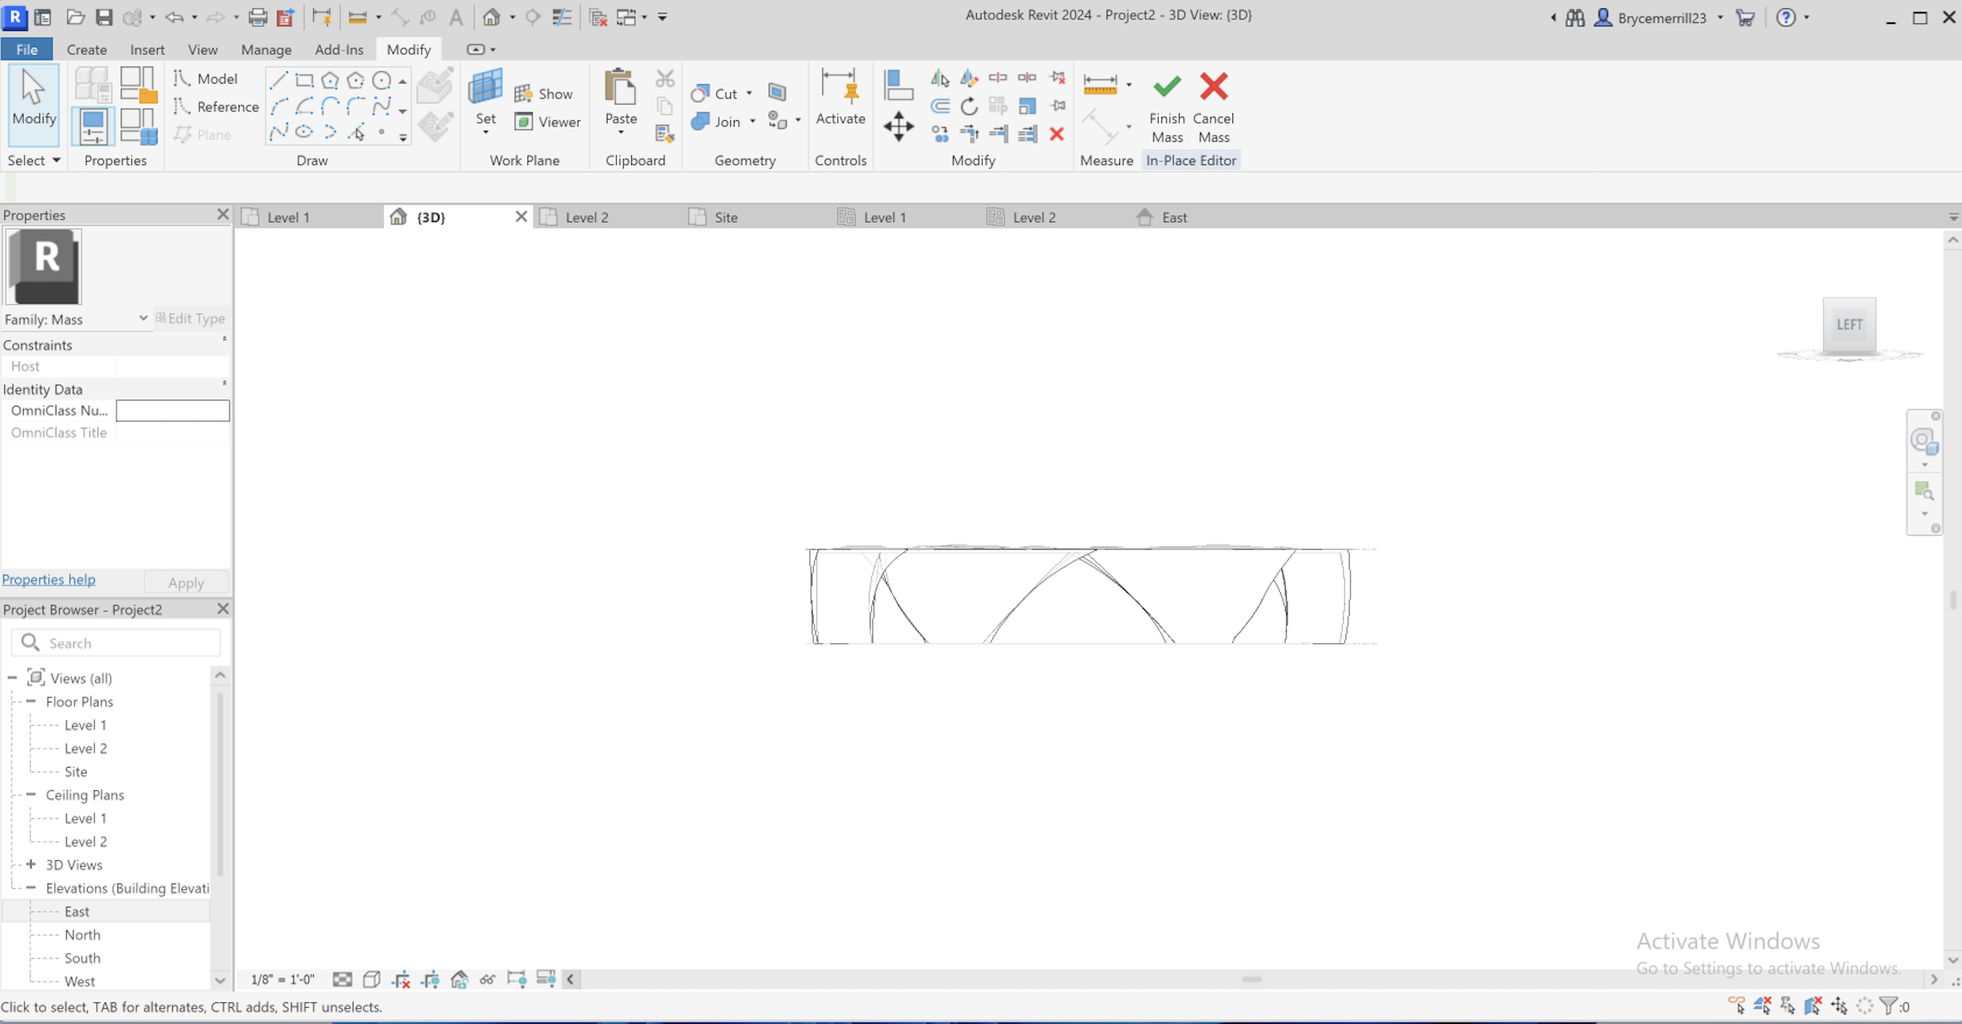
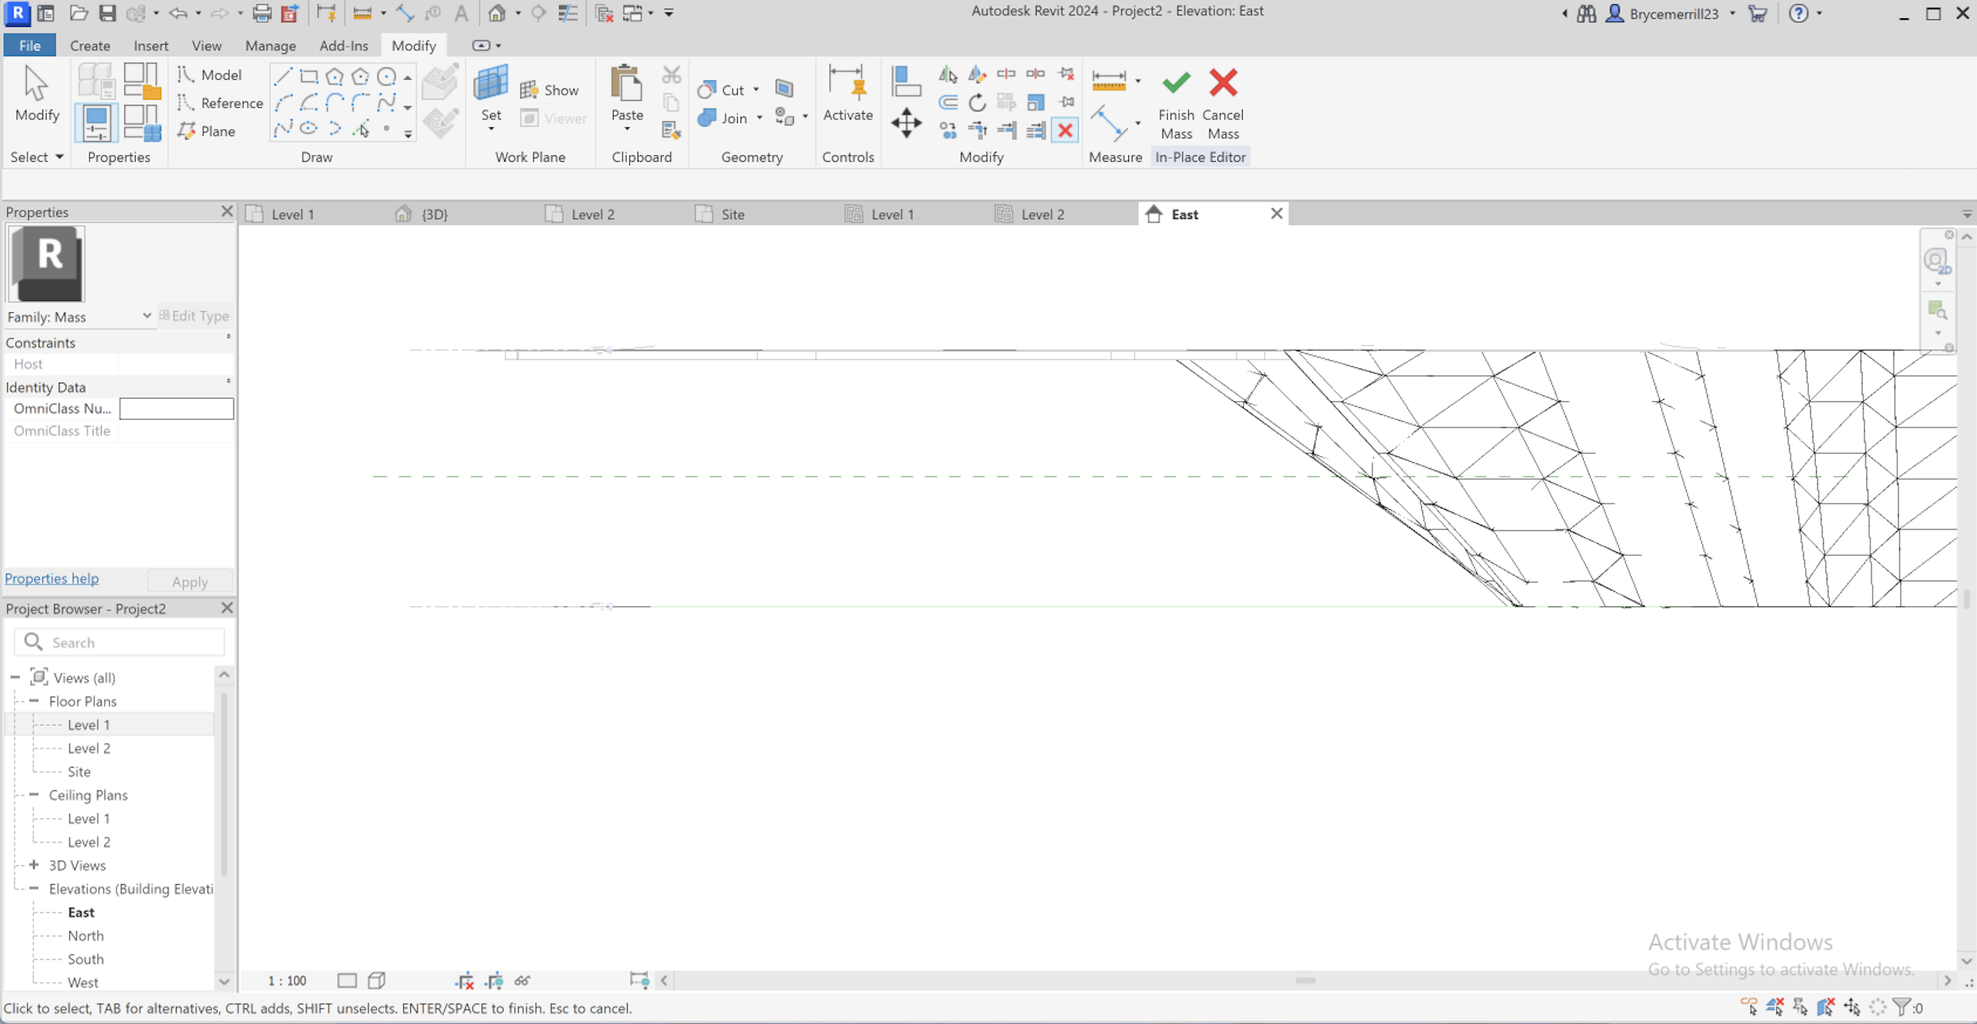
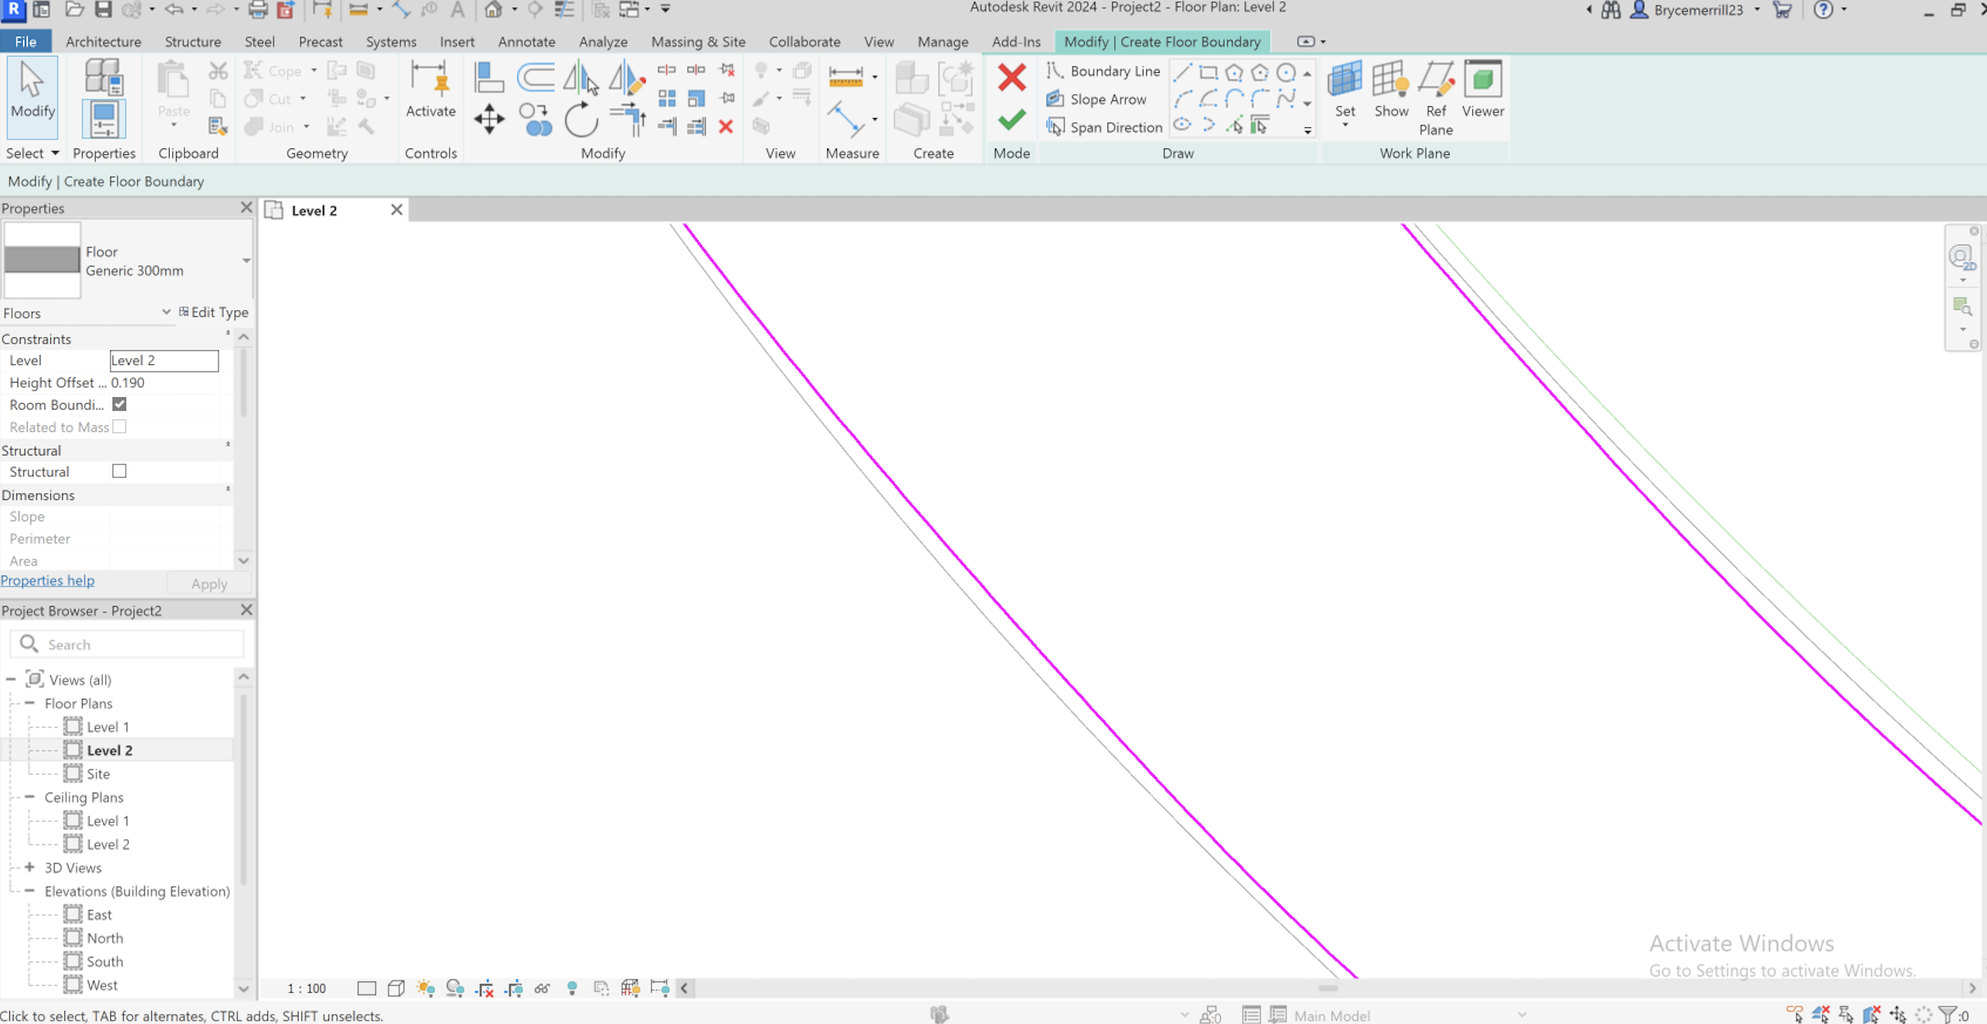
Step 1: image 1- In Revit, I created a reference at the Ange I wanted and then more lines in the shape of a double helix using the spline tool, extending the curves on opposite sides to serve as the foundation for lookout points.
Step 2: Using the modified tool, I shaped the helix to achieve a smooth and continuous flow, ensuring an elegant and visually appealing structure.
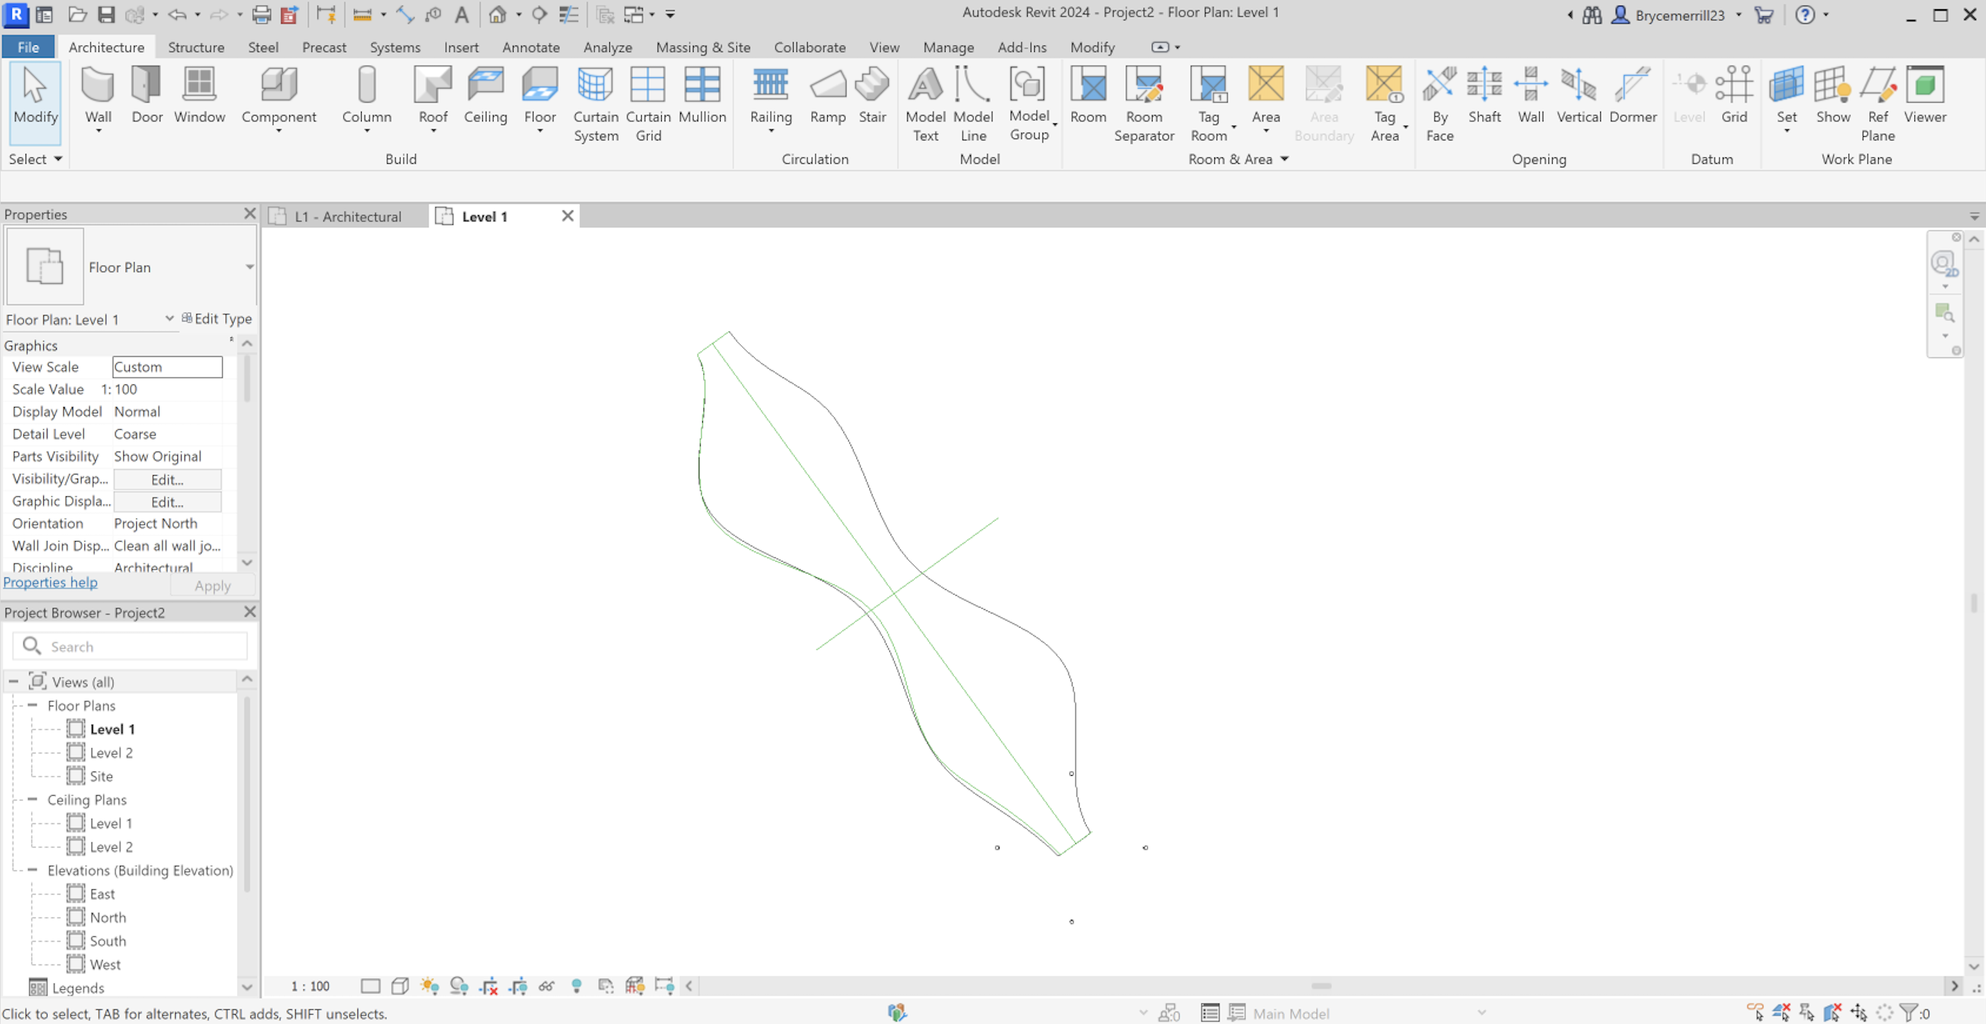
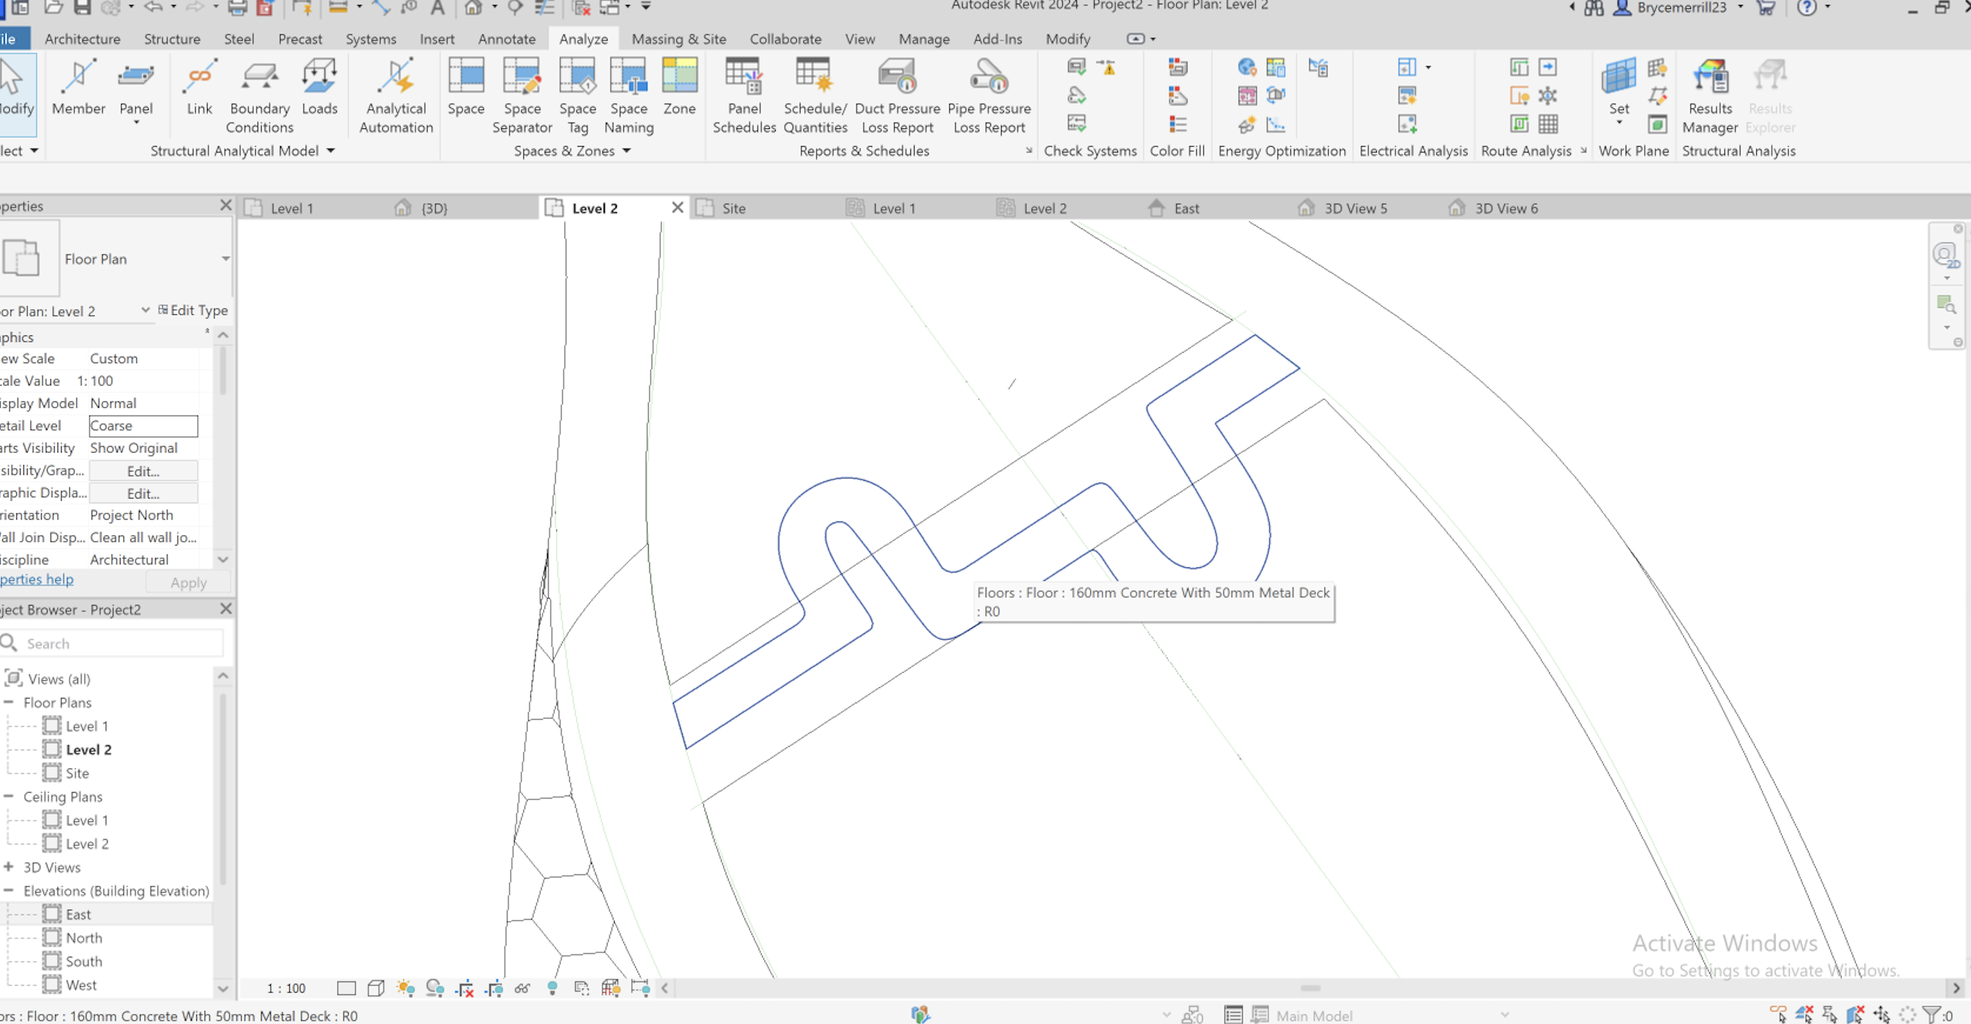
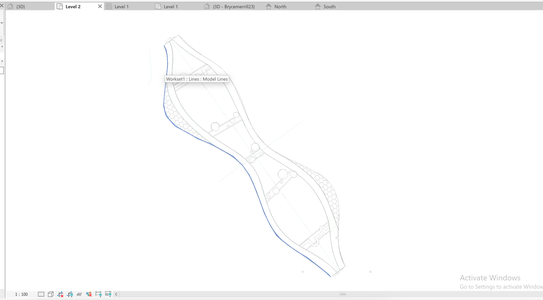
Step 3:image 2 - With the helix design finalized, I utilized the "Floor" tool to create a well-supported base structure capable of bearing the load.
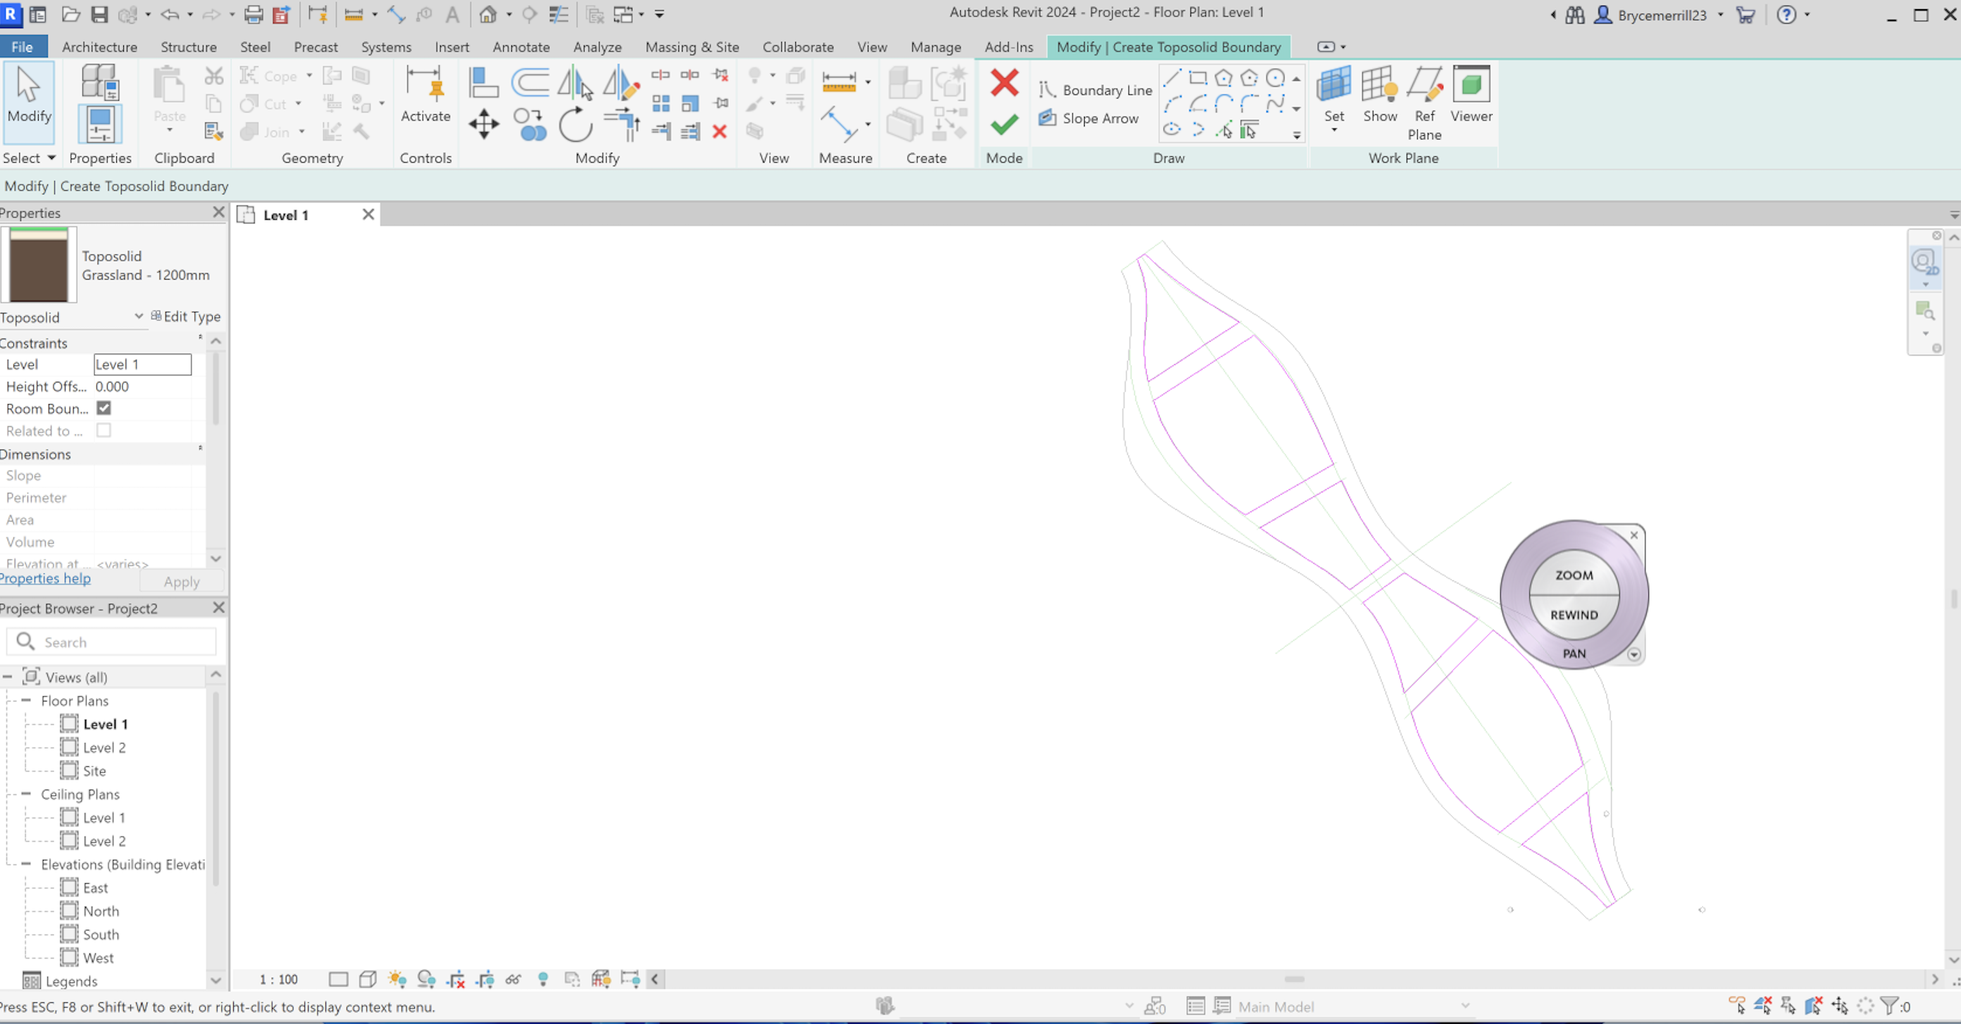
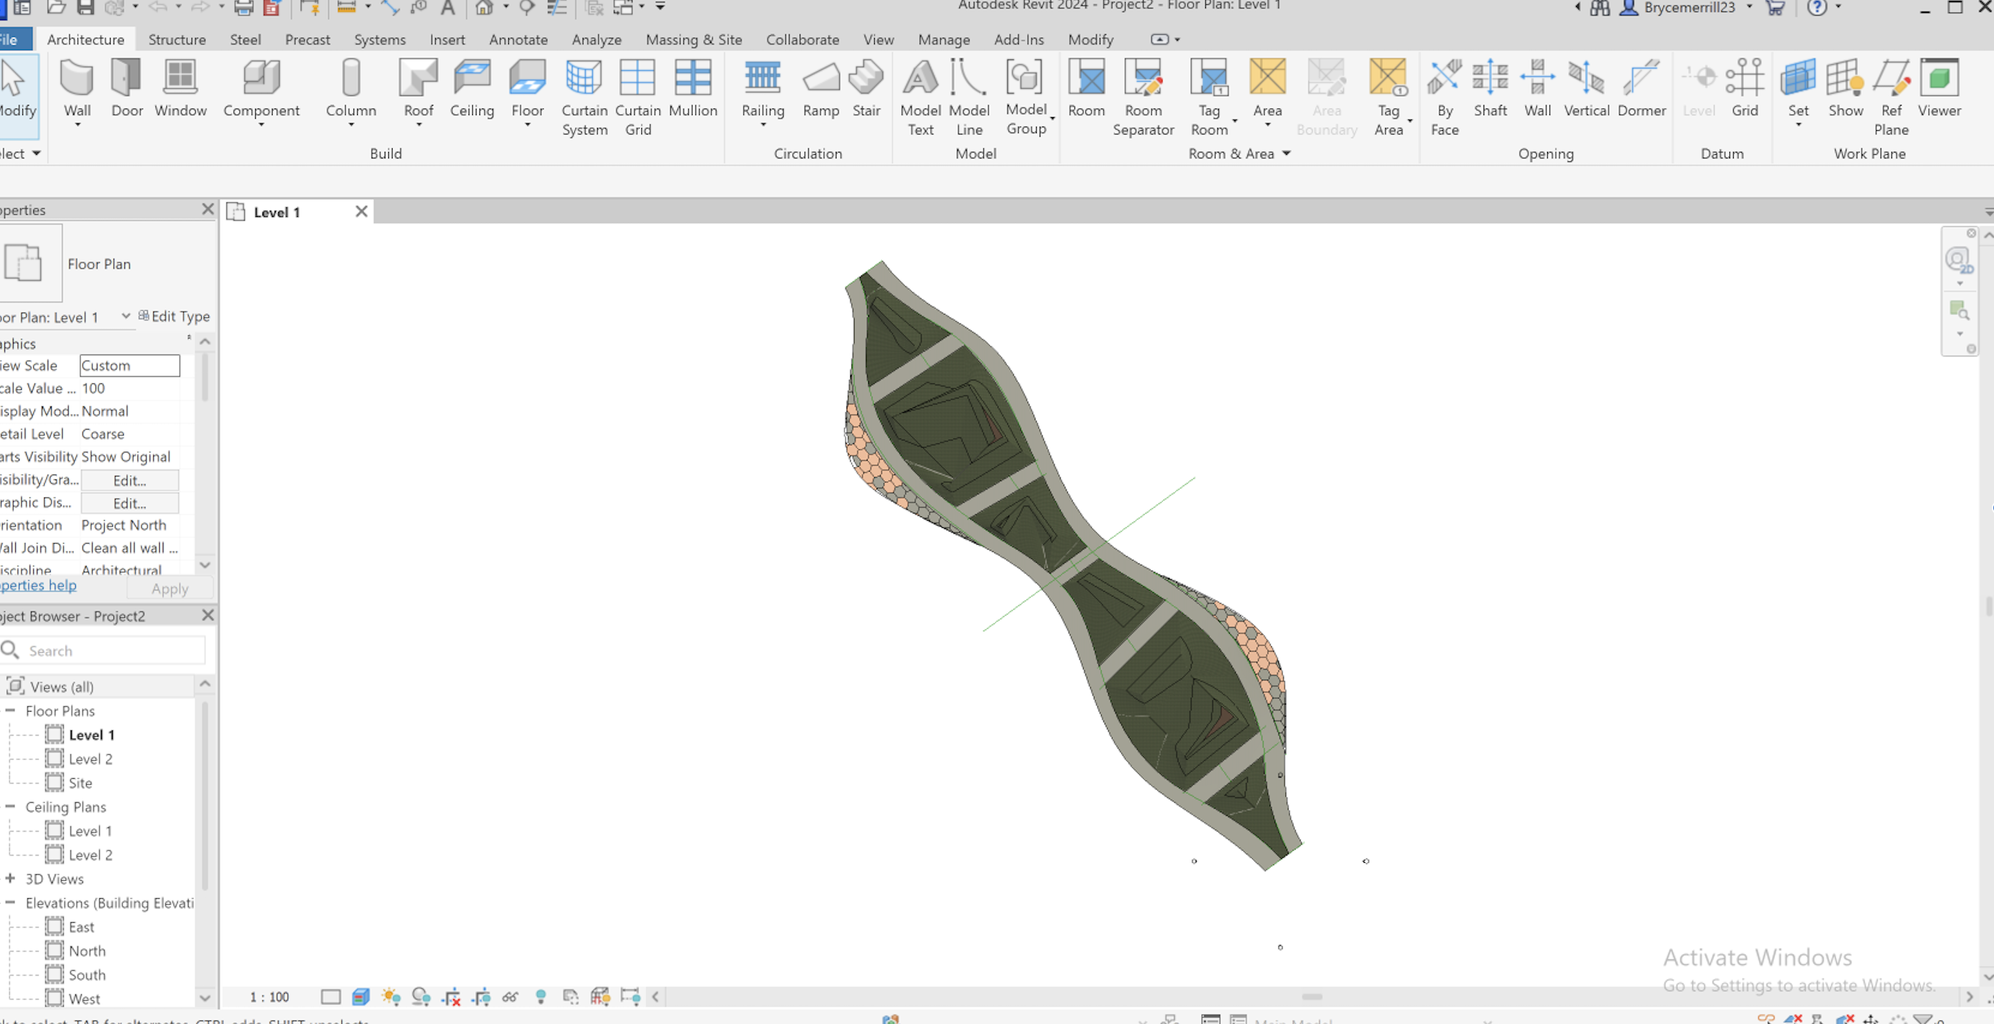
Step 4: images 3-4 Next, I used the "Model" tool to divide the helix into distinct areas, including green spaces, walkways, pedestrian crossings, and lookout points. This division allowed for a more focused approach when refining and detailing each element of the bridge which I could use later.
Step 5: image 3 - For the lookout points, I carefully positioned spaces that seamlessly blended with the helix's design, offering panoramic views of the surroundings.
Step 6: image 3 - The walkways were shaped to follow the helix's curves, providing ample space for pedestrians and cyclists.
Step 7: Throughout the process, I paid close attention to the structural aspects, ensuring that each element was properly supported and capable of withstanding various loads and stresses, which were mainly posed on just the materials used.
Real Life
In the real-life section of the bridge design process, the especially in the base structure the attention is put on specific properties and characteristics of the chosen materials, concrete and steel, to ensure the stability and load-bearing capacity of the helix bridge.
After scheduling the full construction of other similar bridges here is the process that i found would be the best, reminder that I am not a professional, so make sure to correct me in the comments. I would love to learn.
Concrete Foundation and Supports:
- Concrete Mix Design: Carefully select the concrete mix to achieve the desired strength and durability (depends on climate and other factors). High-strength concrete mixes are commonly used for bridge foundations to withstand heavy loads and resist compression forces (always tacking in enviromental factors).
- making sure to add piezoelectric technology in the structure
- Reinforcement with Steel Bars (Rebar): To enhance the concrete's tensile strength, steel bars are embedded within the concrete foundation. The rebar acts as internal support, preventing cracks and failure caused by tension forces that may occur due to loads or environmental factors.
- Geotechnical Investigation: Before construction begins, extensive geotechnical investigations are conducted to assess the soil conditions and determine the appropriate design for the foundation. Soil bearing capacity, settlement analysis, and other factors are considered to ensure a stable and long-lasting foundation. (I am actually working with a research facility working directly with this, and I never knew how much soil can affect the structure, for under different loads/stresses, stuff like earthquakes, all soil acts differently.)
- Deep Foundations (if required): In some cases, depending on the soil conditions and load requirements, deep foundations like piles or caissons may be used to provide additional support and stability.
Steel Structural Elements:
- Steel Grade Selection: Depending on concrete and other factors such as sustainability engineers will choose the appropriate grade of steel based on its mechanical properties, including yield strength and tensile strength. These properties dictate the steel's ability to withstand loads and deformation.
- Computer-Aided Design: Advanced computer-aided design (CAD) software is used to model and analyze the complex double-helix design. This enables engineers to optimize the steel structure's dimensions, minimizing material usage while maintaining structural integrity.
- Corrosion Protection: Since bridges are exposed to outdoor environments, steel components are protected against corrosion through techniques like galvanizing or applying protective coatings. This helps extend the life of the structure and maintain its load-bearing capacity over time.
Load-Bearing Capacities (discuss more later on) :
- Dead Loads: Engineers account for the self-weight of the bridge and any stationary objects permanently attached to it, such as railings or lighting fixtures.
- Live Loads: The bridge's intended use by pedestrians, cyclists, and potential vehicular traffic is carefully considered. We will need analyze the maximum expected live loads and ensure the steel and concrete components can handle them safely.
- Environmental Loads: The bridge must withstand environmental forces like wind, temperature changes, and seismic activity (this is different for each location).
Overall, the combination of meticulous material selection, structural analysis, and adherence to safety standards ensures that the this bridge remains a reliable and aesthetically pleasing structure for generations to come.
Step 19: The Out Look

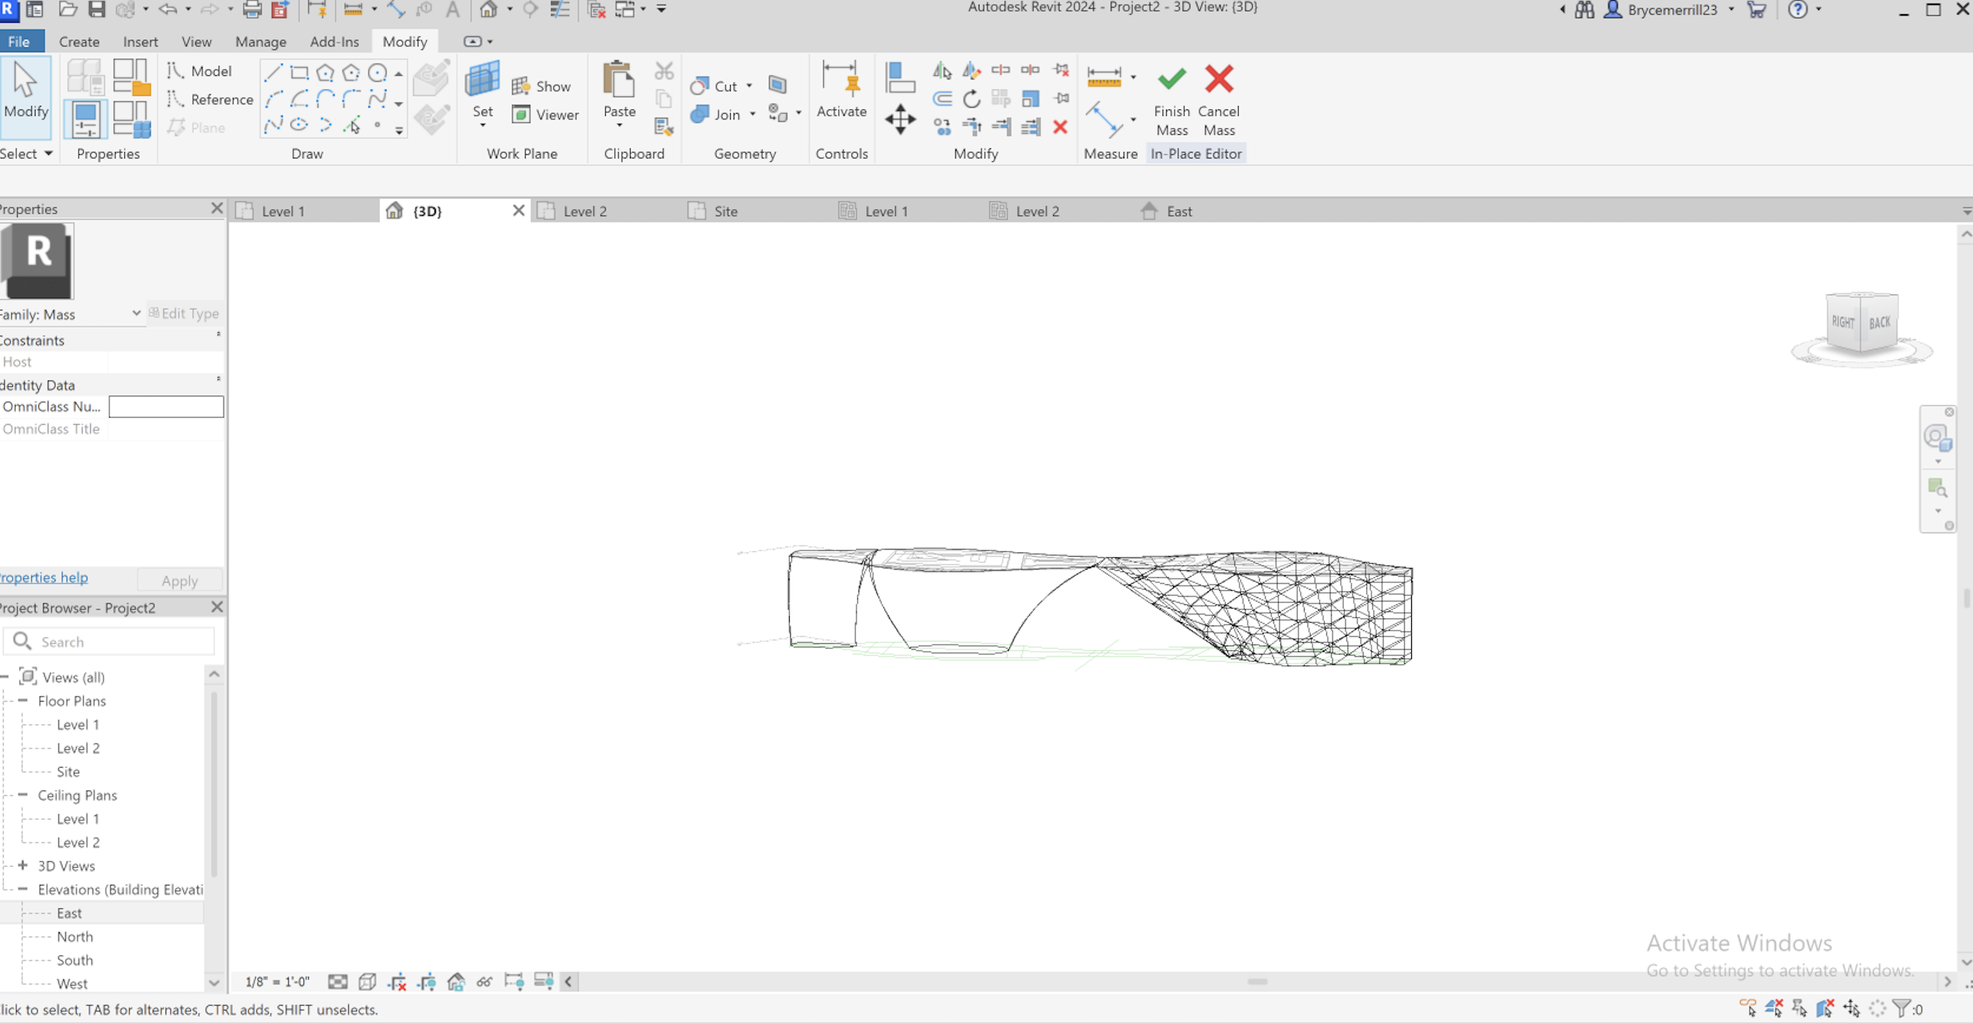
Step 1 (image 2 - First I created mass to serve as a form)
- First I selected the in-place mass toll and named it
- Next on two separate lines, I created my desired form which I formed in the step above.
- Finally, I selected both curved lines and pressed "create mass"
Step 2 (Image 3 - The Perfect hexagon shape that I assigned to the mass)
- Perfect Hexagon - I first selected the architecture design template, which provided me with a suitable environment to work on this element.
- To better understand the pattern in a three-dimensional context, I switched to the 3D view, allowing me to visualize the design from various angles and perspectives.
- Within the "Massing & Site" tab, I accessed the "In-Place Mass" option. This feature allowed me to create a custom mass element, providing me with the flexibility to design and experiment freely.
- Using the drawing tools available, I sketched a line within the mass element. It was crucial to ensure the line's length was set precisely to 1600 units, aligning with my design specifications.
- With the line in place, I employed the "Create Form" tool to extrude the line along the Z-axis, extending it vertically to achieve a desired height of 8 meters. This step transformed the line into a solid surface, forming the foundation for the hexagonal pattern.
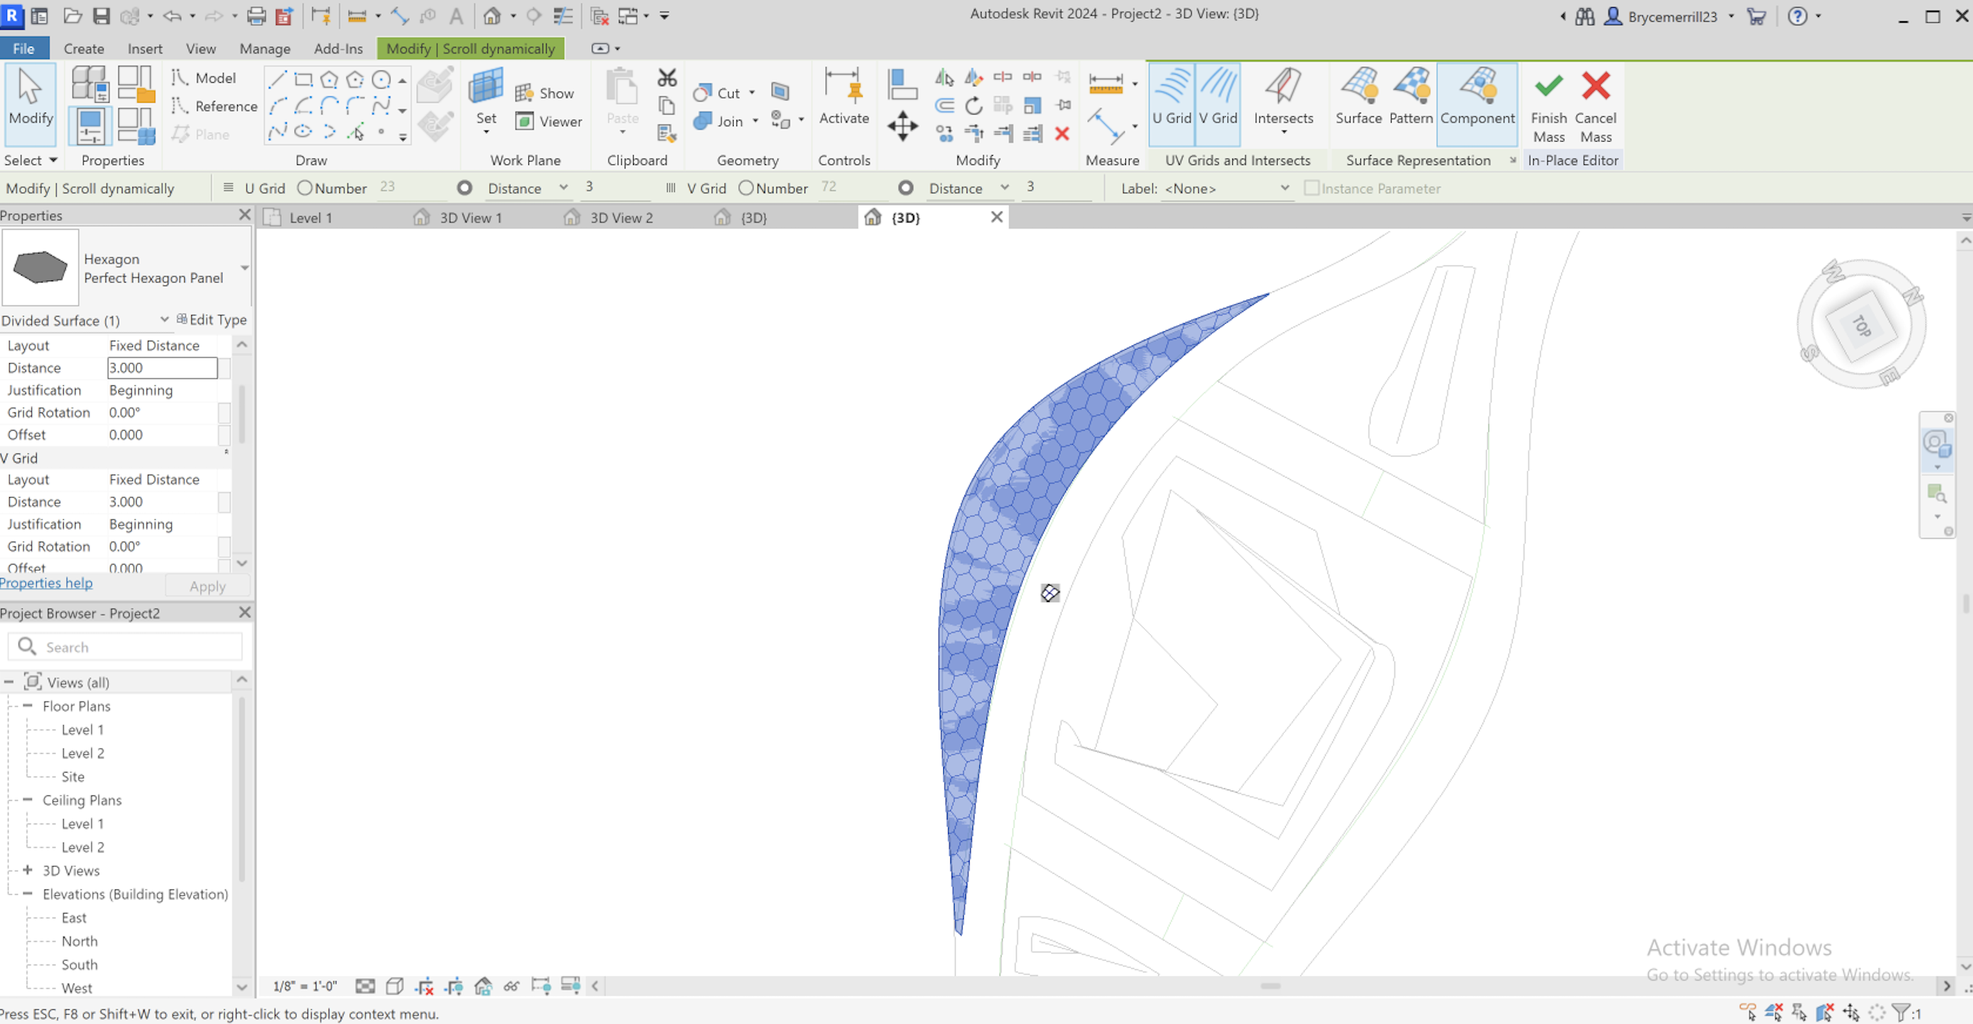
Step 3 (image 4 - applying the perfect hexagon to the mass)
- The next step involved dividing the surface into a grid of hexagons. Utilizing the "Divide Surface" feature, I carefully applied the hexagonal pattern to the surface. This process automatically generated a network of hexagons, creating an intricate and visually captivating design.
- To refine the pattern further, I accessed the properties panel, which provided a range of options to customize the hexagonal pattern. I meticulously explored and evaluated the available choices, ensuring the selected option aligned harmoniously with my design vision.
Real Life :
Step 1: Concrete Pouring and Forming
- High-strength and sustainable concrete mix, as specified in the CAD design, would be mixed and poured into the prepared formwork. Care would be taken to ensure the concrete is evenly distributed and compacted to avoid air pockets.
- And specifically adding the piezoelectric technology - for clean energy collection
- Workers may use vibrating equipment to ensure proper compaction and eliminate any trapped air bubbles.
- The concrete would be allowed to cure and gain sufficient strength. The curing time would depend on the concrete mix used and environmental conditions.
Step 2: Form Removal and Surface Preparation
- Once the concrete has cured to the required strength, the formwork would be carefully removed, revealing the concrete mass in the shape of the perfect hexagon.
- Surface finishing would be done to ensure the exposed concrete surface is smooth and free from defects. Techniques like polishing, sandblasting, or using form liners for specific textures can be employed to achieve the desired appearance.
Step 4: Dividing the Surface into Hexagons
- Once both the concrete and wooden hexagons are ready, the pattern would be laid out on the concrete surface.
Step 5: Finishing and Customization
- Surface treatments, such as staining or coloring, could be applied to enhance the visual appeal of the hexagonal pattern.
- Other decorative elements or finishes may be added to complement the overall design and integrate the outlooks harmoniously with the surrounding environment.
Step 20: Hills
Hills - How they were created?
- Establishing Elevations: I determined the elevations at which the green hills would be placed, considering the natural topography of the site and ensuring smooth transitions between the hills and the bridge's walkways.
- Creating Toposurface: In Revit, I used the Toposurface tool and places barriers so that they would along with the spaces of the hills within the bridge. I input elevation points and adjusted the contour lines to match the desired elevations for the hills.
- Modeling the Hills: Using the Create Mass tool, I modeled the individual green hills on the toposurface. I considered the dimensions and shapes of each hill, ensuring they blended harmoniously with the surrounding landscape and walkways.
- Refining the Shape: To achieve the cascading effect of the hills, I adjusted the mass shape and sculpted the terrain using the Modify Mass tool. I paid close attention to the flow of the land, creating gentle slopes and natural undulations.
- Adding Vegetation: Once the basic hill shapes were finalized, I proceeded to add vegetation using the Revit Planting tool. I selected native plants and trees that suited the local climate and soil conditions, ensuring the sustainability and ecological impact of the greenery.
Real Construction:
Constructing the green finish and waterproofing layer on the bridge involves careful planning, selection of appropriate materials, and precise installation techniques to ensure the longevity and aesthetic appeal of the structure. Here's a step-by-step guide on how this can be accomplished (I go into more info later on about the layering Step 26):
Step 1: Surface Preparation
- Clean and Level Surface: Ensure that the surface where the green finish will be installed is clean, free from debris, and appropriately leveled.
- Waterproofing Layer: Apply a specialized waterproofing membrane to the surface. This layer acts as a barrier to prevent water from penetrating the underlying structure.
Step 2: Installation of Protection Geotextile
- Unroll the Geotextile: Place the protection geotextile over the waterproofing layer. This geotextile acts as a safeguard, protecting the waterproofing membrane from potential damage during the installation and maintenance of the green finish.
- Secure the Geotextile: Secure the edges of the protection geotextile to prevent movement during subsequent installation steps.
Step 3: Adding Drainage Core and Filter Geotextile
- Drainage Core Installation: Lay the drainage core over the protection geotextile. The drainage core contains reservoirs that facilitate efficient water drainage, preventing water buildup on the green areas.
- Filter Geotextile Placement: Place the filter geotextile over the drainage core. The filter geotextile allows water to pass freely into the drainage core while preventing any clogging from overfilled materials.
Step 4: Installing ABG Roofdrain
- ABG Roofdrain Application: Lay the ABG Roofdrain material on top of the filter geotextile. This drainage composite and geotextile provide an effective drainage system for the green structure.
- Secure the ABG Roofdrain: Ensure that the ABG Roofdrain is firmly in place, with proper overlap and connection between adjacent sheets to create a seamless drainage system.
Step 5: Green Finish Installation
- Vegetation Selection: Choose appropriate vegetation, such as grass, shrubs, or trees, that suits the local habitat and climate conditions.
- Planting and Landscaping: Plant the selected vegetation on the green areas of the bridge. Proper landscaping techniques should be employed to achieve an aesthetically pleasing and natural appearance.
Step 6: Perforations and Channels
- Construction of Perforations and Channels (go into more depth in step 29) : Construct the perforations and channels to facilitate efficient drainage of excess water away from the green areas and the bridge structure.
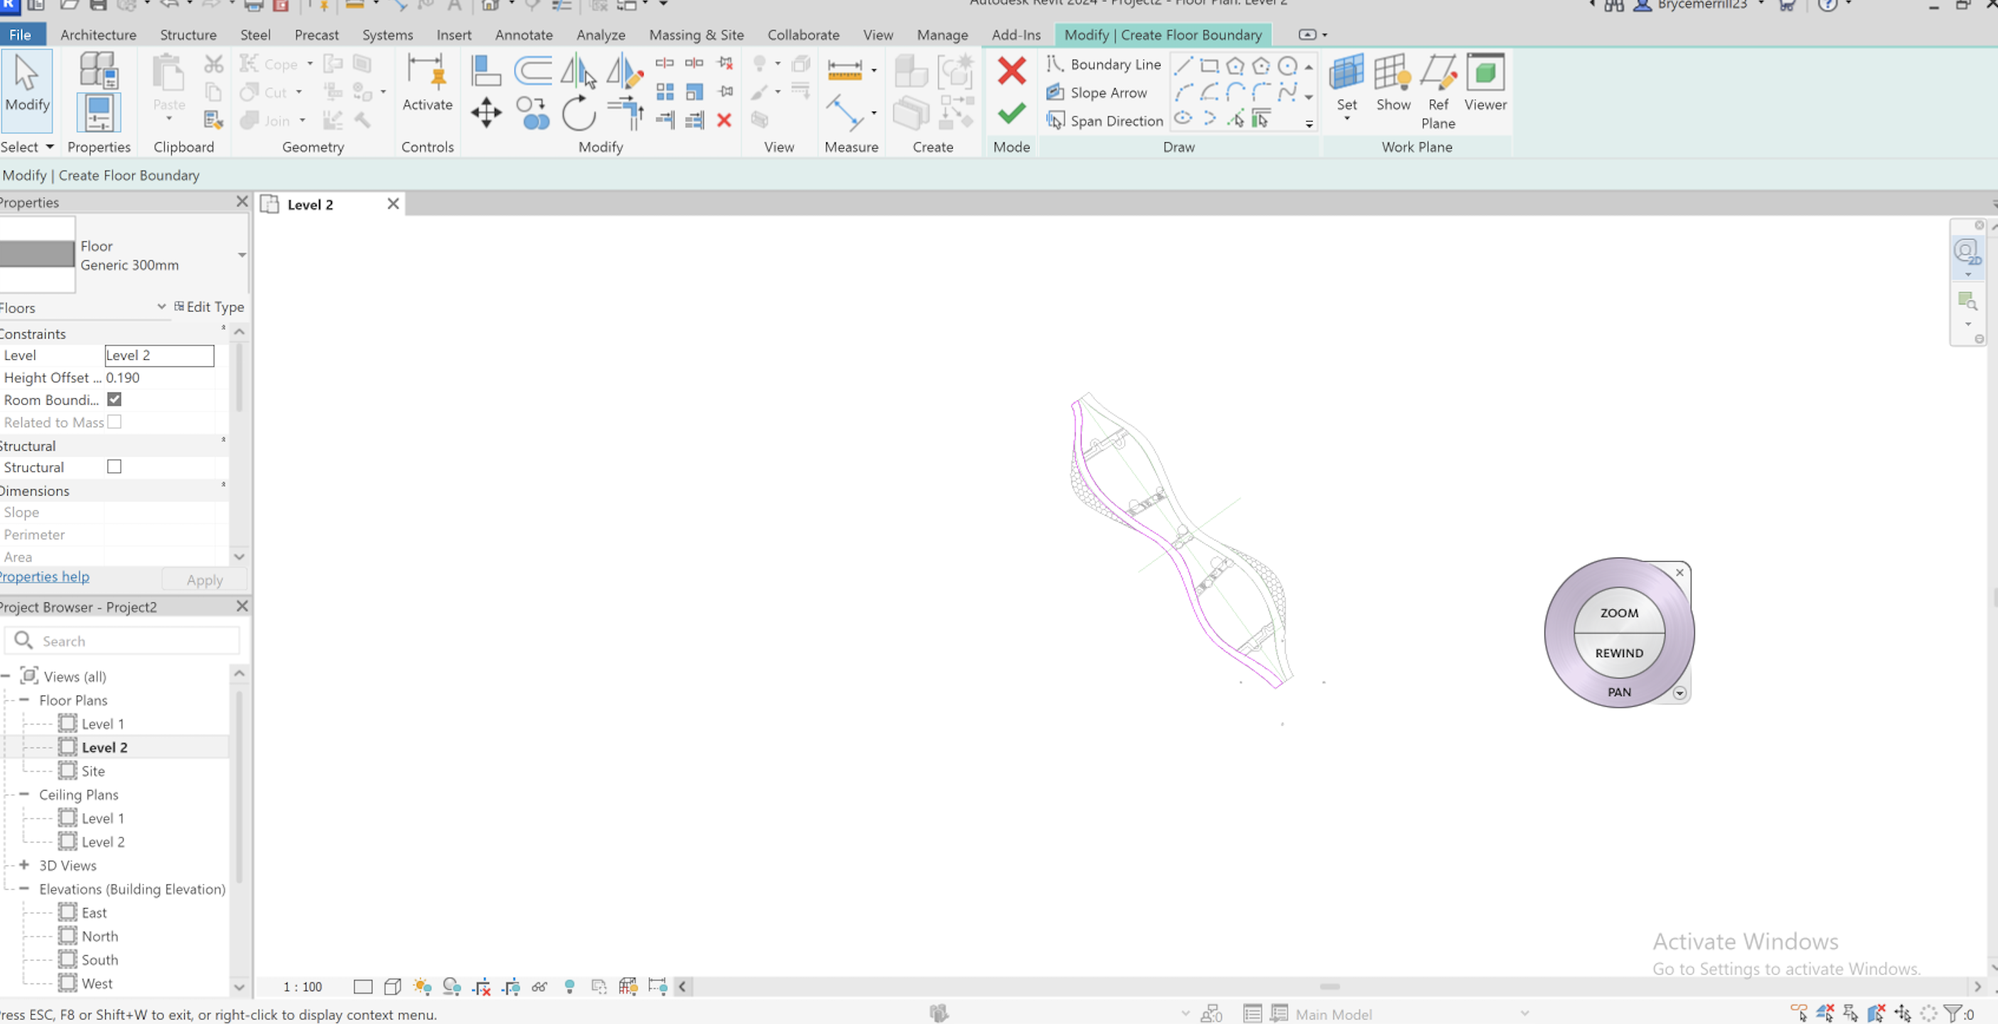
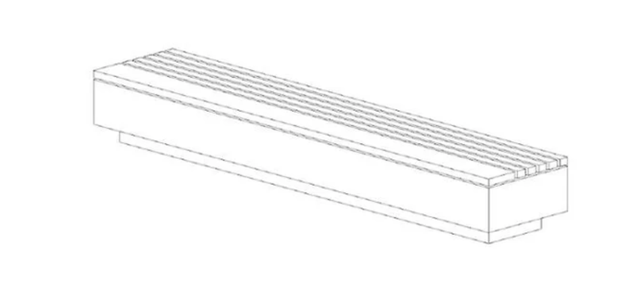
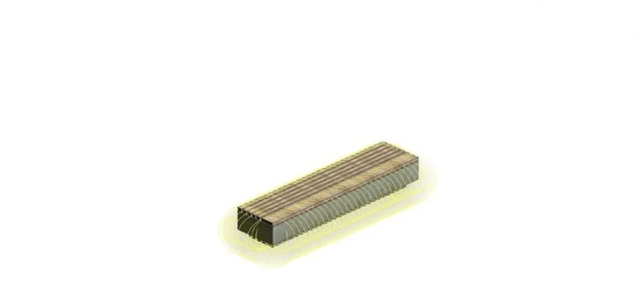
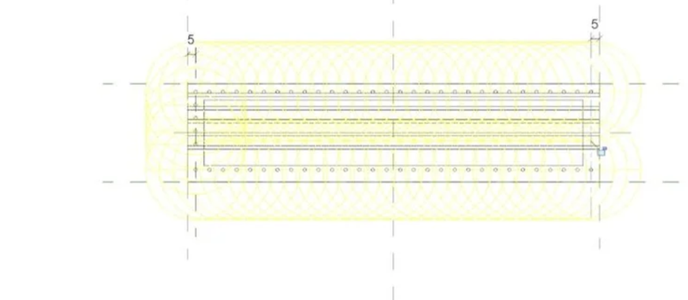
Step 21: The Base/structure
Step 1: I went ahead and used the Create Mass tool to bring my bridge's base structure to life. Making sure it perfectly aligned with my overall design concept was crucial at this stage.
Step 2:(image 5) Establishing a reference plane became my guide for placing and elevating the walkways in sync with the bridge's natural flow. It allowed me to maintain a seamless connection throughout the structure.
Step 3: Utilizing the spline tool, I molded the base, midline (where the reference plane was) and the top where the structure of the bridge is. I wanted this base/structure to be fluid and organic shapes, beautifully echoing the curves that carry through the whole design. This step allowed me to add a touch of elegance to the bridge's appearance.
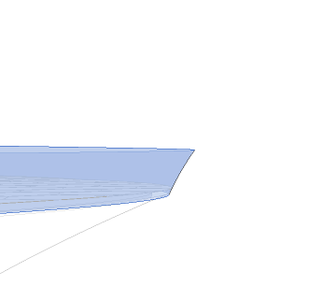
Step 4: (image 3)Next I selected all three levels of forms and used the create mass took to finish the form into a solid.
Step 5: (image 2-3) Then carefully selected materials and textures that perfectly matched the bridge's aesthetic, making sure the colors would uplift the entire structure.
Step 6:(image 1) Now, fine-tuned the positions and structure to get the form I wanted, to achieve an appealing visual flow. My goal was to provide pedestrians with an enjoyable and smooth experience as they moved along the bridge.
Step 22: Walkways -
Step 1: Plan and Conceptualize - Before starting the 3D modeling in Revit, I developed a clear plan and conceptualized the design for the curved and colorful walkways on the bridge. I visualized the desired layout and considered the integration of vibrant colors and bold lines to create an engaging and aesthetically pleasing environment.
Step 2: Establish Reference Lines - Using Revit's reference lines, I determined the layout and alignment of the walkways. These lines served as guides for creating the sweeping curves and bold lines that would define the pathways.
Step 3: (image 2) Create Path Families - To achieve the curved walkways, I utilized Revit's Path families. These families allowed me to customize the shapes and curves of the walkways, ensuring a dynamic and fluid design that harmonized with the rest of the bridge's aesthetics.
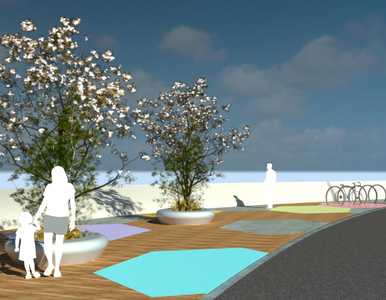
Step 4: (Image 1) Apply Colorful Materials (only to some) - To introduce vibrant colors to the walkways, I applied colorful materials to the path families. I carefully selected a palette of hues that complemented the overall design and added a sense of energy and vibrancy to the pedestrian experience.
Step 5: Adjust Path Width and Bold Lines - To create big and bold lines on the bridge, I adjusted the width of the path families to make them prominent and eye-catching. I also incorporated bold lines using Revit's line tools, strategically placing them to accentuate key areas and guide the pedestrian flow.
Step 6: Fine-Tuning and Review - I meticulously fine-tuned the curves, colors, and lines, ensuring a cohesive and visually captivating design. Regularly reviewing the progress helped me make any necessary adjustments to achieve the desired impact and functionality.
Step 7: Ensuring the walkways were structurally sound was paramount. I paid special attention to the base structure, considering its strength and load-bearing capacity to guarantee safety and stability for everyone using the bridge.
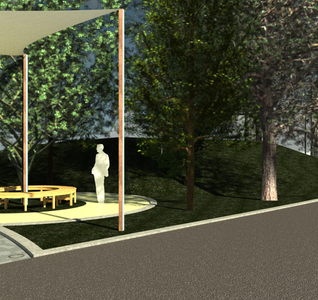
Step 8: (image 1)Adding well-placed lighting fixtures was a smart decision for enhancing safety during nighttime use. The carefully planned lighting also highlighted the bridge's beauty, making it a stunning sight to behold after dark.
Step 9: (image 4) Mindful of practicality, I took into account water flow and drainage on the walkways. Preventing water pooling and ensuring easy maintenance was essential for keeping the bridge in top condition.
Step 10: The final design review was a moment of satisfaction and adjustment. I made sure every detail contributed to a harmonious and aesthetically pleasing base structure with captivating and colorful walkways.
Real-Life Construction:
Creating curved and colorful walkways on the bridge involves a combination of architectural design, engineering, and construction techniques. Here's a step-by-step guide on how to construct these walkways in real life:
Step 1: Plan and Conceptualize
- Design Vision: Develop a clear plan and vision for the walkways, considering the desired layout, curvature, and integration of vibrant colors and bold lines to create an engaging and aesthetically pleasing environment.
- Site Assessment: Assess the site's topography and existing infrastructure to ensure the walkways' seamless integration with the bridge's overall design.
Step 2: Establish Reference Lines
- Surveying: Use precise surveying techniques to establish reference lines and layout points on the bridge. These lines will serve as guides for creating the curved walkways.
Step 3: Create Path Forms
- Formwork: Construct formwork to shape the concrete or other materials that will form the walkways. Use the established reference lines as a guide for creating the desired curves and shapes.
- Reinforcement: Install steel reinforcements within the formwork to provide strength and stability to the walkways.
- Concrete Placement: Pour sustainable and air-rated concrete into the formwork and use appropriate techniques to achieve the desired curved design of the walkways.
Step 4: Apply Colorful Materials
- Color Selection: Choose high-quality and durable materials in a palette of vibrant colors that complement the bridge's overall design concept.
- Material Application: Apply the selected colorful materials to the walkways' surfaces, creating a visually appealing and dynamic environment.
Step 5: Structural Considerations
- Base Structure Evaluation: Ensure the bridge's base structure, including its foundation and load-bearing capacity, is structurally sound and capable of supporting the additional weight of the walkways.
- Safety Measures: Implement safety features, such as handrails and anti-slip surface treatments, to enhance pedestrian safety.
Step 6: Lighting Installation (more on step 28)
- Lighting Plan: Develop a lighting plan to ensure proper illumination of the walkways during nighttime use.
- Light Fixture Installation: Install well-placed lighting fixtures that enhance safety and highlight the bridge's beauty after dark.
Step 7: Water Flow and Drainage (more on step 29)
- Drainage System: Implement a drainage system to prevent water pooling on the walkways. This system should efficiently channel water away from the surface to ensure easy maintenance and prevent water-related damage.
Step 23: Railing
Step 1: I went ahead and used the Create Mass tool to bring my bridge's railings to life. I used this tool because do to the unique structure/form of my bridge I was unable to use the traditional tool to create the form precisely.
Step 2: Establishing a reference plane became my guide for placing the second model to establish the height, I made sure the height of the railing alleged with the standard height of railing for bridges in California (which is "42 inches nominal")
Step 3: (image 3)I the first flow of the railings I carefully designed, so it would blend and have the same flow as the base of the structure, I did not want it to be straight up and down so that is why I made the second line of it from a little wider than the baseline to give it the flow and strut I wanted.
Step 4: (image 2) Next I selected all two levels of forms and used the create mass tool to finish the form into a solid. And assigned it the material to match the base of the base.
Step 24: Bench Family
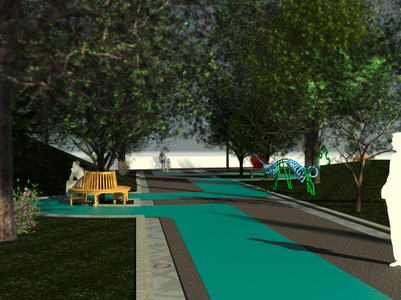
This bench has unlocked new realms of creativity in Revit for you, particularly in the realm of lighting. It's a unique piece that comes to life at night with its dynamic lighting fixture at the base, creating a captivating and enchanting display. I carefully selected materials that add a touch of sophistication and tie into the central theme of the project, giving the bench a distinct and elegant flair.
Step 1 - Creating the Metric Furnisher Family (image 2) :
- Begin with a Metric Furnisher Family Template: To start designing the bench, I selected a metric furnisher family template, which provides a standardized starting point for creating furniture elements.
- Construct the Bench Width: Using reference lines, I accurately represented the width of the bench, which measures 60cm. This ensured that the proportions and dimensions of the bench are precise.
- Define Placement and Dimensions: More reference planes were added to indicate the positioning of each part of the bench and their respective dimensions. These reference planes helped maintain alignment and consistency during the design process.
- Adjustable Length: Additional reference planes were introduced to make the bench length adjustable. By utilizing the dimension tool, the bench could be easily customized to fit various project requirements.
- Assigning Materials: To add realism to the model, materials were assigned to each element. The base and bulk of the seat portion were given a concrete material, while the top wooden seating pad received a wood material matching the wooden facade used in the project to create a cohesive design language.
- Creating the Wooden Seating Pad: Using the rectangle tool and copy-paste functionality, I constructed the unique wooden seating pad on top of the concrete base. This distinctive design element adds visual interest and ties the bench back to the overall architectural theme.
Step 2 - Implementing Lights (image 3-4):
- Import Metric Lighting Fixture: To incorporate lighting into the family, I imported a metric lighting fixture available in the Revit library. This fixture served as the basis for integrating lighting elements into the bench.
- Directional Light Adjustment: To achieve the desired lighting effect, I added a small extrusion above the lighting fixture, redirecting the light downwards. This adjustment ensured that the light would focus exclusively on the bench area, enhancing its visual appeal and functionality.
- Placement Using Reference Planes: I placed the lighting fixture around the base of the bench, carefully aligning it with reference planes to maintain precision and accuracy in its positioning.
- Mirroring for Symmetry: To create a balanced and symmetrical design, I mirrored the lighting fixture to the other side of the bench. This step ensures that the bench is well-illuminated on both sides.
- Skill Development: Incorporating lights into the family presented a new challenge and an opportunity to acquire new skills. This process allowed me to gain familiarity with lighting fixtures within Revit, enabling me to create customized and aesthetically pleasing lighting solutions.
Step 25: Trees/Landscaping
Step 1: Site Analysis
I carefully conducted a thorough site analysis, assessing various factors to make informed decisions on where to place the trees. By studying sunlight exposure, wind patterns, soil conditions, and the proximity to other structures and walkways, I identified the ideal spots that would maximize the trees' potential and enhance the overall landscape.
Step 2: Select Tree Species
Taking into account the local climate and the site's unique conditions, I personally handpicked tree species that would flourish in this environment. I considered the size of the trees at maturity, their growth rate, and their specific benefits, such as providing ample shade and contributing to air purification. My goal was to choose trees that not only served a functional purpose but also added to the aesthetic appeal of the pedestrian bridge.
Step 3: Create Tree Grid Layout
Drawing from my design expertise, I meticulously crafted a grid layout for the tree placement, ensuring a well-balanced and visually pleasing arrangement. With Revit's precise tools, I artfully positioned and aligned each tree within the grid, achieving a seamless and harmonious distribution across the bridge.
Step 4: Provide Adequate Root Space
With a keen eye for detail, I planned for sufficient root space for each tree, recognizing the critical role it plays in their healthy growth and longevity. By skillfully utilizing Revit's capabilities, I visualized the root space requirements, making sure they harmonized with the bridge's underground utilities and structures.
Step 5: Consider Surrounding Elements
Mindful of the bridge's overall design concept, I thoughtfully considered how the trees would interact with other elements on the bridge. I aimed to create a fluid connection between the trees, walkways, seating areas, and other landscape features. Using Revit's visualization tools, I fine-tuned the tree placement to ensure seamless integration with the surroundings.
Step 6: Sustainability and Maintenance
Drawing upon my commitment to sustainability, I took proactive steps to incorporate eco-friendly practices into the tree placement. I opted for native species that require less water and maintenance, ensuring a greener and more resilient environment. By thoughtfully implementing an irrigation system, I aimed to support the trees' growth while minimizing water consumption. (https://sactree.org/resources/native-trees/) - Native trees in SAC - image 2
Step 26: Use of Wood

The extensive use of wood in the design especially the lookouts is a conscious and intentional decision that holds multiple advantages, both aesthetically and environmentally that stikes close to home.
- Aesthetics and Warmth: Wood exudes a timeless and inviting appeal, infusing the entire structure with a sense of warmth and natural beauty. The natural textures and grain patterns of wood create a soothing and welcoming atmosphere for visitors, making them feel more connected to the environment and the surrounding landscape. The integration of wood into various architectural elements, such as beams, columns, and interior finishes, adds a touch of elegance and craftsmanship to the overall design.
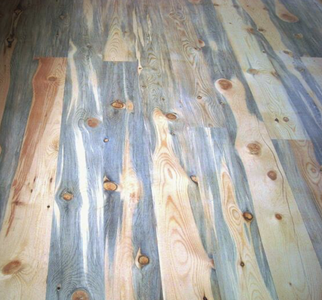
- Bark Beetle Wood and Blue-Stained Wood (image 1): The decision to incorporate bark beetle wood and blue-stained wood is particularly noteworthy. As mentioned earlier, California has been facing severe bark beetle infestations, leading to the death of many trees. Instead of letting these infested trees go to waste, "Rest and Ride" utilizes them for construction, thus salvaging valuable timber that would otherwise be lost. This approach not only helps manage the issue of beetle-infested forests but also prevents additional waste from ending up in landfills.
- Sustainable Material: One of the key reasons for choosing wood is its status as a renewable and sustainable material. Unlike non-renewable resources like concrete and steel, wood comes from forests that can be responsibly managed and replanted. By selecting wood as the primary building material, "Rest and Ride" reduces its environmental impact and aligns with eco-friendly and green building principles.
- Carbon Sequestration: Trees naturally absorb carbon dioxide from the atmosphere during their growth. By using wood from sustainably managed forests, the carbon stored within the wood remains trapped even after being harvested for construction. This process contributes to carbon sequestration, effectively reducing the carbon footprint of the building.
- Fostering Awareness: By prominently featuring bark beetle wood and blue-stained wood in the design, the use raises awareness about the importance of sustainable forest management and the need to address environmental challenges. It serves as a poignant reminder of the impact that climate change and human activities have on our forests and encourages visitors to consider their role in promoting ecological balance.
- Biophilic Connection: The use of wood aligns with the biophilic design concept, which seeks to incorporate natural elements into the built environment to enhance human well-being. Studies have shown that exposure to natural materials like wood can reduce stress, improve cognitive function, and foster a stronger connection with nature.
Step 27: Green Spaces
Green Spaces: Layers and Components
The Green spaces on my bridge were designed with a specific focus on integrating infrastructure with the natural environment while providing essential structural drainage and protection. The design of these green structures involves several layers and components to ensure their sustainability, ecological functionality, and long-term performance. Below is an in-depth exploration of the layers and components of the green areas:
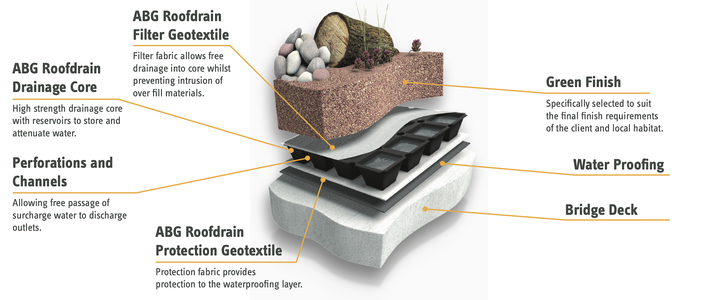
Green Finish and Waterproofing Layer:
The green finish is the top layer, and it is specifically selected to suit the final aesthetic requirements of the client and local habitat. This layer includes vegetation, such as grass, shrubs, or trees, to create a natural appearance that seamlessly blends with the surrounding landscape.
Beneath the green finish, a waterproofing layer is installed to protect the underlying structure from water penetration. This layer ensures that rainwater does not infiltrate into the structural components, preventing potential damage and prolonging the lifespan of the green areas.
Protection Geotextile:
The protection geotextile serves as a barrier between the green finish and the waterproofing layer. Its primary function is to provide protection to the waterproofing layer, preventing any damage that may occur during the installation or maintenance of the green finish.
Drainage Core:
The drainage core is a high-strength drainage layer placed below the waterproofing layer. It contains reservoirs that store and attenuate water, allowing effective drainage and reducing the risk of water buildup that could potentially compromise the structural integrity.
Filter Geotextile:
The filter geotextile is placed above the drainage core and acts as a filter, allowing free drainage of water into the core while preventing the intrusion of overfilled materials. This ensures that the drainage system remains unobstructed and efficiently manages rainwater.
ABG Roofdrain:
ABG Roofdrain is a critical component of the green structure. It is a high-performance drainage composite and geotextile that protects waterproofing systems and provides free-flowing omnidirectional drainage. This efficient drainage system helps in the attenuation of rainwater and mitigates the effects of stormwater.
Perforations and Channels:
The green areas are designed with perforations and channels that allow the free passage of surcharge water to discharge outlets. This feature ensures that any excess water is effectively drained away from the structure, reducing the risk of water buildup and potential structural damage.
References:
- https://www.abg-geosynthetics.com/wp-content/uploads/Green_bridges_and_tunnels.pdf
- http://www.diva-portal.org/smash/get/diva2:994668/FULLTEXT01.pdf
Step 28: Canopies
Step 1 - Creating the Canopy Family:
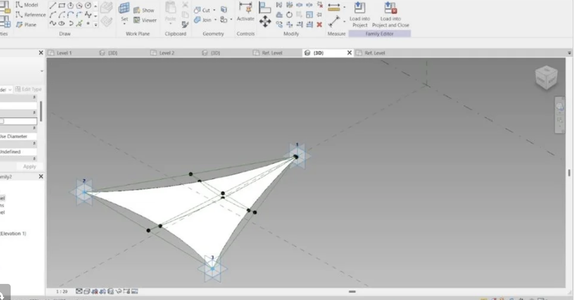
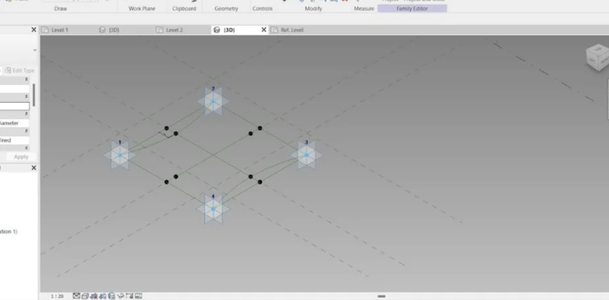
I began by creating a metric generic model adaptive family in Revit for the shade covering. This allowed me to have control over the dimensions and shape of the canopy. I used the point element tool to place points in the desired shape of a rectangle, making them adaptive to ensure flexibility. Then, using the spline tool, I connected these points to form the initial structure. To achieve the wavy and natural look I envisioned, I added more points along the connector lines and used the spline tool again to create the desired curves. This process allowed me to design a visually appealing and dynamic canopy with its curved edges.
Step 2 - Creating Curved Edges:
Continuing from the previous step, I added additional point elements to the newly formed lines and connected them to shape the curved edges of the canopy. This step was crucial in achieving the sail-like appearance I aimed for, as it added fluidity and elegance to the overall design. The interplay of the curved edges with the straight lines gave the canopy a unique and artistic touch.
Step 3 - Generating a Solid Form:
After finalizing the canopy design, I selected the lines representing the structure and utilized the "create a solid form" feature in Revit. This process converted the intricate lines and curves into a solid, three-dimensional form, bringing the canopy to life in the digital model. The 3D representation allowed me to visualize the final result and make any necessary adjustments before incorporating it into the project.
Step 4 - Importing and Placement:
With the canopy family created and its 3D form generated, I imported it into my main project file. I carefully aligned one point of the canopy to the first level of the structure, ensuring a stable connection. To enhance the canopy's aesthetics and functionality, I strategically attached the other two points to nearby trees. This placement not only provided the desired sail-like look but also allowed the canopy to offer shade to the stage area for most of the day and additional shade to surrounding areas, enhancing comfort for various activities throughout the day.
Step 29: Lighting

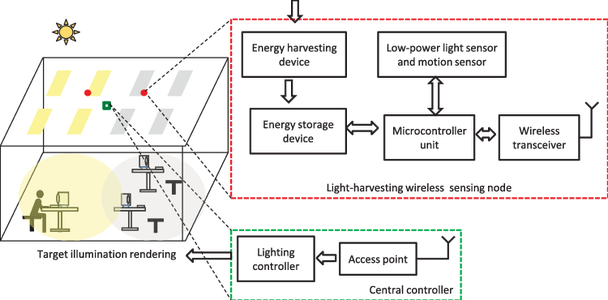
As part of the bridge's design, I incorporated innovative and impactful lighting solutions to enhance the walkways' safety and aesthetics, ensuring a memorable experience for pedestrians and visitors both day and night.
Lighting Design Considerations:
- In researching lighting solutions, I took into account several factors to create an immersive and functional lighting design for the walkways:
- Safety: The primary objective was to ensure the safety of pedestrians using the bridge during nighttime. Illumination played a crucial role in guiding their path and preventing accidents.
- Aesthetics: Lighting also presented an opportunity to enhance the bridge's overall visual appeal, aligning with the artistic theme and creating a captivating experience for users.
- Energy Efficiency: To promote sustainability, I focused on energy-efficient lighting options, utilizing LED technology and other environmentally friendly lighting solutions.
Strategic Placement:
- I strategically placed lighting fixtures along the walkways to achieve optimal coverage and create a pleasant ambiance. The lighting fixtures were carefully integrated into the bridge's structure, ensuring a seamless and aesthetically pleasing appearance.
Pathway Lighting (images 1 and 3):
- For the main walkways, I utilized low-level pathway lighting fixtures. These fixtures emitted a soft and inviting glow that illuminated the path, guiding pedestrians safely across the bridge. The pathway lighting was carefully spaced to provide consistent and uniform illumination.
Accent Lighting:
- To accentuate the bridge's architectural elements and artistic features, I incorporated accent lighting fixtures. These fixtures were strategically positioned to highlight key design elements, adding depth and dimension to the bridge's appearance.
Smart Lighting Control (image 2):
- To optimize energy usage, I implemented smart lighting control systems. These systems utilized sensors to detect ambient light levels and adjust the lighting intensity accordingly. Additionally, the control systems allowed for programmable lighting sequences, enabling the bridge's lighting to complement special events or occasions.
Sources:
https://lightingcontrolsassociation.org/2017/07/21/introduction-to-lighting-controls/
https://bondilights.com.au/the-best-tips-and-tricks-of-outdoor-lighting-placement/
Step 30: Water Management

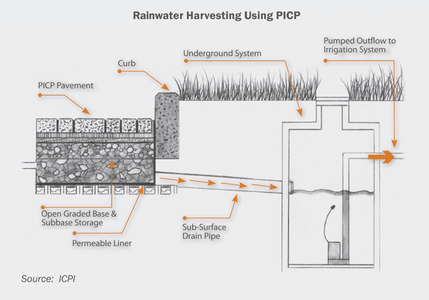
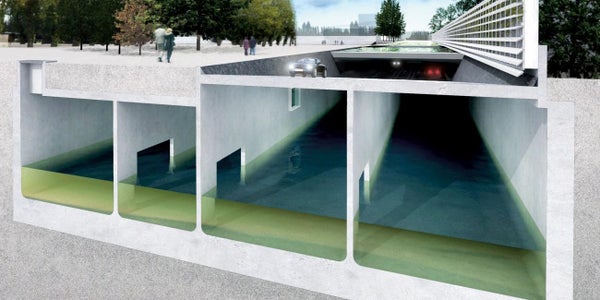
When designing the bridge, I prioritized sustainable and eco-friendly features, and one aspect that stood out was the implementation of a rainwater harvesting system. The decision to integrate this innovative technology into the bridge's drainage system was driven by the desirto promote water conservation, reduce reliance on external water sources, and contribute to the overall environmental resilience of the structure. Also, as Sacramento is prone to droughts and super high temperatures (I am writing this and it is over 100 degrees out right now), it is crucial that no water is going to waste, and when we get water, it is being used effectively.
Down below you will find my research/implementation plan:
Introduction and Design Priorities
- Briefly introduce the bridge design and mention the prioritization of sustainable and eco-friendly features.
- State the significance of the rainwater harvesting system and its role in water conservation and environmental resilience.
Selection of Materials
- Describe the use of porous and permeable materials for the bridge's deck and drainage channels to facilitate natural rainwater flow.
- Explain how this design choice allows rainwater to be easily collected and channeled into the harvesting system.
Rainwater Collection Process
- Describe the journey of rainwater from the moment it touches the bridge's surface.
- Mention the presence of gutters and downspouts that direct rainwater toward a central collection point.
- Highlight the importance of filters to remove debris and impurities before entering the storage tanks.
Rainwater Storage Tanks
- Explain the concealed location of the storage tanks within the bridge's structural elements.
- Emphasize the durability and sustainability of the tank materials.
- Mention the substantial capacity of the tanks to store significant amounts of rainwater during heavy rainfall.
Smart Sensors and Monitoring
- Discuss the integration of smart sensors and monitoring devices.
- Explain their role in assessing weather conditions and water levels in real time.
- Highlight how this data helps in efficient water management and activating irrigation pumps when needed.
Irrigation for Green Spaces
- Describe how the rainwater is used for irrigation purposes.
- Emphasize the positive impact on the local ecosystem and urban biodiversity.
- Highlight the benefits of using harvested rainwater to nourish green spaces along pedestrian walkways.
Non-Potable Water Supply Network
- Explain the integration of a non-potable water supply network for secondary uses.
- Mention specific areas where the harvested rainwater is directed, such as service areas, restrooms, and maintenance facilities.
- Emphasize the reduction in reliance on municipal water sources for non-drinking purposes.
Sustainable Commitment and Conclusion
- Recap the bridge's commitment to sustainability and responsible water use.
- Mention how the rainwater harvesting system sets an example for future eco-friendly infrastructure projects.
- Conclude by highlighting the bridge's harmonious coexistence with nature and its positive impact on the community.
Image One:
In Image One, the implementation of the rainwater harvesting system as depicted in image two.
Sources:
https://www.belgardcommercial.com/resources/news_and_articles/picp_rainwater_harvesting
https://link.springer.com/chapter/10.1007/978-3-030-11084-0_23
Step 31: Renewable Energy
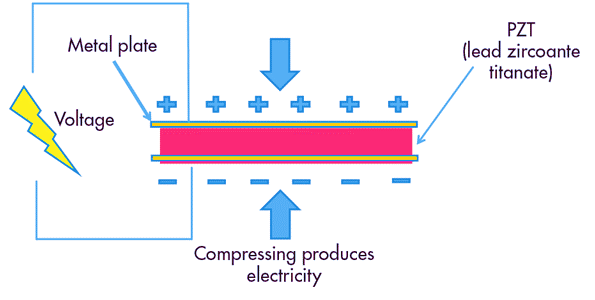
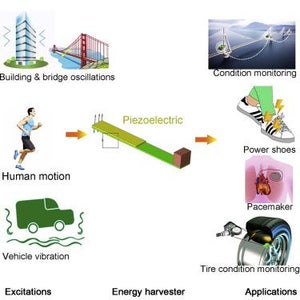
To achieve the goal of making the pedestrian bridge carbon neutral, I researched on energy consumption and sought out solutions that would not disrupt the flow of pedestrian and cyclist traffic or compromise safety. After careful consideration, I identified piezoelectric technology as an ideal solution. Like probably most of you I was completely new to this topic but I learned so much and hope you can to down below.
---
In this project, I am going to utilize innovative piezoelectric technology in my pedestrian bridge to harness mechanical energy from footsteps and bike movement. This energy will be converted into electrical power, contributing to the bridge's sustainability and reducing its reliance on external power sources.
Implementation Plan
To implement piezoelectric technology, I will embed specially designed piezoelectric materials within the walkways of the bridge. These materials will be strategically placed in areas with high foot traffic and bike movement to maximize energy capture.
Energy Harvesting Process
As pedestrians walk or cycle over the piezoelectric elements, the mechanical stress caused by their movement will generate an electric charge across the materials, producing electrical energy. I will use a power conditioning system to convert the pulsed voltage into a stable direct current (DC) output for practical use.
Energy Storage and Utilization
The harvested electrical energy will be stored in batteries or supercapacitors, acting as energy reservoirs. This stored energy can be used to power various components on the bridge, such as lighting systems, sensor networks for monitoring foot traffic, and charging stations for electric bikes and devices used by pedestrians and cyclists like lighting.
Environmental and Economic Benefits
Piezoelectric technology offers environmental benefits by generating electricity without the use of fossil fuels, contributing to a reduction in greenhouse gas emissions. Additionally, it is highly reliable and requires minimal maintenance, making it a cost-effective and sustainable solution.
Sources:
Step 32: Dampers and Isolators
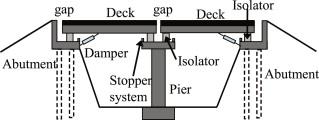
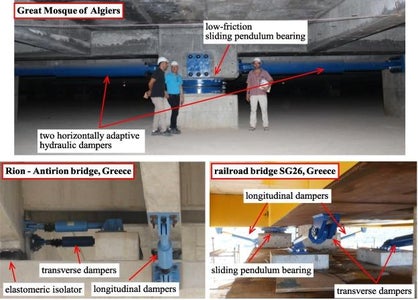
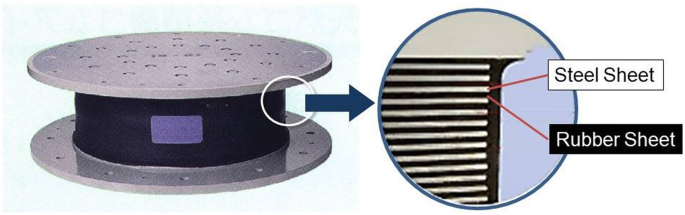
In designing the Sacramento Enliven Bridge, I conducted extensive research on dampers and isolators to strengthen its structural integrity and provide a comfortable experience for pedestrians, workers, and the city. Considering California's seismic activity, I am particularly aware of the importance of earthquake-resistant measures. Additionally, my current work as an assistant in a lab at UC Davis, focusing on these elements, has further enriched and fascinated me. Down below are specifics based on my research:
- Damping Mechanisms for Vibration Control:
- This Bridge features a variety of advanced damping mechanisms to control vibrations arising from different sources.
- These damping systems play a crucial role in reducing the bridge's oscillations and ensuring a smooth ride for both vehicles and pedestrians.
- Tuned Mass Dampers (TMD):
- Strategically positioned at specific points along the bridge's structure, tuned mass dampers are employed to counteract dynamic vibrations caused by factors like wind-induced oscillations or heavy traffic loads.
- These TMDs consist of a mass connected to the bridge through springs and dampers. The system is tuned to resonate at frequencies that counterbalance the unwanted vibrations, thereby minimizing their impact on the overall structure.
- Fluid Viscous Dampers (FVD):
- Fluid viscous dampers are incorporated into the bridge's support system to provide supplemental damping against lateral movements caused by wind or seismic forces. These dampers consist of a piston and cylinder filled with a viscous fluid that dissipates energy as it flows through small openings in response to lateral movements.
- FVDs are particularly effective in reducing the bridge's response to dynamic loads, ensuring a stable and comfortable experience for users.
- Seismic Isolation Bearings:
- Considering Sacramento's seismic zone, the bridge is equipped with seismic isolation bearings at critical locations, such as the bridge piers and abutments. These bearings allow the bridge to move independently from the ground during an earthquake, effectively isolating the structure from seismic vibrations.
- This technology significantly reduces seismic forces transferred to the bridge, minimizing potential damage and enhancing post-earthquake functionality.
- Examples of Specific Models that Would Work Great with the Bridge and its Unique Structure:
- For tuned mass dampers, the bridge utilizes state-of-the-art models like the "Frascati Tuned Mass Damper." This advanced device employs high-density materials and sophisticated control algorithms to precisely dampen vibrations and stabilize the bridge during windy conditions.
- In the case of fluid viscous dampers, the bridge incorporates models like the "Taylor Devices Fluid Viscous Damper." These dampers provide superior damping performance, effectively protecting the bridge from lateral forces and ensuring user comfort and safety.
- For friction dampers, specialized models like the "Wire Rope Damping Systems" are installed along the bridge's cables to counteract cable oscillations, reducing fatigue and enhancing the overall durability of the bridge.
Sources:
This is something I found so interesting, and that I have never really thought about it before, so if anyone is interested I would love to talk about it in the comments.
- https://www.taylordevices.com/industries/structural/
- https://www.goldengate.org/exhibits/seismic-isolation/
- https://www.eng.buffalo.edu/mceer-reports/06/06-SP07.pdf
- https://www.iitk.ac.in/nicee/wcee/article/WCEE2012_0911.pdf
Step 33: Sensor Technology in Bridge Design
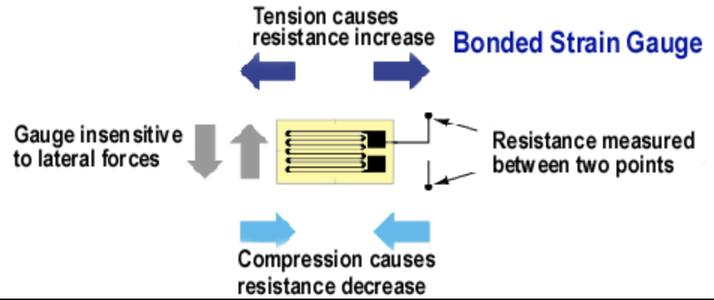
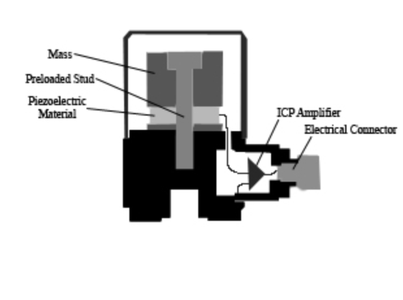
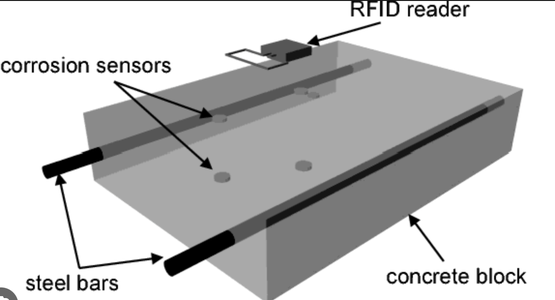
Before I delved into the world of architecture and engineering, I never truly understood how sensors were intricately implemented into bridge design. It was only when I had the opportunity to talk to professionals in the architecture space that I realized the incredible role that sensor technology plays in shaping modern bridges. Below you will find the research that I did on this topic:
- Strain Gauges (image 1): Strategically placed strain gauges are embedded into critical load-bearing components of the bridge. These sensors detect minute changes in the structural strain, allowing engineers to assess how the bridge responds to varying loads, temperature changes, and environmental conditions. The data from strain gauges assists in ensuring the bridge's structural integrity and safety.
- Environmental Sensors : The bridge's integration with nature is enhanced by environmental sensors that collect data on weather conditions, humidity, temperature, and wind speed. This information helps engineers assess the bridge's performance under various weather scenarios and optimize its design to withstand environmental challenges.
- Accelerometers (image 2): Advanced accelerometers are placed at key locations along the bridge to measure acceleration and vibration. These sensors provide real-time information on how the bridge reacts to dynamic forces, such as passing vehicles or water currents. By analyzing this data, engineers can optimize the bridge's design to minimize vibrations and enhance its stability.
- Corrosion Sensors(image 3): The bridge's exposure to water demands vigilance against corrosion. Corrosion sensors embedded in critical components continuously monitor the presence and extent of corrosion. Early detection enables engineers to implement preventive measures and extend the bridge's lifespan.
- Fiber Optic Sensors: Advanced fiber optic sensors are utilized to measure strain, temperature, and vibrations with exceptional precision. Distributed acoustic sensing (DAS) technology allows continuous monitoring of the bridge's entire length, providing comprehensive insight into its behavior under varying conditions.
- Energy Harvesting Sensors: My goal of this bridge is to embrace sustainable practices through the integration of energy harvesting sensors. These sensors capture and harness energy from the environment, such as vibrations or solar radiation, to power various monitoring devices and reduce the bridge's overall energy consumption.
References:
- https://www.campbellsci.com/bridge-monitoring#:~:text=Sensors%20used%20in%20Bridge%20Monitoring&text=vibrating%20wire%20strain%20gauges,inclinometers
- https://www.mistrasgroup.com/how-we-help/monitoring/bridges/
- https://www.mtu.edu/mtri/research/project-areas/transportation/infrastructure/bridge-condition/
Step 34: Walkthrough
This is a walkthrough of my project, where you get to experience what it would be like to take a leisurely stroll through my bridge in real life.
Note: Sorry for the bad quality, my computer could not handle any more than it was already handling.
Step 35: Questions?/Recommendations?
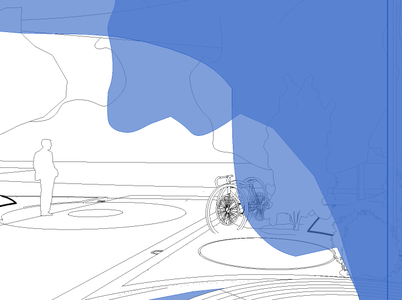
If you have any questions about the design, my idea, the vision, Revit, how it works, the flow, why I did something, my research, etc., just let me know. I would love to answer them!
Also, on the other hand, if you think something could be better, if there is an area that needs improvement, or if you have any recommendations about anything, I would also love to learn. This process has been a huge learning experience, so anything you would like to add will be a huge help for me to learn and grow.
Step 36: What I Learned
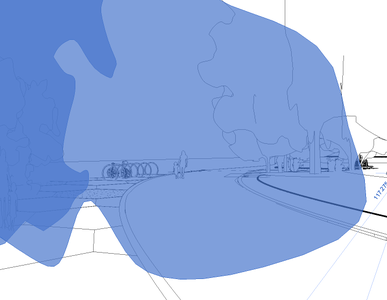
I initially saw this opportunity as a way to help fund a youth-run organization that my co-founder and I are co-founding. Our organization's focus is on architecture and sustainability, aiming to educate people about sustainable building materials and practices. We are passionate about supporting and gathering materials from our communities that would otherwise end up in the trash or recycling. Our goal is to give these materials back to those in our community who are transforming them into sustainable building materials. While we are at a very early stage in our journey, my co-founder and I are super excited about the direction we're headed.
But this opportunity ended up being so much more than that,
Throughout this incredible journey, I've discovered a whole new world of possibilities in architecture. When I first embarked on this project, I never imagined that it would ignite such a deep passion within me. Architecture has become more than just a career path; it's now a part of who I am.
Using Revit was a game-changer for me. It allowed me to turn my wildest ideas into 3D realities, and every click felt like bringing my dreams to life. It was both challenging and exciting to learn the ins and outs of the software, but the feeling of accomplishment when I saw my designs come to life was beyond words.
As I delved into researching the city's history and new developments, I realized the impact architecture can have on a community. Understanding the city's past and blending it with the future was a beautiful dance of tradition and innovation.
Learning about civil architecture and structures showed me that there's so much more to it than just buildings. It's about creating spaces that people can thrive in, where functionality and beauty go hand in hand. It's about making a lasting impact that stands tall for generations to come.
But perhaps the most profound lesson I've learned is about sustainability. It's not just a buzzword; it's a responsibility we carry as architects. Exploring eco-friendly materials and practices made me realize that we have the power to shape a greener, more sustainable world through our designs.
But above all, this project has shown me the true magic of architecture—the power to bring people together. The bridge isn't just about connecting two points; it's about uniting hearts and minds. It's a symbol of hope, inspiration, and progress. It's a place where dreams take flight, where ideas flourish, and where communities come alive.
Step 37: Thank You!
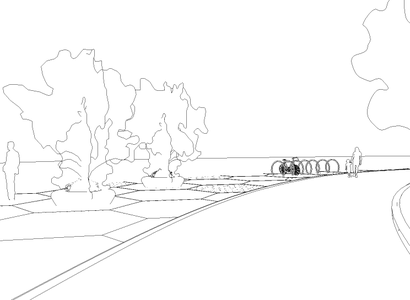
I poured my heart and soul into this project, and I hope that the passion and purpose behind every design choice shine through. This Bridge is not just about architecture; it's about fostering change, bringing people together, making a sense of community, and empowering communities.
- - - - - - - -
I am grateful for the opportunity to be a part of this transformative journey, and I want to express my deepest appreciation to all who supported me along the way. This experience has given me a reason to explore my deepest passions, and I am excited to continue this pursuit with unwavering enthusiasm.
To the Instructables team, thank you for providing this platform to express my creativity and share my vision with the world. It has been an incredible journey of self-discovery, and I am honored to have been a part of it.
With heartfelt gratitude,
Bryce Merrill

Grand Prize in the
Make It Bridge


Comments
11 days ago
Please feel free to ask questions. I would love to answer them!