Introduction: Teaching Engineering Design Using 3D Printed Rubber Band Cars


This project-based learning course uses Tinkercad to teach the engineering design cycle by creating and testing 3D-printed rubber band cars. Students will explore and run experiments on the provided car, then use the information they gather to brainstorm and create their own rubber band car. All teaching videos, lab notebooks, and CAD files necessary to run this unit are included.
I designed this project for the seventh-grade students at the Alternative School for Math and Science in Corning, NY. I wanted a stand-alone unit that taught a systematic approach to engineering, rather than the "guess and check" method often offered at this level. This course takes 4 weeks to complete. I hope you enjoy it! - Patricia Killian
Attachments

Supplies
Classroom access to a 3D printer
PLA Filament - assorted colors
Tinkercad rubber band car CAD flies links
Teaching video links file
Student Notebook
Rubber bands for wheels - Alliance Rubber 54625 Advantage Rubber Bands Size #62
Rubber bands to drive car - Alliance Rubber 00721 Advantage Rubber Bands Size #32
Small rubber bands - Cra Z Art Cra-Z-Loom Ultimate Tub 8000 Latex Free Rubber Bands
Super Glue
Meter tapes for each group
180mm x 120mm x 120mm sizing box made of cardboard with 3D printed corners.
Laptops/Chromebooks or Tablets for student Tinkercad use
Step 1: Teacher Prep: Print and Assemble the Basic Car

Steps 1 - 3 are done by the teacher in the weeks before the unit begins.
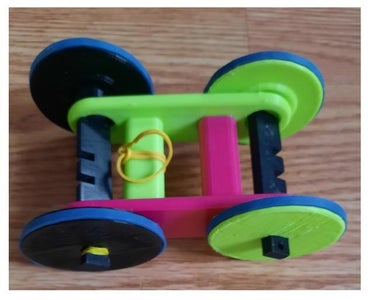
Using the basic Rubber Band CAD file, 3D print enough cars for each group of 2 students to have one car. Each vehicle has 2 body parts, 4 wheels, and 2 axles. No supports are required to print these parts. Assemble the rubber band cars according to the video using super glue (cyanoacrylate).
Rubber Band Car ASMS
Step 2: Teacher Prep: Print Larger Wheels, Longer Car Bodies, and Rubber Band Holders
Print a few copies of the larger wheels and longer car bodies. These will be used for experiments and can be shared among all the students. The CAD files have the mm lengths printed on the parts to make it easier for the students to quickly record sizes as they run the experiments to determine the effects of body length and wheel size on distance traveled. Videos explaining how to make a longer car body and larger wheels are provided in the video links document if students want custom-sized wheels.
Larger wheels
Longer Car Bodies
Rubber band holders for experiments
Step 3: Teacher Prep: Create Your Sizing Box
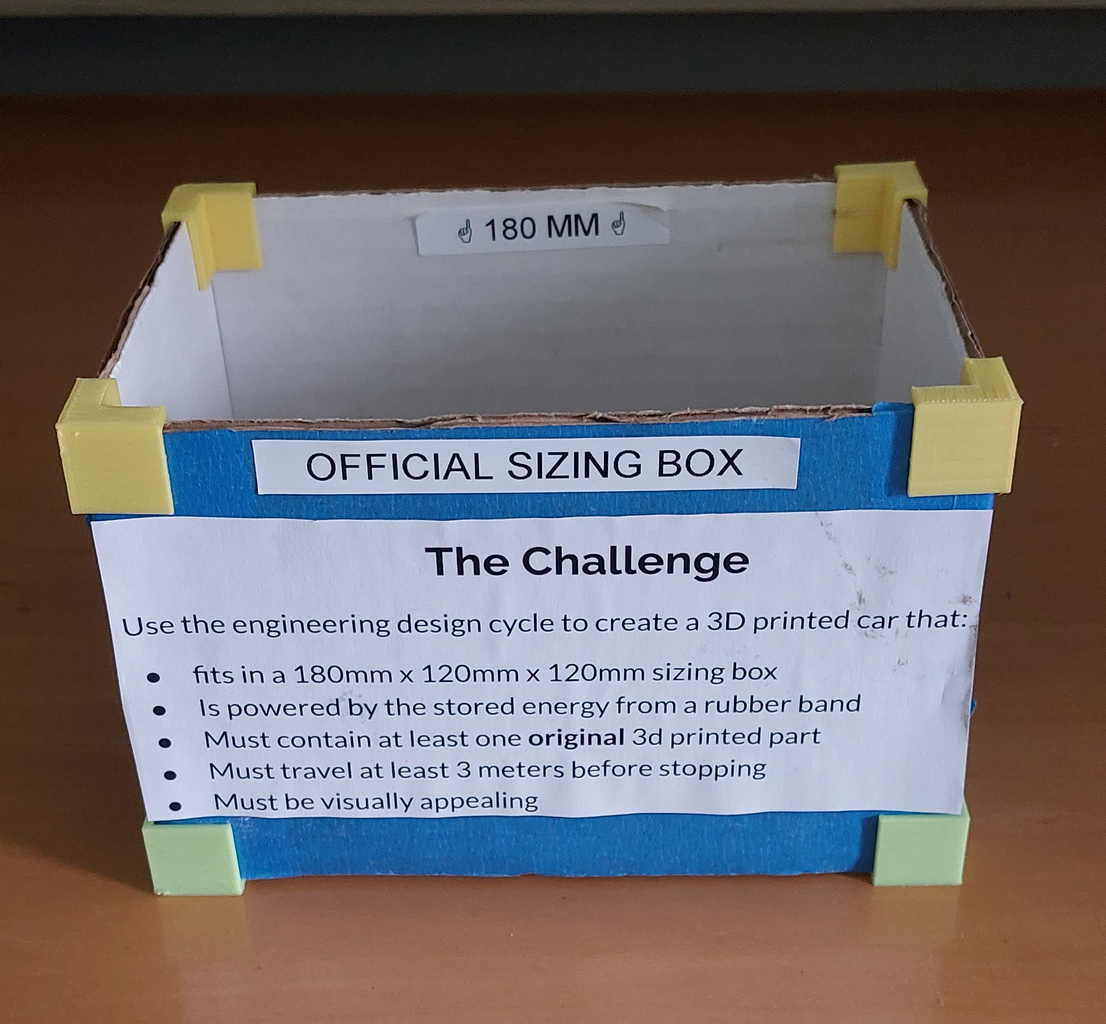
Students have a difficult time visualizing size in metric units. The sizing box will help them to see if their car design actually fits in the challenge size. Cut box sides out of sturdy cardboard and create the box by attaching the 3D printed edge pieces.
Rubber band Car Sizing box Edges
Step 4: Introduce the Challenge
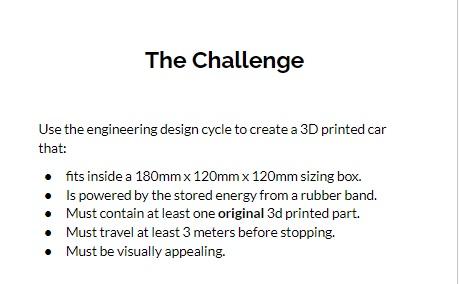

Day 1: Distribute the student Notebooks to each student. Introduce the engineering cycle as a "systematic approach to solving a problem". Explain the challenge as the students follow along on pages 2 and 3 of the notebook. After going over the Challenge on page 3, distribute the 3D cars you made in step one. Demonstrate how to use the car and then let the class explore the cars for the rest of the class period. Some students may need help getting their cars to work. Allow them to struggle and let them work together and share ideas for how to make them work better.
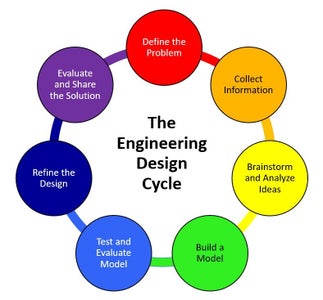
Step 5: Explaining the Engineering Design Cycle
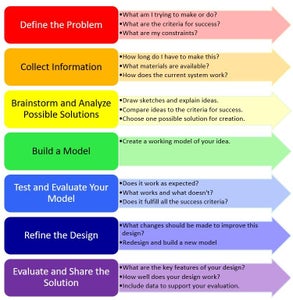
Day 2 of the design challenge focuses on explaining each part of the engineering design cycle. Start by reading page 5 of the notebook to the class as they follow along. Allow time for questions and clarification. Be sure to check for understanding of vocabulary such as criteria and constraints. Let students start to fill out page 6 by copying information from page 3. Brainstorm other possible constraints such as their personal CAD skills and the time necessary to print parts. Students can then fill out the information on page 7 given by the teacher. I typically allow 4 weeks for this unit and allow students to use any common items that they wish to bring from home. Some students may want to experiment with skateboard bearings in the axles or adding lubricant. This is completely up to the teacher, so page 7 must be copied from the board. If time permits, Students may start working on page 8.
Step 6: Begin Collecting Information
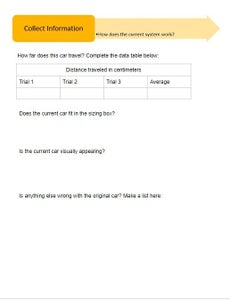

Days 3 - 4 are spent gathering data about the existing car to understand the system better and determine the optimum car and wheel size. Students will work with their partners to fill out the data tables and write simple conclusions for each experiment.
Step 7: Create Tinkercad Accounts and Learn CAD Basics
Students will need time to play around with the basics of Tinkercad. I typically have students make a snowman to learn how to manipulate objects. Key concepts include grouping, resizing, aligning, and sending to the printer. They don't need to print the snowman, but they may want class time to display their virtual creations. This is a great end-of-class filler and can be spread out over several days. It will take a minimum of two days for students to get through the basics. Once students understand the basics of Tinkercad, have each student make a copy of the basic car files into their accounts. Giving students access to the how-to-use Tinkercad videos will allow them to move forward at their own pace and be able to refer back to them as they begin to design their new rubberband cars.
Step 8: Allow Students to Design Their Own Car

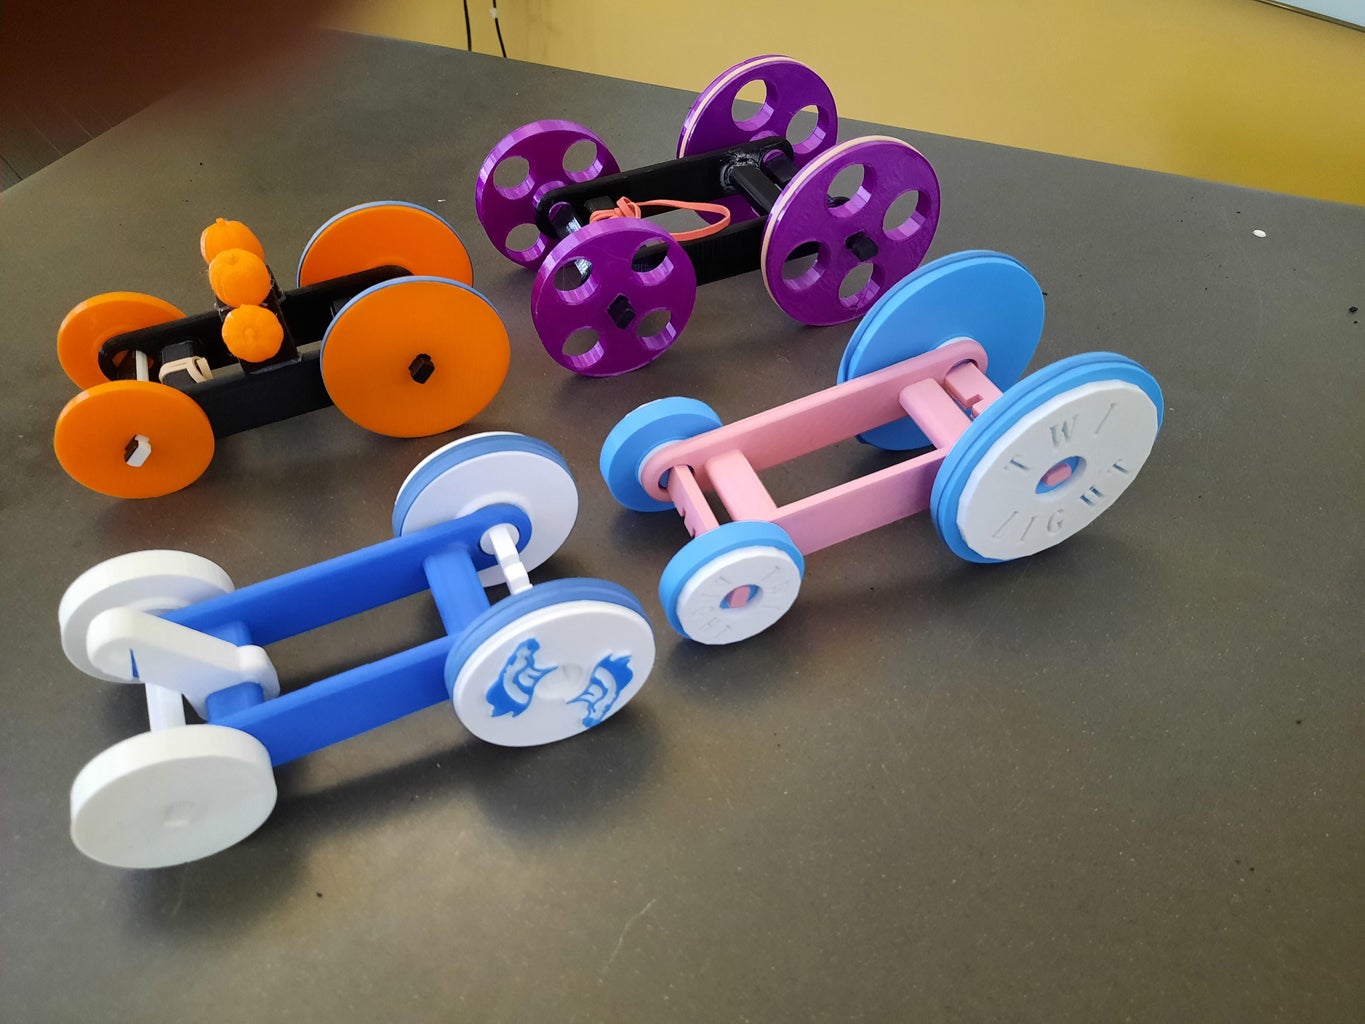
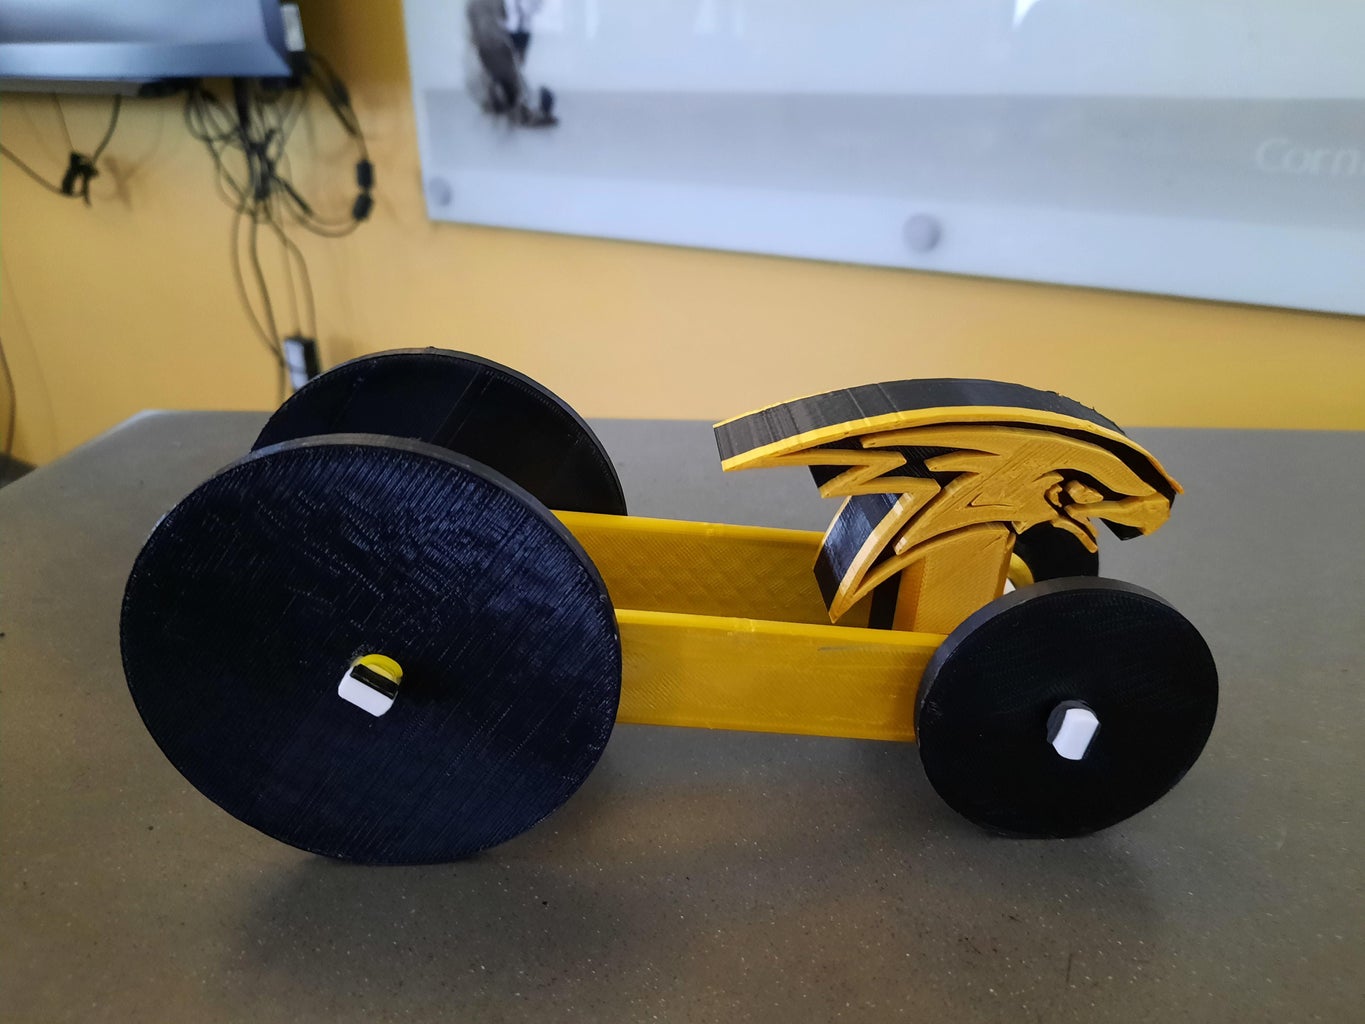
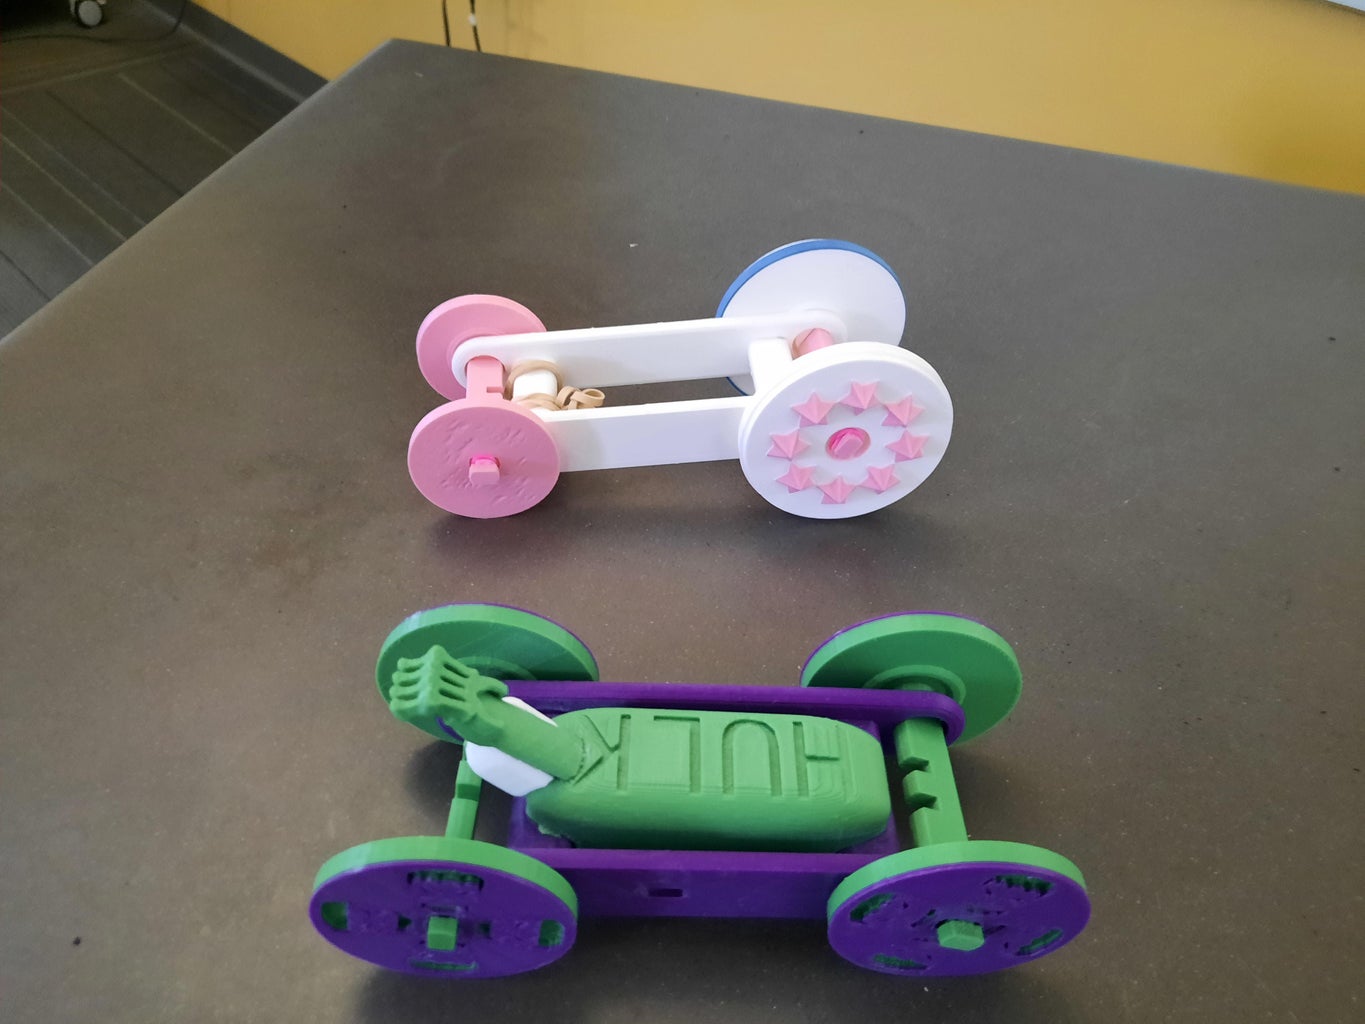
This is the fun part! Students will take the information that they gathered about the original car and design their own car to meet the challenge. This will take several days to design and then several more to get all the prints done. Plan on a due date for the CAD files, and then allow yourself about a week to get all their files printed (depending on how many 3D printers you have access to). Pause this unit and move on to other curricula in the meantime. Students can create longer car bodies, create larger wheels, add rubber band holders, and create hub caps. See the video links PDF for help with making custom longer bodies and larger wheels.
Step 9: Evaluate and Share

Once all the cars have been printed and assembled, allow students a day or two to test and evaluate their cars. Any necessary changes are made, and then the teams do the final touches on their notebooks.
At our school, we do an afternoon assembly where each team shows off their car to the grade. Cars must go through "inspection" stations: sizing box, 3-meter distance run, and esthetic design. The Math teacher checks all cars in the sizing box, then the cars must run the required 3 meters, and finally, the art teacher comments on the beauty of each team's design and takes a picture of the team and car for the yearbook. Once all cars pass inspection, The teams run their cars in a race against the science teacher's car ( built in secret). If any student's car beats the teacher's car, the whole grade gets donuts! This is one project they will never forget.

This is an entry in the
Project-Based Learning Contest


4 Comments
5 days ago
This is AMAZING. Thanks for sharing this! I'm sure it will get used by others.
Reply 5 days ago
Thanks!
Reply 4 days ago
We've got one printed out and are building it today! My 4yo grandson was absolutely amazed that I could put his name on the wheels (in Tinkercad).
4 days ago
Terrific and engaging design exercise for students! Thank you for sharing!