
Introduction: Apollo11 Lunar Lander L.E.M. the " EAGLE"


I was asked by Youth directors Andy and Amanda, for some kind of rocket slash space idea and if I wanted to help, I said yes.
How about the Apollo11 lunar Lander or LEM? Yes!! they said and the rest is history.
Last phot shows grand kids Alex and Jackson having a ball aboard the Lander.
Attachments

Supplies

Step 1: Lunar Footing


First I started making the feet that would support the lander.
I took 10 in pan wife gave me..(sort of) and used it as a mold for concrete and metal supports.
I used scrap steel i have and tack welded to tabs that would secure foot to led via pin.
Step 2: Lander Frame Work


Here we start making the supporting frame work.
First the 2 cross pc's I bolted together made from 2 room wall dividers I stripped down to bare metal.
I added a pc of steel plate to the ends for strength and gives a place to add mounts for the legs.
Now I use parts of trampoline frame I got off craigslist for free to make the skirt supports and legs them selves.
I welded 3 inch cut pc's of tubing to each of the corners so "U" like skirting bars would slide into and then be bolted into place.
In the pictures you can see the frame is supported by a large steel shelf unit which is same height as Lunar frame legs will be.
Now I welded more pc's from tramp frame I cut to each end of base that will hold legs on with a bolt.
I then cut the legs to length and drilled a hole in top and bottom to bolt to base and pin to feet.
Lastly I cut leg lower supports, 2 per leg that bolt and welded to leg then screw pinned to skirt supports making a very sturdy frame system.
Step 3: Lunar Flooring and Module Support


The flooring was really simple and this is where we go to wood for now.
Just a couple of pc's of 1/2 inch partical board, 2 by 6's and 2 by2's.
I f you look close in first picture you can see the 2 by 2's riding along the frame base.
This is what helps guide the module unit on and keep it centered, worked very good.
Then as You can see in the pictures the flooring is allowing me to start the Lunar Module construction using hollow core doors I also got for free off craigslist.
Step 4: Construction of Lunar Crew Module


The Module started off with forward wall section and the whit pc of wood was just a temporary support.
Then the roof section and onto the front section.
You will see the front get closed up but that's because at this stage I didn't know how much to leave open for windows.
The floor was cut to have a 1/2 inch gap between front and rear section so after I constructed the rear section I would simply place 1/2 in boards in between the front and rear screw in place and cut also making the mid section support.
I decided to make the rear end open like a door so Parents could take pictures of the kids having fun so crowding wouldn't be an issue around the door hatch.
So I used 2 hollow core doors and 2 aluminum supports off my bosses truck, thanks Dave.
Step 5: Fuel Tanks


In these photos you can see the fuel tanks on each side of in front of module.
They have 2 inch foam insulation board and the sides are wrapped with the skin of hollow core doors the taped and painted for safety around the kids.
These were fun to make.
Step 6: Lander Windows and Entry Construction


The front of lander where the door hatch is was really fun to make and windows were just as fun.
Using more 2 inch foam board and a lot of gorilla Black tape really made this part of the build go really fast.
Now in the pictures you can see wher the front was covered as I said completely at first.
Then I had to remove 2 sections for the windows and the window frame work was made from 1/2 inch boards.
The hatch opening and sides were 2 inch foam board and I used plexiglass 1/4 inch for the window panes.
Did a little painting and it was on to the next part.
Step 7: Antenna Array


Not much to talk about here but remember the 10 inch pans my wife sort of donated?
Well here they are again used as the antennas for the Lander worked great!!! Thanks Baby!
Step 8: Lander Skirting


Now the Skirting went pretty fast and worked great.
Used 1/2 inch pc's of scrap plywood and 1 inch foam boards.
Foam boards were used on the ends because of multiple cuts I need to make going around all the frame work and legs.
Used self tapping screws about 4 in each panel and it was done.
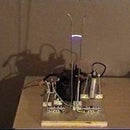
Step 9: Rocket Engine Exhaust Cone and Fire Light


My friend Rick , gave me a spa light that glowed red and super super bright which was used for the engine fire.
I used and old 28 inch garden fountain tub supported with plywood and hung from the lander with 2 steel supports.
Funny thing is when I was putting the lander together at my work church I wasn't able to get it mounted nor did I have an exact plan yet to mount and ran out of time for that day.
I work second shift so I came in, and there it was, the lander was Blasting off with fury of fire glow and I had no idea how.
Turns out my friend and boss Mark took the reins and made a mount and hung the light before I got to work.
I never even told him what I had to do? ( He is the man, the myth, the legend) and part farmer for his massive vegetable garden.
Step 10: Ladder


Once again thanks to craigslist I was able to get an exercise machine and use it's steel to make a very nice ladder.
Foam board was mounted under the top edge above where the leg bolt is.
Then a 3/4 inch pc of wood was screwed to the Lander base and extended to under the foam board so kids could step on it without hurting them selves.
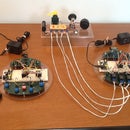
Step 11: Electronics


Not a whole lot here but what is there is cool for kids.
You can see the front main control board which is arcade lighted switches the come on momentarily in multi colors.
Then on back right wall it has environmental controls .... well a fan, colored lights, buzzer, strip lighting that you dial different colors.
It has an Led white cabin light and switch and where the docking hatch plate in ceiling is colored lights.
Outside of Lander you have the red fire light for engine and 2 strobe lights from fire alarm lights, one on top one on bottom looks really neat which you can see flash in the video.
Step 12: RCS Rockets


Reaction control system rockets weren't completed do to time but once I assembled in church I had 2 of them done as well as gold foil heat shield I made from thermo blankets
Step 13: Sold!!!


My friend at work Eric text me a couple days later and ask if I want to sell it, maybe this guy would want it?
Turns out he was right and he did buy it.
Funny how he advertises for apollo11 and that's exactly what Lem I made, the "EAGLE" which I renamed "EAGLE 1".
This was Divine!

This is an entry in the
Metal Contest


2 Comments
2 days ago
Got it! I'll try that?
2 days ago on Step 13
Great idea with the non stick pan with concrete- Proper terminology when the wife is missing stuff is that it was "acquired or it was commandeered" ..he..he. he. Nice work.
Semper FI