
Introduction: Crayon Baby Costume


What can be more colorful for the Halloween season than a crayon costume?
Well, a box of crayons costume.
Today we will make a box of crayons costume for the little ones in the house.
Join me through this instructable on making a box of crayons costume for our babies.
Supplies

- Foam (Various colors)
- Hot Glue
- Contact cement
- X-acto
- Embosser
- Pencil
- Small plastic cups
- Respective logo templates
- Marker
- Scissors Optional
Step 1: Template


First of all I leave you the template of the texts/logos for printing, in the size that I am using, in my case for a 4-month-old baby.
You can print it in grayscale, no difference.
These Crayons logos will be later transferred to the eva foam.
In my case I decided to use an eva foam for the structure since it is a soft material for the movements of a baby.
I used a foam with a glitter finish to give it a more illuminated and cheerful appearance.
I used these eva foam sheets:
4x Glittered Yellow eva foam
1x Glittered Red
1x Glittered Green
4x normal yellow to inforce structure.
1x Purple, Blue, Red, Orange, Green Olive
1x White For logo edges
1x black Optional for hat
Step 2: Shape Tracing


To transfer the graphics to the foam, we will first re trace with a pencil the outlines of each text, logo or shape on the template.
Then we will cut each piece to transfer them according to the color to which it belongs.
This is to avoid unnecessarily staining any of the lighter materials such as white.
Step 3: Transfer


Now place the paper on the back of the glitter foam, remember to reverse the paper so that the part re traced with the pencil makes contact with the foam.
Step 4: Embossing
Step 5: Cut the Crayola Logos


With the help of the X-acto, we will cut letter by letter and shape by shape from our template, after having transferred them to their respective foam color
When we cut pieces (letters) that go over a background shape, it is best to cut the background immediately so as not to mess up the loose pieces.
then we will glue the loose pieces on the respective background shapes with hot glue or contact cement according to your criteria
Do the same with all the pieces
Step 6: Paste the Crayola Logos


After cutting the letters we will mount them on their respective background or border.
Do the same with all the pieces
Step 7: Cut the Flap


Now we will cut the tab of the box that will serve to give the effect of the crayons inside.
Organize the logos and graphics neatly, use paper cutouts for a quick preview
Step 8: The Crayons


To simulate the crayons we will use the sheets of flat colors and we will cut them into strips according to the size of our baby, I worked with the standard measure of 25 cm wide so to simulate 5 crayons I divided 25 by 5, and each resulting strip I made it 5cms.
Cut the 5 strips and arrange them to your liking.
Step 9:


We will then make the hole in the box that allows us to see part of the content.
For that, with our texts and logos organized, we will use the tab that we already cut to make the curved shape similar to a smile.
these shapes and logos are based on the original crayola box
Crayola Crayons were invented by Binney & Smith in 1902 and first offered for sale in 1903. Alice (Stead) Binney, a school teacher and wife of co-founder Edwin Binney, suggested the company manufacture an inexpensive alternative to imported crayons of that era.
Step 10: Paste Your Crayons


now we will glue our fake crayons to the box to give the structure more solidity.
help yourself with a ruler and a pencil to create guides that place it well in the space, paste the false crayons approaching the hole of the smile, do it respecting the distribution space previously demarcated
Step 11: Green Stripes


Although the original box has changed, the green stripes on the sides of the classic box design remain until today.
it's time to replicate them in our costume
so we will cut 2 strips of glitter green eva foam
and we will place them in the following way: the initial strip 12 cm from the base and 7 cm from the internal width
the second strip will go parallel to the first and will be a little thinner.
use the hot glue to stick the parts respectively
after gluing the strips cut the excess of the edges with the X-acto
Step 12: Paste the Logos


After gluing the side strips, we can now paste our logos in the way that they had been initially distributed, remember that I based myself on the crayola crayon's box, you can create the variations you want.
Step 13: Paint It Black


With the help of the ruler and a marker we will paint the characteristic sticker lines that the crayons carry
Step 14: Fold the Tabs


With the help of the embosser and a ruler we will draw the lines where folds are generated, remember to do it gently as it can ruin the eva foam
Step 15: Make the Hole for the Head


use a circular shape to make a symmetrical hole if it is the case make small cuts so that the head enters smoothly, it all depends on the size of the head and the circle used.
start gluing the tabs that you think are convenient start by joining the front with the back.
Step 16: Join All the Parts


now use glue to join all the missing pieces, the lid tab, and other tabs
Step 17: Finish Joining


finish joining the lateral sides with the torso (previously attached back and front)
Step 18: Finished Union


Finally we will glue the lid of the box of crayons, use hot glue and let dry by pressing for a better glue
Step 19:


then when everything is consolidated, we will use the X-acto to open the holes that will serve for the arms.
open one first and then from that replicate the same action on the opposite side but remember to mirror your piece
Step 20: Crayons Time


the time has come to sharpen our Crayons.
so to make the sharpen ends we will use the plastic cups.
We will disassemble a plastic cup which will serve to make the molds, disassemble the cup as shown in the images and use the side and the base to then transfer them to the eva foam and line the new cups
Step 21: Transfer the Cup Molds


transfer the molds to their colored sheets, keep in mind to add 1 or 2 mm more to the mold since by not doing it due to the thickness of the material it will not be able to adjust correctly and will leave empty spaces, I had to make all the molds 2 times due to for this reason
then with the help of hot glue, line the cups with the molds.
the cups will give the illusion of being the tips of the crayons that come out of our box
Step 22: Locate Your Crayon Tips


Depending on the color of the plastic cups, place them on the colored strips that simulate our crayons.
For that use the hot glue gun. and be careful not to burn your fingers, also let the hot glue dry a bit so it doesn't melt the plastic
Step 23: Custom Text


Using the pennant transfer that we had used in steps 2 and 12, I decided to make a personalized text (the name of our baby model) on it
Since it's coming from the opposite direction, I should have made the letters mirrored, and later cut them with the X-acto, then paste them on the red flag in the correct order.
Step 24: Final


I really enjoyed doing this project for the youngest in the house, it is quite colorful and cute, and it also fits perfectly with the time of Halloween
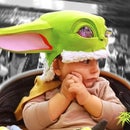
Step 25: Bonus: Tiny Crayon Hat


To make a little crayon hat, follow the same procedure as the crayon tips, but this time make two small holes in the sides and pass a thin rubber through them, then tie a knot to keep it from coming loose, and Attach this little hat to your baby crayon costume.
Step 26: <3


Here is the naughty baby Crayon.
Thanks for watch <3
First Prize in the
Crayons Challenge


17 Comments
9 months ago on Step 26
Soo cute! I love it! :D
Reply 4 months ago
Thank you GRCR :)
9 months ago
Hello. Like the idea but I maybe a wee pedantic/purist at this point: if the box is for 8 crayons, that would equate to four at the front and you have five.
Reply 4 months ago
Hi Michele sorry for the late reply, the 8 is because the model's last name in Spanish is Ochoa (something like Eighta) :) it's more like an easter egg than something physically possible XD
have a good day
9 months ago
Gorgeous idea and the baby wearing it is gorgeous too!. Well done
Reply 4 months ago
Thank you :)
8 months ago
so cute
Reply 4 months ago
Thank you so much :)
Question 6 months ago
Just wanted to know, what did you use to embedd video in your instructable
Reply 4 months ago
Hello geekios sorry for the delay, what I do is convert the video from mp4 to gif format, this format is like a fake video so to speak, in the end they are image sequences. When exporting it you have to take into account the size and quality of it for your projects. I hope it helps
8 months ago
cute
8 months ago
good jod
9 months ago
Funny and cute. That baby has drip with fat crayons: D
Reply 9 months ago
Oops I ment dat. Autocorrect
9 months ago
This is cute! Do you have a picture of it being worn?
Reply 9 months ago
Yeah there's a pic. Look at the first one lol
Reply 9 months ago
That is so adorable!