
Introduction: Super Horn (Person-Powered Truck Horn)


Super Horn
This is an easy, inexpensive, loud horn!
It only takes a couple of hours to put together and costs about $12 (Less if you don't have to purchase minimum lengths of pipe).
If you need a portable super loud horn to cheer your team on, rally the troops or let everyone know you're coming, this is it!
I found inspiration from Truck Air Horn Instructable. I simplified, and instead of using compressed air I wanted the horn to be person powered. Lungs will have to do as the power source.
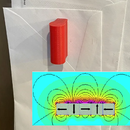
The operation of the horn is simple. The sketch (use Show All Items tab to see) shows how air presses up on the diaphragm in order to escape and in so doing vibrates the diaphragm and creates noise.
[ Video link for those that might have difficulty viewing the horn in action: https://youtu.be/HjfZVC5tyN8 ]
Step 1: Materials and Tools


Materials:
Extra Large Funnel (Mine approx. 17" x 5" dia.)
3/4" PVC pipe ~6" length
1/2" CPVC pipe (Just because it was smaller diameter; if I could have found PVC I would have used it) ~6" length
1/2" CPVC 90 degree elbow
1-1/2" to 3/4" PVC Reducer Bushing (See Step #2: needs to have double walls)
2-3/4" Stainless Steel Hose Clamp
Epoxy glue or Hot Glue (not shown)
Inner tube scrap or latex balloon (Balloon provides a slightly higher pitch and makes horn easier to blow)
PVC cement (Optional)
.
Tools:
Shop Scissors
5/8" Paddle Bit
Drill Motor
PVC Cutter (or hacksaw)
3 Firebricks
Tea Light
Aluminum Foil
Lighter
Heat Resistant Gloves (not shown)
Step 2: Modify the PVC Reducer


The PVC Reducer that you select needs to have a gap between the inner and outer walls. This is the space that air will flow around in before it presses up on the diaphragm and escapes. Some Reducers are solid and don't have this space - you need one with the space.
The PVC Reducer is made so that the small diameter pipe (3/4") will slide only so far into the Reducer and then it hits a lip, stopping the pipe. We need the pipe to be able to slide completely through the Reducer. In other Instructables they cut the Reducer and use other PVC parts or grind down the lip, but we are going to use heat to soften the lip so it bends out of the way and lets the pipe slide through.
The goal is to heat the internal wall (sleeve/tube) of the reducer just until it softens. We can easily do this by capping the internal wall with a piece of aluminum foil - make sure the foil goes slightly over the edges to trap heat - and heating it with a candle's flame.
I found it was easy to use 3 fire bricks and arrange them as shown, with a tea light in the slot between them. Light the tea light and position the PVC Reducer so the flame is centered in the center opening (Do not leave the candle unattended). After a couple of minutes you should be able to slightly flex the inner wall by poking it with a pencil or other rod. At this point, using gloves, grab the Reducer and pipe and force the pipe through the Reducer so it passes completely through. There you have it, no cutting or grinding needed!
Step 3: Prep the Horn Body for the Mouthpiece


I inserted some scrap 3/4" PVC pipe into the Reducer (horn body) and drilled all the way through the side of the Reducer and into the side of the pipe using a 5/8" bit (I had a paddle bit, which worked OK, a twist would also be OK).
Clean out all the shavings and test fit the CPVC pipe to make sure it fits.
The hole you just drilled in the outer wall of the Reducer allows the CPVC pipe to carry air into the space between the inner wall and outer wall of the Reducer. The hole you concurrently drilled (purely for convenience) in the inner wall will be blocked when the 3/4" pipe is installed.
Air will enter through the CPVC pipe and circulate between the inner and outer walls of the Reducer. Air will press up on the diaphragm (not installed yet) and travel up over the lip of the inner wall-3/4" PVC pipe and exit out the 3/4" PVC pipe.
Step 4: Fabricate and Mount the Mouthpiece


Take the CPVC pipe and cut a step/jog into the end about 3/16" deep so half of the pipe is removed. This is to keep the pipe from bottoming out on the 3/4" PVC and leave a slot to allow air to pass into the area between the outer and inner walls of the reducer.
Test fit the CPVC into the Reducer and trim it so that about an inch extends past the Reducer. Push this piece into the elbow and a second 4" long straight piece into the other end of the elbow. Make sure a solid piece of 3/4" PVC is installed into the Reducer so the CPVC wont extend too far into the Reducer (using scrap 3/4" is a good idea) and glue the CPVC to the Reducer. I used hot glue, but epoxy would also work.
The CPVC pipe was not glued together since it fit so tightly anyway (and it would require special CPVC cement).
Step 5: Install the Diaphragm


You can use a common latex balloon or a scrap of Inner tube as the diaphragm. I like the balloon as it was easier to work with, gave a slightly higher note to the horn and made the horn easier to blow than when using inner tube.
Cut the diaphragm material to about 3-1/2" in diameter and stretch it taut over the large opening in the Reducer. Use the pipe clamp to secure it in place while still maintaining the tightness of the diagram. It might be possible to use a zip tie to fasten it in place but I wanted to be able to change or tighten the diaphragm and I was a bit concerned about air leakage with a zip tie, but try it and let me know if it works.
Step 6: Install the Horn's Bell (Cone/Funnel)


Install a length of 3/4" PVC pipe into the Reducer. Trim the 3/4" PVC pipe so that about 2" is exposed (the total length of the pipe is about 3-1/2"). This length is not critical and it can modify the tone of your horn. You can leave it long and trim it down later if you like. A longer length tends to give a lower note and a shorter piece a higher note to the horn.
Trim the funnel so that the cross-section diameter of the cut is just slightly smaller than the outside diameter of the PVC pipe. The point to cut on my funnel was about 4-1/2" from the tip.
You should be able to slide the funnel snuggly onto the PVC pipe.
I did not like the hanging tab on the rim of the funnel so I cut it off.
Step 7: Adjust and Enjoy


You can adjust the amount the 3/4" PVC extends above the lip of the Reducer and you can experiment with different diaphragms and diaphragm tension. You can also try replacing the 3/4" diameter PVC with longer or shorter lengths of pipe.
After you are happy with the sound of your horn you can glue the parts in place or, if the fit is tight enough, just leave them as they are. My version had everything tight so the only joint I hot glued was the 1/2" CPVC mouthpiece to the Reducer body.
Have fun making NOISE! and Enjoy! (Hearing protection is suggested.)

Runner Up in the
Make Noise Challenge

Participated in the
Epilog Contest 8

Participated in the
Remix Contest 2016


21 Comments
Question 2 years ago on Introduction
This is awesome! Is there any way to modify this to be louder and with a much deeper tone? I'm not afraid of making it much much larger. It doesn't need to be portable
Reply 2 years ago
I am not sure what parameter varies the tone of the horn, but it appears that the longer the pipe is from the diaphragm to the funnel the lower the tone. Check out this instructables' video that shows making a similar horn and also a super low tone horn: https://www.instructables.com/Easy-PVC-Fog-Horn/ I think I even like their method for handling the PVC parts better as it looks easier with less modification. I think a larger diameter funnel may also help make it louder.
Good Luck! Please post your results here so all can see. Thanks!
3 years ago
Such a awesome gadget! I’ll have to gather some supplies to make one for my kids.
Reply 3 years ago
It's a lot of fun to make and LOUD! Enjoy!
3 years ago
Wow, I love this! So far I have made with a 5th grade and 7th grade class. Now I am working it into a STEAM class about sound waves. It's easy, fun and the students love it, maybe not the parents when it goes home but definitely the students.
Reply 3 years ago
I am so glad that you are able to use this Instructable to make horns in the classroom -- and teach science! Thank you!
6 years ago
I am considering how to make this work on a bicycle.
Reply 6 years ago
For a bike, you can extend the 3/4" tube so you have sufficient exposed length next to the Reducer so you can clamp it to the handle bars. Then replace the rigid 1/2" CPVC with a flexible tube. Blow on the tube and clear the road!
Thanks for commenting!
Reply 6 years ago
There isn't a lot of room on the road bars. I think I'll clamp it to the downtube instead, and point it at the ground so it doesn't fill up with water when parked outside. This should work well for those who don't pay attention to screaming.
6 years ago
Thank you everyone for all the nice comments!
6 years ago
Very nice. I'll have to try this.
6 years ago
I love that little "heh!" she gave! Awesome project!
Reply 6 years ago
same here ~ when she giggled, i giggled! x^)
6 years ago
Straight-forward to use, no skilled "lipping" or bugling required. Very clever!
6 years ago
I've got all this stuff laying around my garage. But I wonder how this would sound attached to a vuvuzuela?
6 years ago
oh my goodness! Love this! I'm a 67 year old Grammy & I'm going t make this. Now the cows can hear me in the back 70.
6 years ago
I love it. It didn't require a laser cutter/engraver, CNC router, or any other of a host of tools I'm never going to be able to afford.
6 years ago
This is too much work for an old man like me, but I think your design and Instructable are completely brilliant! Wow! If you (or any of your readers) are still in school, this could serve as the basis of an award-winning science project for sure. I'm completely blown away. When I was in school, I played trumpet in the pep band and was always looking for new ways to make impressive sounds. One I named the "Trippet." At the climax of a song, I'd put my trumpet mouthpiece on a thrift-store trombone, stand up and finish on an impossibly high note. Way across the arena, the competing band had no idea how a trombonist could play so high (and in tune, of course)! Your truck-horn idea puts a lung-powered high-decibel noise maker into the hands of the intelligent and skilled builder. It is SO MUCH BETTER than those tacky compressed-gas-can air horns people sometimes bring to a game. Go lung power!
6 years ago
looks cool:) If you had one, you could use a real semi horn. But you've got a good idea!
Reply 6 years ago
Thanks!
I wish I did have a real semi horn! But then again, I don't think a semi horn would make a sound if I tried to blow into it ;-)