
Introduction: Want a Super Strong Magnet? - Try a Halbach Array


Want a Super Strong Magnet? - Use an Array of Magnets
I needed a small super-strong magnet.
We have a steel front door and when there is outgoing mail (a note, or anything else) that needs to be conspicuously waiting to go to the mailbox or on an errand, we like to use a magnet to hold the items at the front door. However, when there are several pieces of mail needing to go out the usual magnet may just not be strong enough to hold everything. So this instructable comes to the rescue! Now we can create a very strong magnet in a small package.
So you want a super strong magnet? You could just purchase a really BIG magnet, or use an array of SMALLER magnets to create 'one' magnet that is super strong. I took 5 cube (8mm x 8mm x 8mm) neodymium magnets and arranged them in various configurations.
There are many ways to do this, but I'll discuss three:
- Align the poles. Stack the magnets side by side with all the north poles pointing in the same direction.
- Alternate Poles -- Stack the magnets side by side and alternate their poles; north up, north down, north up, etc.
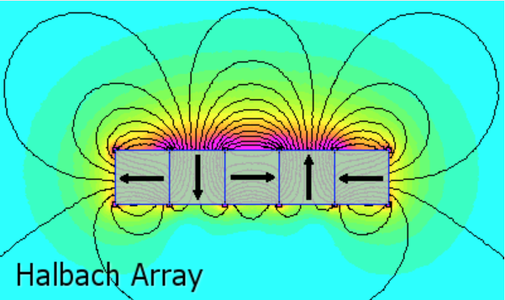
- Create an Halbach Array -- A Halbach Array is a specific arrangement of magnets that will result in the array having one side that has a very strong magnetic field and the opposite side a very weak magnetic field. These strong and weak fields are this array's very unusual property.
The magnetic flux diagrams show 5 magnets. In the first diagram the north poles are all arranged facing in the same direction. (Note: Arrows in the diagrams point to the north pole of the magnet.)
In the second diagram the magnets are arranged in a pattern alternating the north pole's orientation; north up, north down, north up, etc.
The third diagram shows a specific arrangement of the poles that is known as a Halbach Array. The Halbach Array provides a dramatically stronger magnetic field on one side and a much weaker field on the other, as indicated in the diagram by the magnetic lines of flux being closer together and the red/purple color. I had never heard of the Halbach Array before this instructable. It is very unique and very useful arrangement.
A couple of websites I like that describe Halbach Arrays are Wikipedia and K&J Magnetics (K&J is where the diagrams came from. They are a GREAT source for any imaginable magnet you could ever want!).
Supplies


For Each Array:
- Five - 8mm x 8mm x 8mm cube Neodymium Magnets
- 3D Printed Magnet Holder
- All Purpose 'Fix All Adhesive' Other types should work just fine. I had this on hand.)
- Tape (To hold magnets while glue sets)
- Permanent Marker (Not Shown)
- Magnetic Pole Indicator (Optional)
If You Want To Measure and Compare the Arrays' Forces:
- Weighing Scale
- Steel Plate
- 3D Printed Magnet Measurement Holder
- Plastic rigid tube/rod
- Plastic Jar or other nonmagnetic support
Step 1: Design Magnet Holder


I wanted a small holder that would be easy to grip and also have a nice space inside to hold the 5 small magnets.
I just threw a design together using Fusion 360.
Step 2: 3D Print the Magnet Holder


I printed the magnet holder using PLA at 210 C, 40C bed and 25% infill. Nothing special. Just use what works best for you.
[Banana is optional. I just recently learned about using a banana to show scale, so I thought I'd try the banana unit of measurement :-).]
Step 3: 'All Poles Aligned' - Insert Magnets


I used the magnetic pole indicator to line up the poles in of the magnets in the same direction (magnets will do this anyway, it's just you will not know which way is north; but it doesn't matter!) and used a pen to mark the north poles with an arrow (standard convention; red color is also used to indicate north).
Slide the magnets in the holder with all arrows pointing in the same direction. This arrangement does not like to be kept together so have some tape handy to keep the magnets in the holder.
Step 4: 'Alternating Poles' - Insert Magnets


In this arrangement the magnets are stacked together alternating their poles; North up, South up, North up, South up, North up.
According to what I read this orientation was supposed to be the strongest, but I ended up being surprised. It may have something to do with whether the magnets are in contact with the mounting surface (steel) or not.
Step 5: 'Halbach Array' - Insert Magnets


This is the most unusual array, with strong and weak magnetic fields. The magnets are arranged with the poles as shown as inserted into the magnet holder.
You can test the magnetic strength of the strong and weak sides of the array by loading the magnets accordingly. It is quite unusual.
Step 6: Measure Magnetic Array Performance (optional)


I designed and 3D printed a magnet holder to facilitate measuring the force required to break the magnet away from a steel plate. It would have been better if I had an actual force gauge but I rigged up a way to measure the force using a digital scale.
I cut a plastic container to allow the steel plate to sit on top and the magnet holder and plastic tube/rod to be located below it. I then pushed down on the tube/rod until the magnet came off of the steel plate.
I recorded multiple tries while recording in slow motion in order to catch the highest reading on the digital scale.
Here are my results:
- Halbach Array (Strong field side) - 2,396 g (over 5 pounds of force)
- Halbach Array (Weak field side) - 407 g
- Poles Aligned - 1,875 g (over 4 pounds)
- Poles Alternating - 1,655 g
As a side note, a single magnet had 450 g of pull.
The Halbach Array is the winner! And the weak magnetic field side is sure weak in comparison.
Step 7: Go Experience Some Magnetic Attraction


Assemble the type of array that you wish and use the glue to permanently install the magnets in the holder.
Well, my outgoing mail problem is solved! Now go and get magnetically attracted to something! Enjoy!

Participated in the
Magnets Contest


2 Comments
17 days ago
Really nice Writeup and examples!
I will test this as i have a 50-Pack of Neodyn magnets (Cubes) which i ordered and didnt realice, they are N35 and not N52. Maybe i can "Salvage" them this way ;)
Reply 17 days ago
Thank you for your kind words.
I wish you good luck with your magnet "salvage" project!