
Introduction: Cai Zong - Chinese String Art


In this Instructables, you will learn to make a Caizong, a kind of Chinese string art. This colorful decoration is cheap, easy, and beautiful. You can display it near windows, on doors, in your car, as a necklace and virtually anywhere else!
Step 1: Supplies

For the Caizong:
- String (as many colors as you would like, I would advise 3-6)
- Thin cardboard (like in a tissue box)
- Double sided tape
For the display:
- Beads
- Fishing line
- Sewing needle/wire
- Swivel hook
- Any other decorations you like
Tools:
- Ruler
- Craft knife
- Scissors
- Pencil
Step 2: Cardboard Strip Base


Cut a cardboard strip, roughly 1 by 6 inches. The size doesn't actually matter that much, just make sure it's relatively long and narrow.
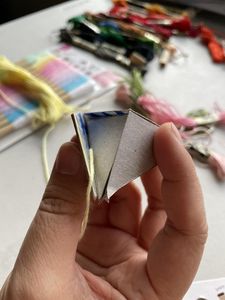
Step 3: Etching Folds


Using the pencil, craft knife, and ruler, measure out and etch squares. Don't cut through the cardboard, just make a notch so it's easier to fold. Then, etch opposite diagonals of each square like a zigzag so that a bunch of right isosceles triangles are formed. It's okay if one of the pieces isn't perfect (see the bottom segment of the first image), the important thing is that you need at least 6 triangles (but more is safer).
Step 4: Folding the Base


See diagram and images:
Valley fold along fold 4 slightly.
Valley fold along fold 8 slightly.
Valley fold side 5 so that side 3 touches side 7.
Valley fold side 9 so that side 11 to touches side 1.
Valley fold side 12 so that side 10 touches side 6 and side 13 touches side 2.
Continue folding naturally until you run out of triangles.
Step 5: Add Some Double Sided Tape


Place a piece of double sided tape between the last triangle and the surface it will stick on. Do not press the last triangle onto the tape yet.
Step 6: Prepare the String

Place a piece of string on the double sided tape. Press the triangle onto the tape.
Step 7: String Art Time!


Hold the pyramid shape so that you see three triangular sides with the right-angled vertices facing you. Hold the string and thread it along the corner facing you like in the diagram.
Step 8: Repeat!


Repeat until satisfied. Make sure that every time you start a new line, press the string against the previous line so that no cardboard colored gaps show through (see image).
Step 9: Changing Colors


When you are ready to change colors, tape down the loose end of the string. Cut it off with scissors and tie a new string on. Cut off any extra string length on the knot, as it will make the caizong look worse.
Step 10: Keep Repeating!


Repeat the previous steps until you are satisfied with the design. If you just want a caizong, you can stop here. But if you want to display it fashionably, read on!
Step 11: Preparing the Display

Tie two lengths of fishing wire onto a swivel hook or something else. Thread one or two beads onto it. Then, thread the fishing line through a sewing needle or a loop made of wire.
Step 12: Thread the Fishing Line


Thread the needle through the middle of the caizong, from the top of the caizong to the bottom. Pull the lengths of fishing wire through, then remove the needle.
Step 13: Add a Tassel

Loop a few lengths of string around one of the fishing wire pieces. You can also add beads or anything else!
Step 14: Remove Extra Fishing Wire

Cut off any extra length of fishing wire.
Step 15: Tie Up Tassel

Cut another segment of string and use it to tie the loose ends of the tassel to the fishing wire.
Step 16: Finished!
The Caizong is finished! All you need to do now is find somewhere to display it!

Second Prize in the
Rope and Cordage Challenge


7 Comments
Tip 1 year ago on Step 5
It is easier to keep the thread from falling off the edges if you stick a pin into each tiny hole at the apexes of the triangles. Secure them with glue if needed. As long as you use the same type of pins they look quite attractive.
Reply 1 year ago
Thanks for the tip!
1 year ago
FYI What you are using isn't called string. It is embroidery floss.
Reply 1 year ago
Thank you for notifying me.
Reply 1 year ago
embroidery floss...string...it is still a pretty craft job. Definition of floss: floss is a cord or string of thin filaments
1 year ago
Very pretty! And will make a great craft project to do with my nieces. Thanks!
1 year ago
Really cool 👍 thanks for sharing