
Introduction: Transforming Hyperbolic Sculpture


In this Instructables, you will learn how create a 3D hyperboloid out of straight wooden skewers, as well as how to move it with hydraulics, and display it. The hyperboloid can expand and contract, become tall and thin or short and stout. It looks amazing from the top AND from the side!
A hyperboloid is a doubly ruled surface. This means it can be built with straight beams, producing a strong structure at a lower cost than other methods and is widely used in industrial and architecture design. This video shows how this can be applied in a pretty cool way! As for how it moves, it's basically a lot of scissor lifts (another video) packed together.
Here we make a lattice of wooden sticks that result in curved surface. We can control the curvature of the resulting surface by changing how we build the lattice.
Supplies


- Two 100ml Large Plastic Syringes with 40 Inch Tube
- Forty 18-Inch 5mm Diameter wooden/Bamboo sticks (Or any 18 Inches long stick)
- Rubber bands and clips (We used those small rubber bands from Rainbow Loom)
- Spray paint
- Canvas or wooden board
- Metal wire (gauge 10)
- Wood ruler or wood stick
- Two beads
- Zip ties
- Hot glue gun
Step 1: Make X's (20x)


Rubber band two sticks together, then loop the band over each stick individually. Slide the rubber band down to the middle.
If you want to spray-paint the sticks to make them a different color like we did, here is a tip: don't put too much effort into the rubber bands right now (in fact, just skip step 4 entirely and do it after spray painting), as the spray paint will straight up DISSOLVE the rubber bands.
Step 2: Lattice


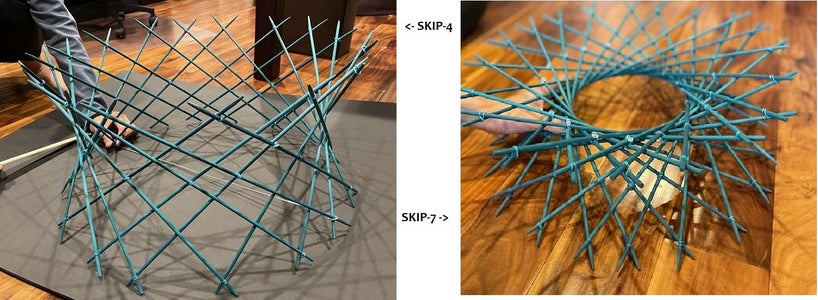


Lay out crossed-stick pairs in as shown. You can then decide curvy your final product will be. The more X's you skip before attaching two X's to each other (see diagrams), the more curved and small the sculpture will be. We made one sculpture with skip-3 (ignore the typo, it's not skip-4) and one sculpture with skip-7.
Why these numbers? If the number of total sticks is not relatively prime to the skip-number, the sculpture will just become a bunch of separate sculptures. For example, 21 sticks with skip-7 would have 7 separate sculptures. Stick #1 would connect to Stick #8, which would connect to stick #15, which would connect back to Stick #1. We want the entire sculpture to be connected. With 20 sticks, stick 1 would connect to stick 8, and then 15, 2, 9, 16..., only looping back to 1 after connecting to every stick.
Step 3: Finish the Loop


Wrap the lattice around and connect the crossed-stick pairs in the same pattern.
Step 4: Reinforce With Clips


Select of row of intersection points (we chose the row that was one diamond shape below the outermost intersection points) and rubber band them.
Step 5: Control Structure

Use metal wire to create a hook that will be used to pull/push one side of the hyperboloid structure.
Connect the hooked wire to the wooden ruler. This will serve as a lever, because hydraulics don't push across a lot of distance. We used a wooden ruler, but you can use any sturdy wire or wood stick.
Test and adjust the length of metal wire as necessary.
Step 6: Hydraulic Setup


Put the coupling (to fit the pipe) to the tip of the syringe as needed. Connect one syringe to the pipe. Press all the way in to let out the air in this syringe. Now, dip the other end of the pipe into a jar with water then pull the first syringe to fill the pipe and syringe with water till full. Lastly, connect the second syringe with the other end of the pipe.
Step 7: Paint!


Spray paint the canvas/wood board, hyperboloid structure, and the control lever.
We found out the hard way that spray paint dissolves rubber bands, and had to reinforce the structure afterwards.
Step 8: Attach Hyperboloid


Lay the hyperboloid structure on the canvas. We need to find the two opposite X's — one will be a fixed point and the other one will be pulled by our control structure. For 20 sticks, these are X #1 and X#11.
For the fixed point:
Drill two holes on the canvas. Stick the tips of the X into the holes. On the other side of the canvas, glue two beads to the tips of the sticks. This will secure this side of the structure on to canvas without lose of flexibility to move. For the fix side, attach the loop to the crossed tips, secure with rubber bands as needed.
Step 9: Attach Lever


Next, try out and find out the pivot point for the lever on the ruler that allows the hyperboloid to expand and contract the most. Drill a hole and use wire to secure the ruler/lever.
Step 10: Attach Hydraulic


Attach the hydraulic structure with zip ties. Drill holes as needed.
You can display on a table, facing up, or hang the final work on the wall as a wall decoration (If you do this, you should further secure the hyperboloid structure’s fix point with wires)! Have fun!

Runner Up in the
Make it Move Challenge


7 Comments
8 months ago
Ohhh wow really brilliant!! Outstanding!!
8 months ago
Wow! Grandma, what dexterous digits you have!
I made a composite of the first banding because I found it a tiny bit hard to follow w/o looking at the two steps side by side (after which I think you grabbed the loop 'wrapped' around the right-hand stick. pulled it, twisted it and looped it over stick at left). Here 'tis!
The hydraulics was a nice touch. I've a set of those syringes for refilling HP cartridges and used the hydraulics to fill and empty the syringes without ever thinking of using a pair as a system. As I write this, thinking that yours are larger than mine, I am wondering the effect/impact of using a large and a small syringe to control something hydraulically. A larger volume of fluid would move the smaller piston with less effort applied to the plunger of the larger piston? Ahhaaaarggg! You've sent me down another rabbit hole!
As to the skip step(s), I count one less than you between the respective intersections. Is that because you are counting the first connected intersection, each intervening intersection, but not the next one connected?
Most interesting sculpture and so dynamic!
Now, a bit of Woodworking is in order to construct a base to properly hide all the mechanics and allow room for some ingenious perpetual motion device - or randomly reactive, perhaps so passersby might think "I think it moved," without being immediately able to replicate what they thought they noticed first?
Then, maybe life-size?
Reply 8 months ago
Thanks for the feedback about the images!
Hydraulics are tricky! With differently sized tubes, the thinner tube will be moved farther than the thicker tube, but with less force. It would be easier (less force needed) to press on the thinner tube, but the thicker tube would move less.
For the skip steps: Imagine labeling the X's 1, 2, and so on. With skip-3, sticks n and n+3 would be linked. That would be crosses 1 and 4, 2 and 5, etc. This means that there will be ONLY TWO crosses between linked crosses (sticks 2 and 3 are between sticks 1 and 4). A similar situation happens with skip-7: there are only 6 crosses between two connected crosses. I guess the wording is kind of confusing, because skip-3 only skips over two crosses!
A life size project would be really cool, but I don't think we're going to make one. We don't have much woodworking skill either, which is why we made do with the canvas.
Reply 8 months ago
"We don't have much woodworking skill either"
That is a self-fulfilling prophecy! Try your level best not to repeat it to your selves or others!
There's a fellow Roy Underhill on PBS with a show called the Woodwright's Shop "For more than 37 years, Roy Underhill has shared his love of American woodcraft. Using only the hand tools of early America, Roy proves that woodworking doesn't have to be noisy, dangerous or expensive. His insights into the principles of the craft reveal the enduring relationship between tools and material, between human hands and creations of culture."
If you get a chance watch a few shows, he does it all by hand.
Not suggesting you embark upon a life-size expression, of course, but to play with wood a bit. Make a bird house for an Eastern Bluebird out a a single 6" x 6" 5/8" fence picket at home depot. a box with a hole in it!
8 months ago on Step 10
This is one of those art forms you have to be careful not to put it at eye level if you know what I mean. :) Pretty cool idea.
Reply 8 months ago
Yeah, it is pretty easy to get poked by the skewers! Just be careful when putting on the rubber bands.
8 months ago
Really cool 👍